Welcome to our third lesson. In the previous session, we covered the first essential step in any Excel project: creating a new, blank workbook. Now that you know how to create a file, it's crucial to learn how to save it. Without this skill, any work your students do will be lost as soon as they close the program.
This lesson focuses on the two fundamental saving commands in Excel: Save and Save As. We will explore when and how to use each one, ensuring your students can confidently manage their files. By the end of this lesson, you will have a clear, step-by-step guide to teach your students how to save a workbook for the first time and how to update it with new changes.
Saving a Workbook for the First Time
When you save a workbook for the very first time, Excel needs to know two key pieces of information: where to store the file and what to name it. This is the primary function of the Save As command.
Interestingly, whether you click 'Save' or 'Save As' on a brand new, unsaved workbook, Excel will always open the 'Save As' screen. This is because the file doesn't have a name or location yet.
The process involves these key steps:
- Navigate to the File tab.
- Select Save As.
- Choose a location, such as 'This PC' or 'Browse', to open the file explorer.
- Enter a descriptive name for your workbook.
- Click Save.
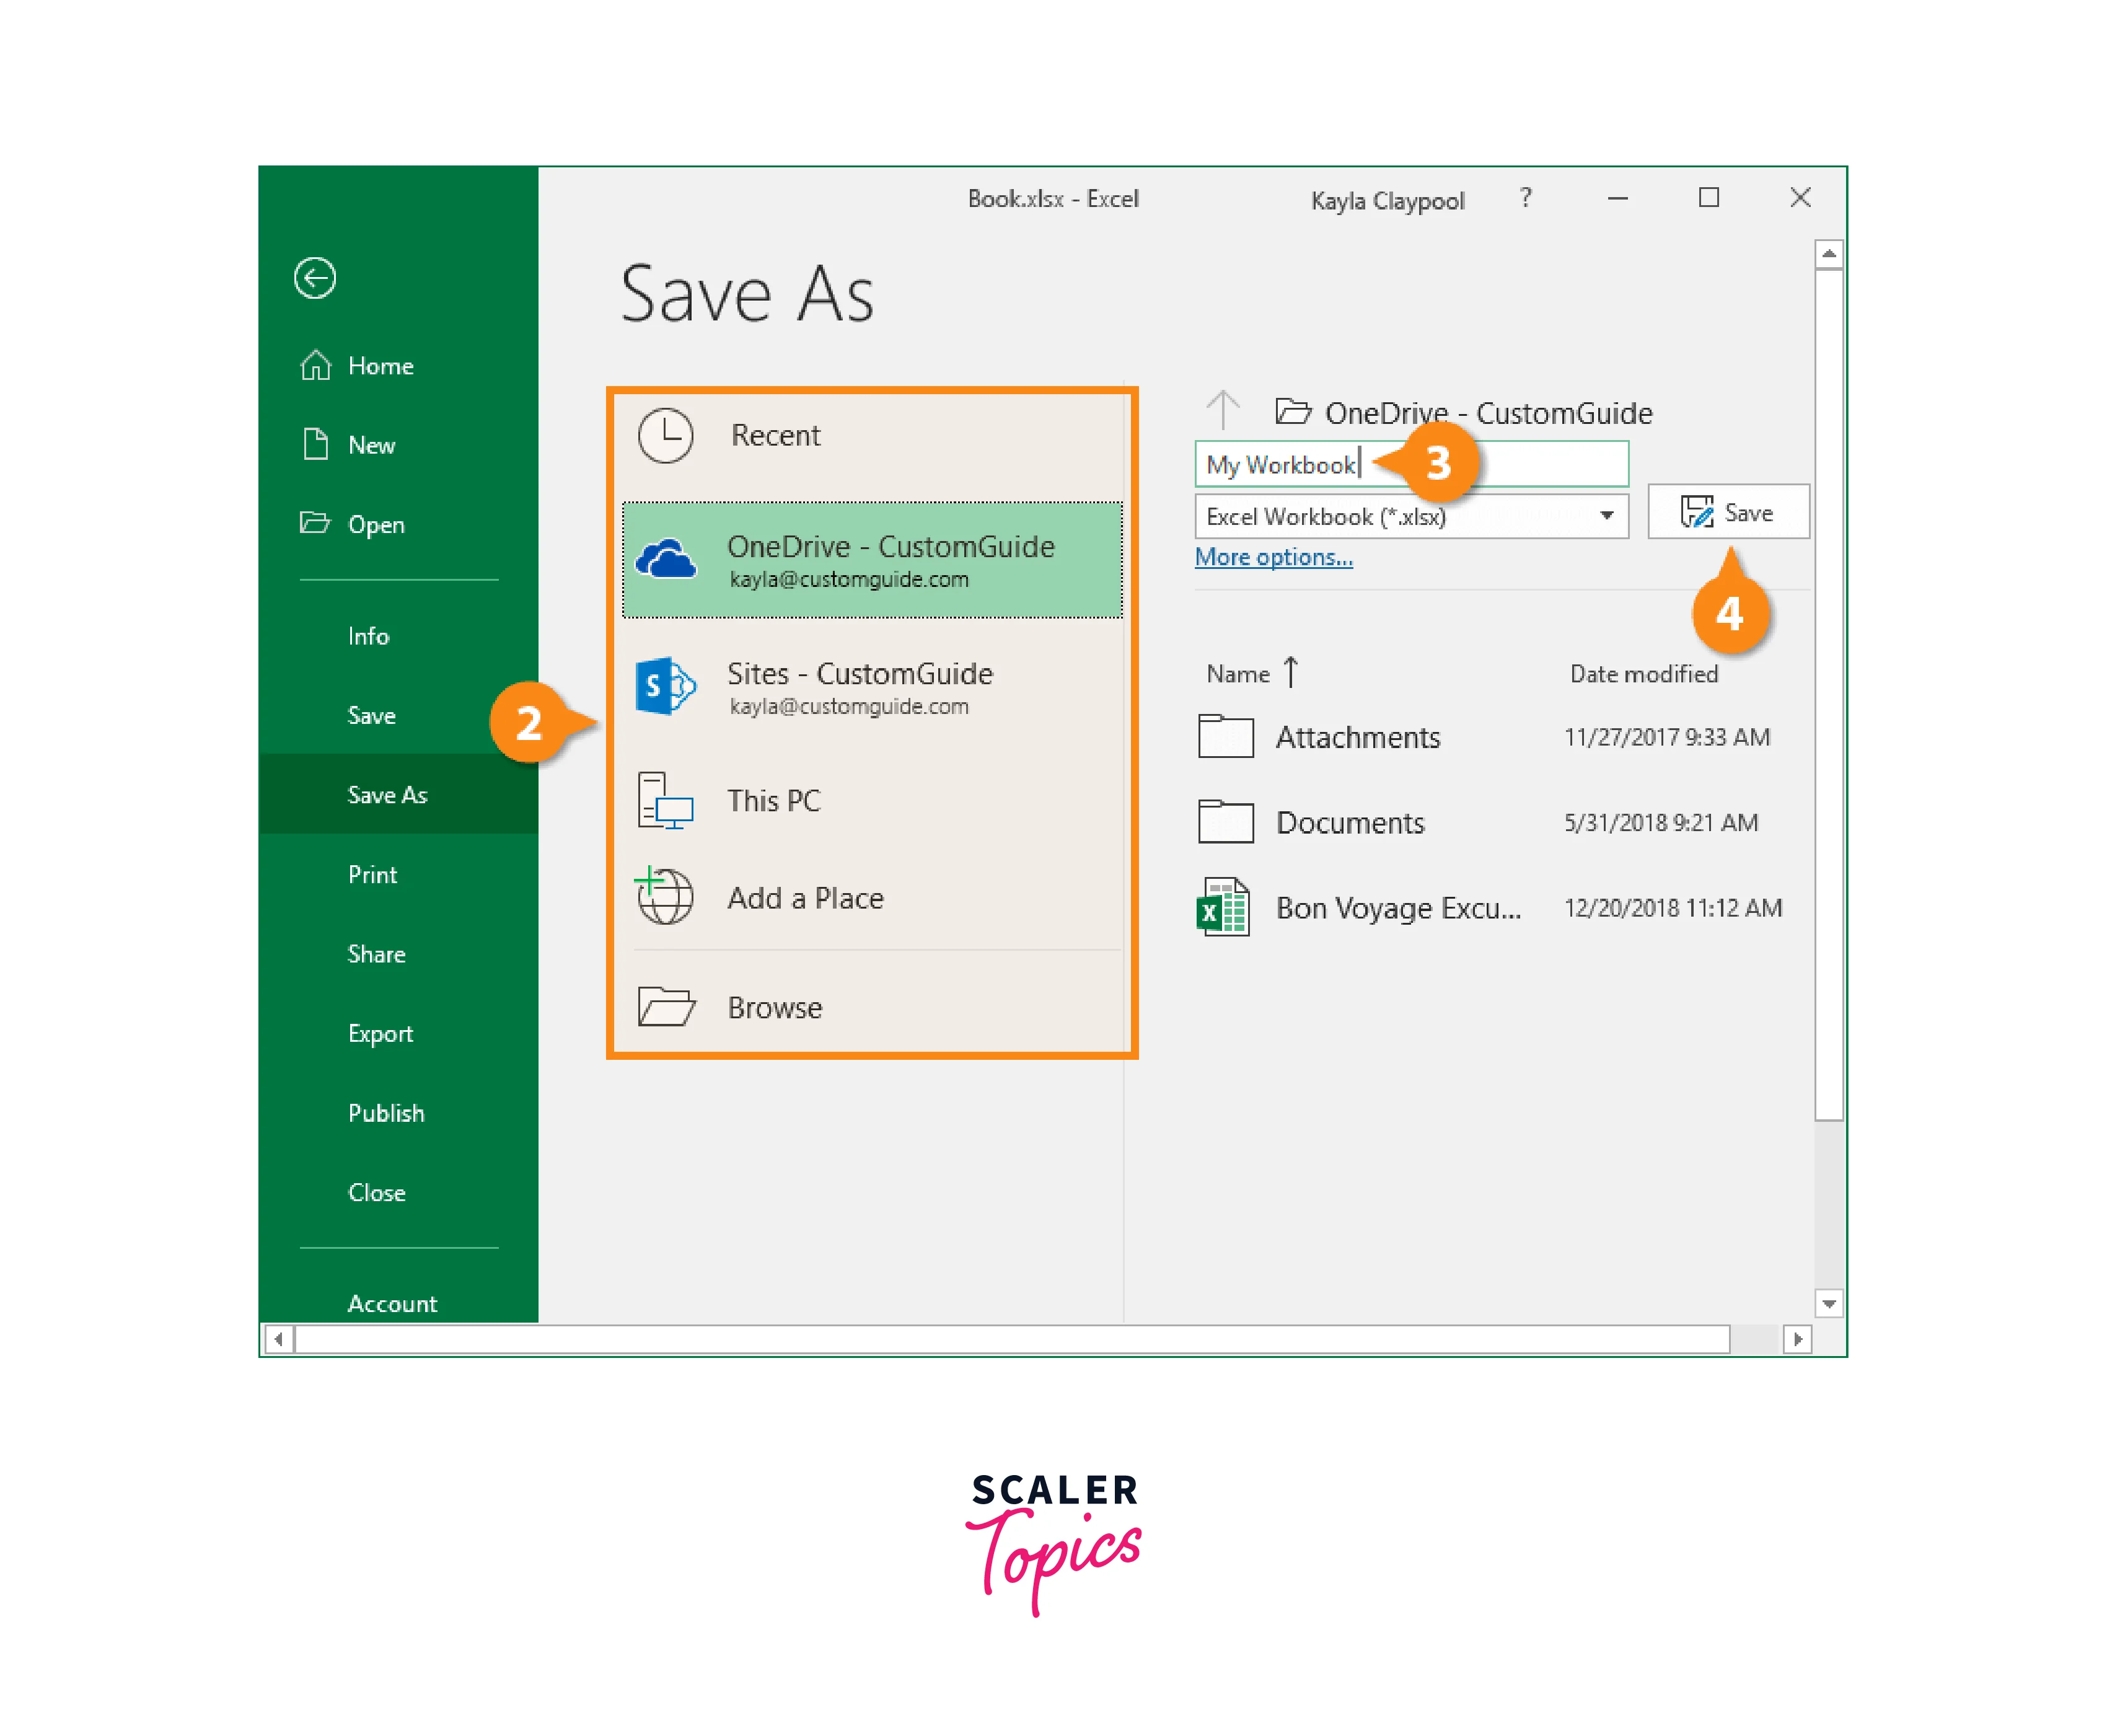
The image below illustrates what this screen looks like. You first select a location (marked with a 2) and then enter the file name and click the save button (marked with 3 and 4).
For a clear, step-by-step written guide, the following resource from TutorialsPoint is excellent. It walks through the process with simple instructions and screenshots that are easy to follow.
Save Workbook in Excel - TutorialsPoint
This guide provides a concise walkthrough of the 'Save As' process. It's a great reference for the exact clicks needed to save a new file.
Please read the section titled Saving New Sheet. Pay attention to the three steps outlined, which cover selecting the 'Save As' option, choosing a location and name, and finalizing the save.
To see this process in action, the video below provides a direct and clear demonstration. Watching it will help solidify the steps in your mind before teaching them to your students.
Excel for Beginners - Save, Save As & Saving Different File Types
This video from MyOnlineTrainingHub demonstrates how to save a new workbook. It also introduces the keyboard shortcut, which is a useful tip for your students.
Watch the segment from the beginning until the first save. The presenter shows how using Ctrl + S or the 'Save' command on a new file triggers the 'Save As' dialog box, where you can name your file and choose its location.
Updating an Existing Workbook with 'Save'
Once a workbook has been saved with a name and location, your students will need to save their progress as they continue to work. This is where the Save command comes in. Unlike 'Save As', the 'Save' command doesn't ask for a name or location. It simply overwrites the previously saved version of the file with the current one.
It is vital to instill the habit of saving frequently in your students to prevent them from losing work due to a power outage or an accidental program closure.
There are three easy ways to save an existing file:
- Go to File > Save.
- Click the floppy disk icon in the Quick Access Toolbar (usually at the top-left of the Excel window).
- Use the keyboard shortcut: Ctrl + S (or Cmd + S on a Mac).
The keyboard shortcut is the most efficient method, and it's a great habit for students to develop early on.
The video you just watched also explains this concept clearly.
Excel for Beginners - Save, Save As & Saving Different File Types
This next segment of the video explains how to save ongoing changes to a file that has already been named.
Please watch the part of the video covering saving changes. It highlights using Ctrl + S and the save icon as quick ways to update a file.
Creating a Copy with 'Save As'
So, if 'Save' is for updating, when would you use 'Save As' on a file that already exists? You use Save As when you want to create a copy of the current workbook. This is useful for:
- Saving a version of a file before making major changes.
- Creating a template that can be reused.
- Saving the file in a different location or with a different name.
The process is the same as saving for the first time: go to File > Save As, and give the file a new name or choose a new location. A handy shortcut for this is pressing the F12 key, which immediately opens the 'Save As' dialog box.
Click-by-Click Instructions for Your Students
Here is a simplified, step-by-step guide you can provide directly to your students (ages 11-14) to teach them how to save their work.
How to Save Your Excel File
It's very important to save your work so you don't lose it! Here's how.
Saving Your File for the First Time
- Click the File tab at the top-left corner.
- Click on Save As.
- Click Browse to choose where you want to save your file (like your Documents folder).
- In the "File name" box, type a name for your project. For example:
My First Budget. - Click the Save button. Your work is now saved!

Saving Your Changes as You Work
Once your file is saved, you need to save your changes as you add more things. This is much faster!
- The Quick Way: Press the Ctrl key and the S key on your keyboard at the same time. Do this often!
- The Icon Way: Click the little floppy disk icon at the very top-left of the window.
Doing this will quickly update your file with all your new work. Remember to save every few minutes!
Conclusion
In this lesson, we have broken down the essential file management skills of saving a workbook. Understanding the distinction between Save and Save As is fundamental for working effectively and safely in Excel.
Here are the key takeaways for your students:
- Use Save As when saving a file for the first time to give it a name and a location.
- Use Save As on an existing file to create a separate copy.
- Use Save to quickly update a file with your latest changes.
- The fastest way to save is by using the keyboard shortcut Ctrl + S.
Now that we know how to create and save a workbook, the next lesson will complete this initial cycle of file management by showing you how to close a workbook and reopen it from its saved location.