In our previous lesson, we toured the Microsoft Excel interface, identifying the key components your students will need to know, from the Ribbon down to the individual cells. With that foundational knowledge, we are ready to take the first active step in using the software.
This lesson focuses on a simple but essential skill: creating a new blank workbook. This is the starting point for every project, the blank canvas on which your students will organize data, perform calculations, and build charts. By the end of this lesson, you will have a clear, step-by-step guide to help your students confidently create their own Excel files from scratch.
Creating Your First Workbook
When you first open the Microsoft Excel application, you are presented with a start screen. This screen gives you two main choices: you can select a pre-designed template or start with a Blank workbook. As we discussed, starting with a blank workbook is the best way for beginners to build their skills from the ground up.
The process involves two main clicks: first selecting 'New' from the menu, and then choosing 'Blank workbook'.
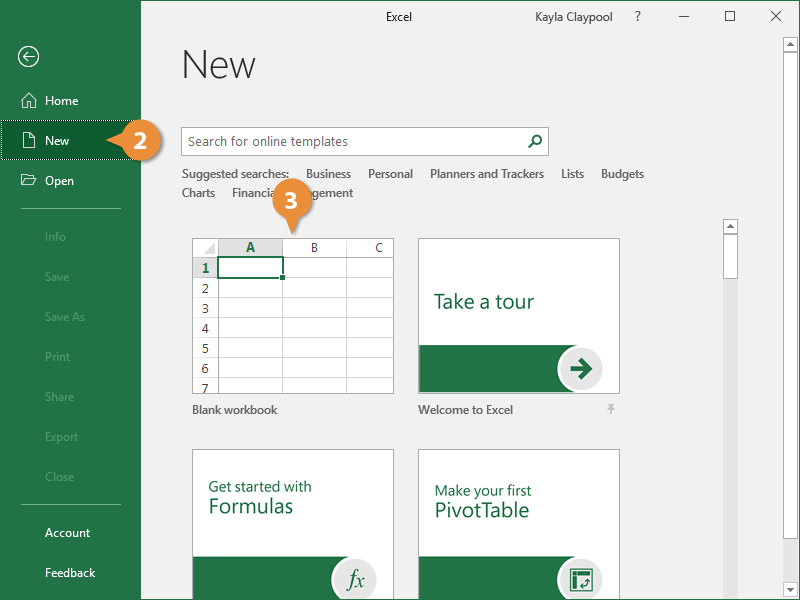
Let's walk through the official steps. The following instructions from Microsoft Support provide a concise, click-by-click guide that is perfect for classroom instruction.
This guide from Microsoft clearly outlines the steps to create a new workbook. It provides the exact terminology and sequence you can use with your students.
Focus on the section titled Create a new workbook. These two short paragraphs contain the entire process. Note the simple language: "Click File, and then click New." followed by "click the Blank workbook."
While text instructions are clear, a visual demonstration can be very effective for students. The video below shows this process in action. It's quick and reinforces the steps visually.
Get Ahead FAST! Excel Express Tutorial for BEGINNERS!
This clip from Teacher's Tech provides a fast and clear walkthrough of navigating the home screen to create a new workbook.
Watch the segment from this part of the video. The presenter quickly shows how to find the 'New' menu and select 'Blank workbook', which is exactly the skill we are focusing on.
A Quick Tip: The Keyboard Shortcut
For students who get comfortable with the interface, you can introduce them to a faster way to create a new blank workbook. Instead of using the mouse to click through the menus, they can use a simple keyboard shortcut.
- On Windows: Ctrl + N
- On a Mac: Cmd + N
Pressing this key combination will instantly open a new, blank workbook, bypassing the start screen entirely. This is a great "pro tip" to share with students once they've mastered the standard method.
Conclusion
In this lesson, we've covered the fundamental process for creating a new blank workbook in Excel. This is the essential first step for any task your students will perform.
The key takeaways are:
- You can create a new workbook from the Excel start screen.
- The standard process is to click File > New > Blank workbook.
- A keyboard shortcut (Ctrl+N or Cmd+N) can be used to perform this action more quickly.
Now that we know how to create a workbook, the next logical step is to learn how to manage the file itself. In our next lesson, we will cover how to save your workbook, close it, and reopen it for future use.