Welcome to your first lesson. The goal of this course is to equip you with the materials and step-by-step guides needed to teach the fundamentals of Microsoft Excel to your middle school students. We will move at a brisk pace, focusing on clear, simple instructions that you can directly adapt for your classroom.
In this introductory lesson, we will focus on the very first step: becoming familiar with the Excel environment. By the end of this session, you and your students will be able to open Excel and confidently identify its key components, including the ribbon, formula bar, cells, rows, columns, and sheet tabs. Mastering this basic vocabulary is the foundation for all the skills that follow.
1. Opening Excel: Blank Workbook vs. Templates
The first thing your students will do is open the Excel application. When they do, they'll be presented with a choice. It's important to guide them toward starting with a Blank workbook to build their skills from the ground up.
The following video provides an excellent overview of this initial start screen.
The Beginner's Guide to Excel - Excel Basics Tutorial
This video from the "Technology for Teachers and Students" channel demonstrates the Excel start screen and the difference between templates and a blank workbook.
Watch the segment from the beginning. Pay attention to how the presenter explains that while templates are useful, it's best to start with a blank workbook to learn Excel properly. This is the approach we will take throughout this course.
Once you double-click "Blank workbook," a new, empty Excel file will open, ready for you to begin.
2. A Guided Tour of the Excel Window
Now that a blank workbook is open, let's take a tour of the main screen. The image below labels the essential parts of the Excel window. You can use this as a reference for your students as you introduce each component.
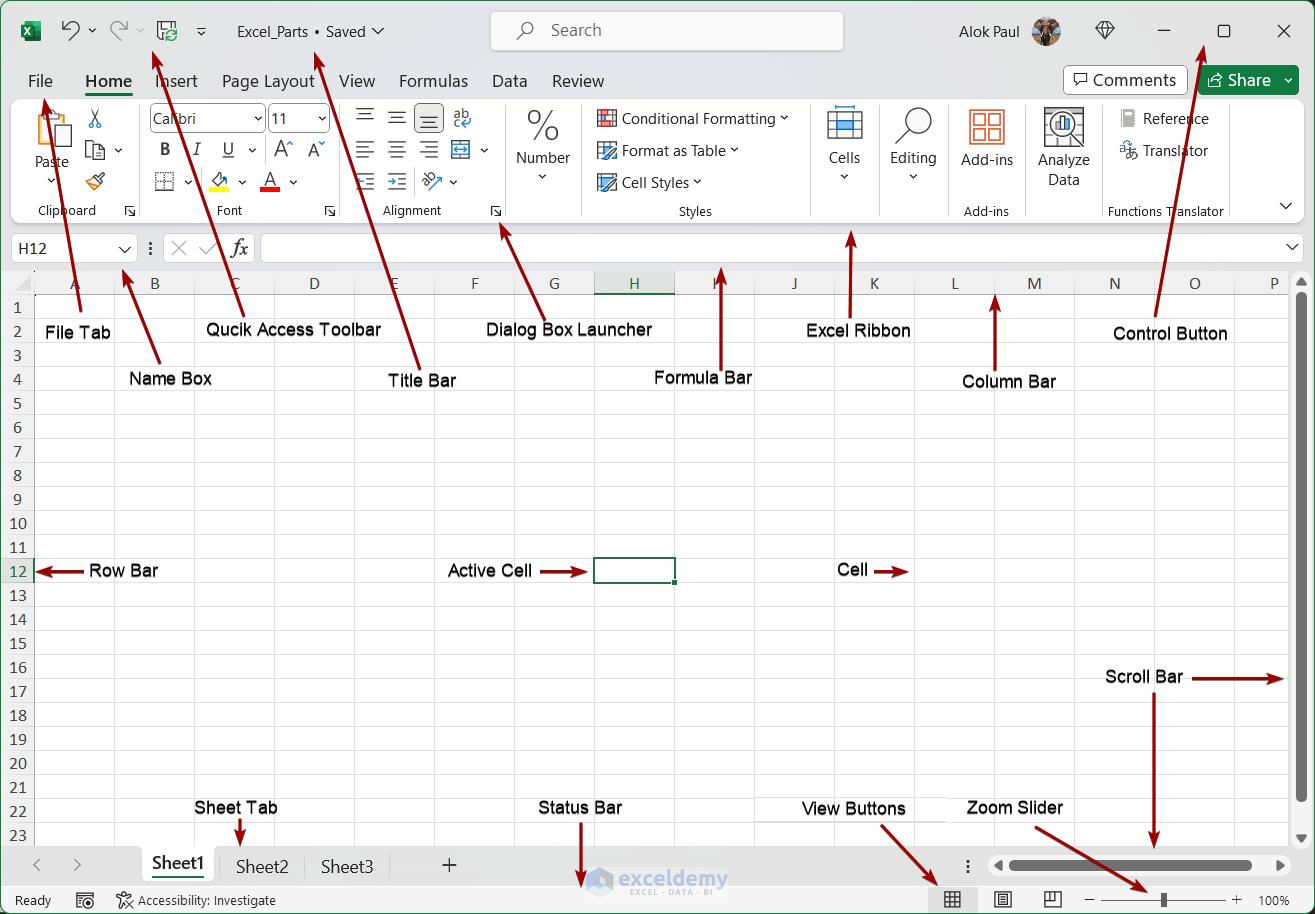
We will now explore these components one by one.
3. The Ribbon: Your Command Center
At the top of the screen is the Ribbon, which is Excel's main command center. It can look a bit busy at first, so it's helpful to break it down for your students. The Ribbon is organized into three levels:
- Tabs: These are the main categories at the very top (e.g., Home, Insert, Page Layout). Clicking a tab changes the set of tools shown on the ribbon.
- Ribbon: The wide band of tools and commands that appears when you select a tab.
- Groups: The commands on each ribbon are organized into logical groups (e.g., on the Home tab, you'll find the Font, Alignment, and Number groups).
This next video segment clearly explains this structure.
The Beginner's Guide to Excel - Excel Basics Tutorial
Let's return to "The Beginner's Guide to Excel" video to see a clear visual explanation of the Ribbon.
Watch the section that breaks down the layout. The presenter does a great job of explaining the hierarchy of Tabs, the Ribbon, and Groups. This terminology will be important when giving your students instructions later.
4. The Spreadsheet Grid: Columns, Rows, and Cells
The main part of the Excel screen is the grid. This is the heart of the spreadsheet, and it’s made of three fundamental elements:
- Columns: These run vertically (from top to bottom) and are identified by letters (A, B, C, ...).
- Rows: These run horizontally (from left to right) and are identified by numbers (1, 2, 3, ...).
- Cell: This is the small rectangle where a column and a row intersect. Each cell has a unique name, or cell address, which is formed by combining its column letter and row number. For example, the cell in the top-left corner is A1.
Understanding the cell address system is crucial, as it's how we tell Excel which data to work with.
[PDF] Lesson 4: Introduction to the Excel Spreadsheet
This document offers clear, formal definitions of the spreadsheet grid. It's a useful text to reinforce these core concepts.
In the PDF, navigate to the section titled 4.2 HELPFUL HINTS WHILE USING THE SPREADSHEET. Read the definitions for the grid structure and the explanation of cell addresses.
5. The Formula Bar and Name Box
Just above the spreadsheet grid are two small but very important boxes: the Name Box and the Formula Bar.
- Name Box: Located on the left, this box displays the address of the currently selected cell (the "active cell").
- Formula Bar: This long box to the right of the Name Box shows you the contents inside the active cell. This is where you will type and edit data, text, and formulas.
[PDF] Excel Basic - Palatine Public Library
This simple guide from the Palatine Library provides concise definitions for these two interface elements.
Find the section titled "The Layout" and read the paragraph that describes the Name Box. Then, read the following sentence that introduces the Formula Bar. This will clarify the distinct function of each.
6. Worksheets and Workbooks
Finally, it's important to understand the difference between a worksheet and a workbook.
- A Workbook is the entire Excel file. Think of it as a whole binder or notebook.
- A Worksheet (or sheet) is a single page within that workbook.
You can have many worksheets in one workbook. You can navigate between them using the Sheet Tabs at the bottom-left of the screen (labeled Sheet1, Sheet2, etc.).
This final video clip provides a quick summary.
The Beginner's Guide to Excel - Excel Basics Tutorial
This last clip from the video tutorial clarifies the relationship between sheets and the overall workbook.
Watch the short explanation from this final segment. It visually demonstrates how multiple worksheets add up to a single workbook.
Conclusion
In this lesson, you've taken a tour of the fundamental parts of the Microsoft Excel interface. We have identified and defined the key terms your students will need to get started:
- Ribbon: The command center organized into Tabs and Groups.
- Columns, Rows, and Cells: The basic grid structure of a spreadsheet.
- Cell Address: The unique name for each cell (e.g., A1, B4).
- Name Box: Displays the active cell address.
- Formula Bar: Used to view and edit the contents of a cell.
- Worksheets and Workbooks: The "pages" and the "notebook" of Excel.
Having a solid grasp of this layout is the first step toward creating powerful spreadsheets.
In our next lesson, we will put this knowledge into practice by moving on to creating, saving, closing, and reopening your first workbook.