In our previous lessons, we've walked through the initial steps of working with Excel: creating a new workbook and, most importantly, saving it. Now we will complete this fundamental cycle of file management by learning how to close a workbook properly and then reopen it to continue your work.
This lesson directly addresses the skills your students need to manage their projects over multiple sessions. By the end, you'll have a clear guide for teaching them how to safely close their files and confidently find and reopen them later. This ensures no work is lost and that they can easily pick up where they left off.
Closing a Workbook
Once a student has saved their work, they need to know how to close the file. There are two primary methods for this in Excel, and each has a slightly different result.
- Closing the Workbook Only (
File > Close): This method closes the active spreadsheet but leaves the Excel application running. This is useful when a student is finished with one file but wants to open another one immediately without shutting down and restarting Excel. - Closing Excel Entirely (The 'X' Button): Clicking the 'X' in the top-right corner of the window will close both the workbook and the Excel program itself.
A critical feature your students should be aware of is Excel's built-in safety net. If they try to close a workbook that has unsaved changes, Excel will display a prompt asking if they want to save their work first. This is a final reminder that helps prevent accidental loss of data.
The resource below provides a great explanation of these closing methods.
Microsoft Excel: Saving, Opening, and Closing – We Thrive Together
This guide clearly explains the difference between closing a single workbook and closing the entire Excel application. It also covers the important safety prompt for saving changes.
Please read the section titled Closing Your Spreadsheet. Pay special attention to the Q&A that clarifies why there are two 'X' buttons and the 'NOTE' about the save prompt.
To close the active workbook while keeping Excel open, you navigate to the File tab to enter the Backstage view and then select Close.

Reopening an Existing Workbook
After a workbook has been saved and closed, the next step is to reopen it. When you launch Excel, it typically presents a list of recent files. If the desired file is on this list, it's the fastest way to get back to work.
If the file isn't in the 'Recent' list, you'll need to browse for it. This is done using the Open command, which is very similar to the 'Save As' process. You'll navigate to the folder where the file was saved, select it, and open it.
The following resource provides a straightforward guide with helpful screenshots for opening a saved file.
Creating Opening and Closing Workbook - w3resource
This guide visually demonstrates the process of opening a workbook, whether it's from the 'Recent' list or by browsing your computer's folders.
Please read the section Open an existing workbook. The screenshots provide a clear, step-by-step visual of the process.
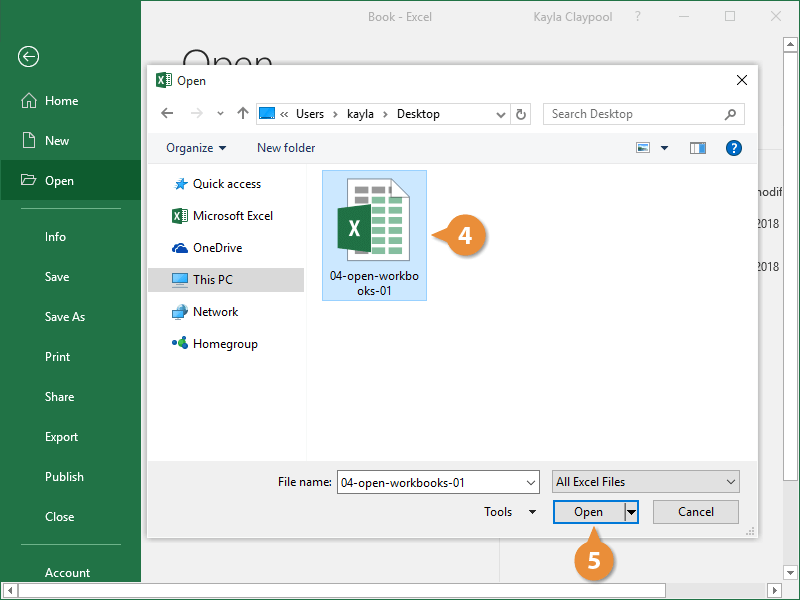
When you use the 'Browse' option, Excel will open a dialog box that allows you to navigate through your computer's folders to find your file.
Click-by-Click Instructions for Your Students
Here is a simplified guide on closing and reopening files that you can provide directly to your students.
How to Close and Open Your Excel Files
When you're finished working for the day, you need to close your file. When you come back, you'll need to open it again. Here's how!
1. How to Close Your File
- First, make sure you save your work! Press Ctrl + S one last time.
- Method A: Close Just the File. Click the File tab, then click Close on the left-side menu. Excel will stay open, but your worksheet will close.
- Method B: Close Everything. Click the X button at the very top-right corner of the Excel window. This will close both your file and the Excel program.
If you forget to save, Excel will ask you! A small window will pop up. Just click Save.
2. How to Open Your File Again
- Open the Microsoft Excel program.
- Click the File tab, then click Open.
- Check the "Recent" list first. You will probably see your file at the top of the list. If you do, just click on it!
- If it's not there, click Browse. A new window will pop up.
- Go to the folder where you saved your file (like your 'Documents' folder).
- Click on your file's name, then click the Open button. Your project is now open and ready to go!
Conclusion
In this lesson, we've covered the final essential skills for basic file management in Excel: closing and reopening a workbook. Your students now have the complete workflow for starting a project, saving their progress, and returning to it later.
Here are the key takeaways:
- You can close just the workbook with
File > Closeor close the entire application with the 'X' button. - Excel will prompt you to save any unsaved changes before closing, which helps prevent lost work.
- To reopen a file, use
File > Openand either select it from the 'Recent' list or 'Browse' to its saved location.
With file management covered, we are now ready to start working with data. In the next lesson, we will begin exploring how to enter text, numbers, and dates into cells, which is the first step in building a useful spreadsheet.