Hello again! In our last lesson, you mastered the VS Code Source Control panel, learning how to review your work and create clean, separate commits for each logical change. You now have a project on your computer with its own version history, like a series of saved snapshots.
Today, we'll take a major step toward getting your project ready for the world. We're going to create a home for it on the internet.
1. What We Are Learning
In this lesson, you will learn how to create a repository on GitHub.com. A repository (or "repo") is essentially a project folder stored in the cloud. This will be the central, online hub for your landing page project.
Our learning outcome is simple and direct: Create a new repository on GitHub.com. We will do this entirely through the GitHub website interface—no code or terminal commands needed.
2. Why This Matters
Think of the Git repository on your computer as a Figma file saved locally on your hard drive. A GitHub repository is the equivalent of saving that file to your shared Figma workspace in the cloud.
Creating a remote repository on GitHub gives us three main advantages:
- Backup: Your code is safely stored in the cloud. If something happens to your computer, your project's history is secure.
- A Single Source of Truth: It becomes the definitive, master version of your project. This is crucial for collaboration (which we'll touch on later) and for deployment.
- Deployment Hub: This is the big one for our goal. Services like Vercel and Netlify (which we'll use to put your site live) connect directly to your GitHub repository. When you update the repository, your website can be updated automatically. This remote repo is the critical link between your local work and a live website.
3. Step-by-Step Instructions
We are going to create a new, empty repository on GitHub. It's crucial that it's empty because we want to fill it with the project history you've already created on your computer.
Step 1: Navigate to the New Repository Page
- Make sure you are logged into your GitHub.com account.
- In the upper-right corner of any page, click the
+icon, and then select New repository from the dropdown menu.
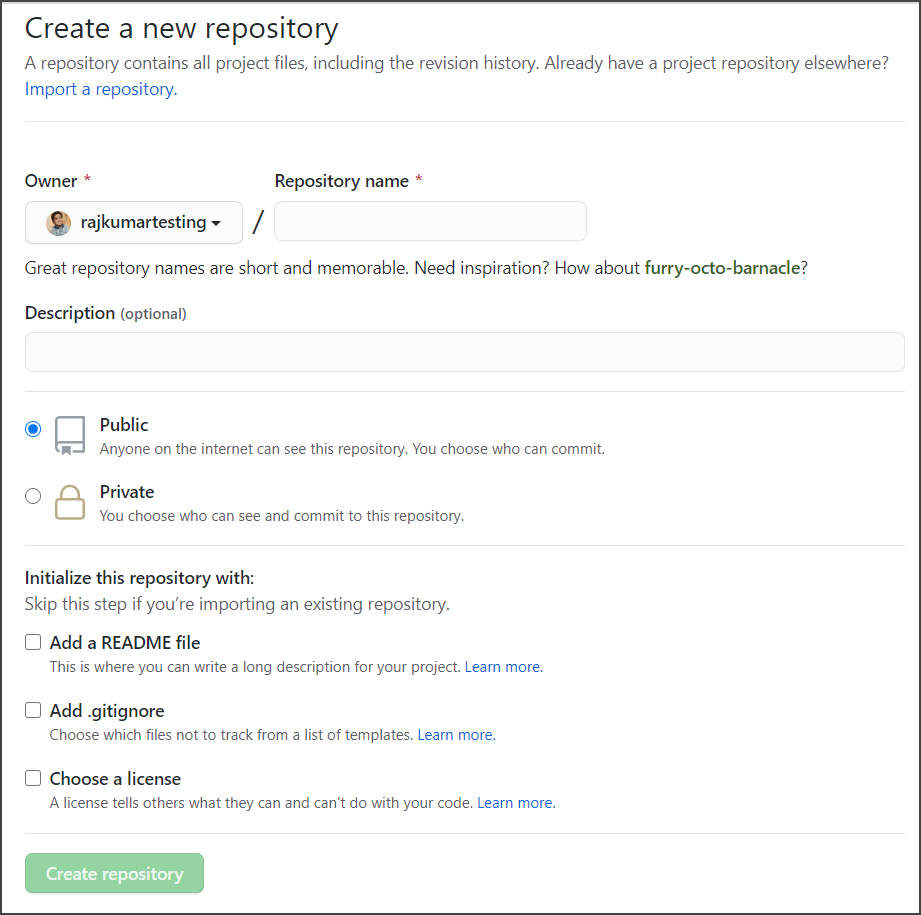
This will take you to the "Create a new repository" page, which looks like this:
Step 2: Fill in the Repository Details
Here, you'll provide the basic information for your project.
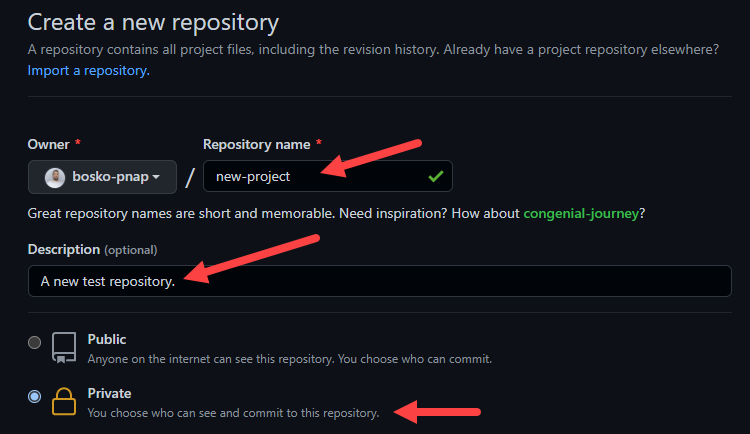
- Repository name: This is the most important field. For consistency, name it the same as your local project folder:
my-landing-page. Repository names can't have spaces, so using hyphens is the standard convention. - Description (optional): Add a short sentence to describe the project. Something like, "My first responsive landing page, built with AI assistance."
- Public vs. Private: This controls who can see your repository.
- Public: Anyone on the internet can see your code. This is great for portfolio pieces or open-source projects.
- Private: You choose who can see and contribute. This is best for practice projects, sensitive work, or anything you're not ready to share.
- For this project, select Private.
Step 3: IMPORTANT - Do NOT Initialize the Repository
You will see a section titled "Initialize this repository with:". It offers checkboxes to add a README file, a .gitignore file, and a license.
Do NOT check any of these boxes.
Why? In our next lesson, we will connect your local project to this new GitHub repository. For that connection to work smoothly, the GitHub repository must be completely empty. If you add a file here (like a README), GitHub will create a commit for it. This creates a separate history on the remote repo that conflicts with the history you already built locally.
Think of it this way: you already have a document with a history on your computer. You just need an empty folder in the cloud to put it in. If you create a folder in the cloud that already has a different title page inside, it creates confusion when you try to sync them.
Step 4: Create the Repository
Once you've set the name, description, and privacy, and ensured no initialization options are selected, click the green Create repository button.
That's it! GitHub will create the empty repository and show you a "Quick setup" page with some instructions. You can ignore those instructions for now; we'll handle them in the next lesson.
For a detailed walkthrough, the official GitHub documentation provides a great guide.
The official 'Hello World' guide from GitHub Docs walks through creating a repository. Follow their steps, but remember our crucial exception.
Read 'Step 1: Create a repository'. Follow the instructions to navigate and fill out the form. IMPORTANT: When you reach instruction #5 ('Select Add a README file'), DO NOT do this. Leave this box and all others unchecked before you click 'Create repository'.
The video below also provides a great overview of this process and explains what each option means.
GitHub Basics Made Easy: A Fast Beginner's Tutorial!
This video from Skill Foundry explains the concepts and walks through creating a repository on the GitHub website.
Watch from 10:54 to 13:10. The presenter explains each option on the 'Create a new repository' page, like public vs. private and the README file. Pay close attention to his explanations, but remember our rule for this lesson: leave the checkboxes for 'Add a README file', 'Add .gitignore', and 'Choose a license' all unchecked.
4. What Could Go Wrong
- Problem: "I accidentally checked 'Add a README file' and created the repository. Now it has a file in it."
- Reason: As we discussed, this creates a commit on GitHub that doesn't exist on your computer, which will cause conflicts later.
- Solution: For a brand new repository, the simplest fix is to delete it and start over.
- Go to your new repository's main page on GitHub.
- Click the Settings tab (usually the last tab on the right).
- Scroll all the way down to the bottom to the "Danger Zone".
- Click Delete this repository.
- GitHub will ask you to type the full repository name to confirm.
- Once deleted, just go back and follow the steps in this lesson again, making sure to leave the boxes unchecked this time.
5. Mini Exercise
Your task is to follow the steps and create the remote repository that will house your project.
- Go to GitHub.com.
- Create a new repository.
- Name it
my-landing-page. - Set its visibility to Private.
- Make sure you do not initialize it with a README, .gitignore, or license.
- Click Create repository.
You are done when you see a page titled "Quick setup — if you’ve done this kind of thing before".
6. Checklist Before Moving Ahead
- I understand the difference between a local repository (on my computer) and a remote repository (on GitHub).
- I can find the "New repository" page on GitHub.com.
- I have successfully created a new, empty, private repository on GitHub named
my-landing-page. - I understand why it was important not to initialize the repository with any files at this stage.
Fantastic! You've now established a home for your project in the cloud. You have a local history on your machine and an empty remote waiting to receive it.
A Look Ahead: In our next lesson, we'll bridge the gap between the two. You'll learn how to connect your local repository to the remote one on GitHub and "push" your commits, syncing your local history to the cloud for the first time.