Welcome back! In our last lesson, you set up a home for your project in the cloud by creating an empty, private repository on GitHub.com. You now have two separate things:
- A project on your computer with its own version history (your local repository).
- An empty project folder on GitHub waiting for your code (your remote repository).
Today, we're going to connect them.
1. What We Are Learning
This lesson covers the final and most rewarding step in our version control setup: connecting your local project to GitHub and pushing your code to the cloud. By the end, the 'Hello World' page you built on your machine will be safely stored and visible in your GitHub repository.
Our goal is to connect your local Git repository to the remote GitHub repository and push your code.
This is like working on a Figma file locally and then using the "Publish" or "Sync" feature for the first time to upload it to your shared team workspace. You're making your local version the official starting point in the cloud.
2. Why This Matters
Pushing your code to GitHub is a critical milestone. It's the action that bridges your local work with the rest of the world (or at least, the cloud).
- Centralization & Backup: Your code now lives in a central, backed-up location. This is your "single source of truth."
- Enables Deployment: This is the key to our main goal. The deployment services we will use later (like Vercel) work by connecting to a GitHub repository. When you push new code to GitHub, the deployment service can automatically see the changes and update your live website.
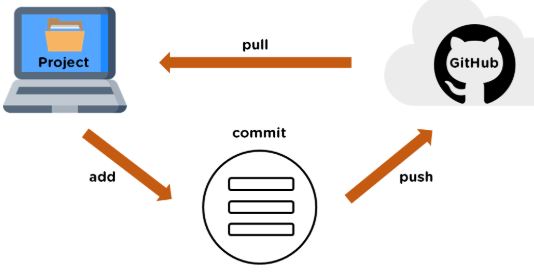
- Completes the Workflow: You will have completed the fundamental version control loop: make changes locally, commit them to save a snapshot, and push them to the remote repository to back them up and share them.
3. Step-by-Step Instructions
We will use VS Code's built-in Source Control features to make this process as simple as possible. The "Publish to GitHub" feature is a convenient shortcut that handles all the configuration for us.
Step 1: Open Your Project and Go to Source Control
- Open your
my-landing-pageproject folder in VS Code. - Click on the Source Control icon in the Activity Bar on the left. It looks like a branching path (⌃⇧G or Ctrl+Shift+G).
You should see your commit from the previous module listed, but also a prominent blue button that says Publish to GitHub.
Step 2: Publish to GitHub
The "Publish to GitHub" button is a powerful one-step command. It will:
- Connect your VS Code to your GitHub account.
- Create a new remote repository on your GitHub account.
- "Push" (upload) all your existing local commits to that new repository.
Click the Publish to GitHub button.
Step 3: Authenticate with GitHub
The first time you do this, VS Code needs permission to access your GitHub account.
- A dialog box will appear saying "The extension 'GitHub' wants to sign in using GitHub." Click Allow.
- Your web browser will open to a GitHub authorization page. You might need to log in to GitHub if you aren't already.
- Click the green Authorize Visual-Studio-Code button.
- Your browser will then ask for permission to open VS Code. Click Open.
This authentication process establishes a secure link between the editor on your machine and your cloud account. You typically only have to do this once.
Step 4: Configure and Publish the Repository
After authentication, you'll be back in VS Code, and a prompt will appear at the top of the screen. This is where you finalize the details of the repository that VS Code will create for you.
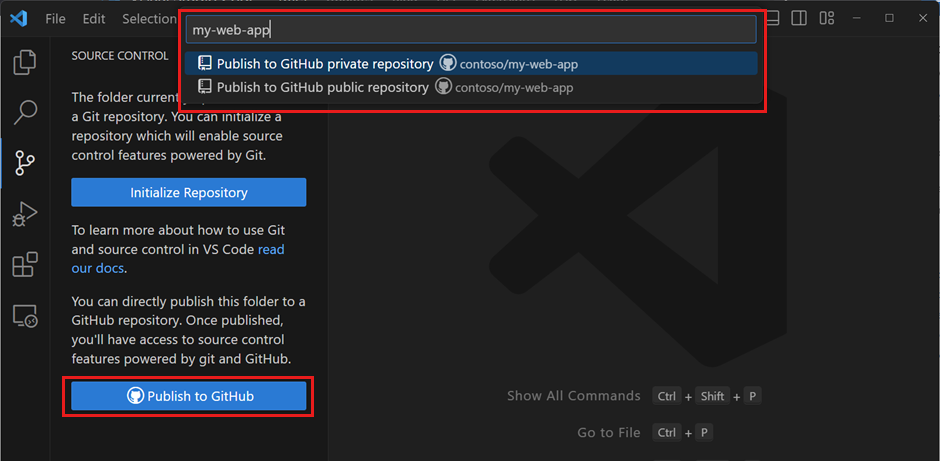
- Repository Name: The field will be pre-filled with your folder's name,
my-landing-page. Keep this. - Privacy: You'll see options to create a private or public repository. Select Publish to GitHub private repository.
VS Code will now perform the magic: it will create the repository on GitHub, link it to your local project, and push your commits. A small notification will appear in the bottom-right corner when it's done.
Step 5: Verify on GitHub
The confirmation pop-up will have a button to Open on GitHub. Click it.
This will take you directly to your new repository page on GitHub.com. You should now see your files (index.html and the styles folder) listed there. You can also click on the "commits" link to see the "Initial commit" message you wrote earlier.
Congratulations! Your local code is now officially synced with a remote repository in the cloud.
The following video from the official VS Code team demonstrates this exact "Publish Branch" workflow.
Using Git with Visual Studio Code (Official Beginner Tutorial)
This official tutorial from the Visual Studio Code channel demonstrates the seamless process of publishing a local project to GitHub.
Watch from 4:48 to 5:49. This short clip shows the entire flow: clicking 'Publish Branch', handling the authentication prompt, choosing the repository privacy, and seeing the final result on GitHub. This is exactly what you will be doing.
4. What Could Go Wrong
-
Problem: I clicked "Publish to GitHub" and it says "A repository with this name already exists."
-
Reason: This is expected! In the last lesson, you manually created an empty repository with the same name. While there are ways to link to it, the most straightforward path for a beginner is to let VS Code handle everything.
-
Solution:
- Go to the repository you created on GitHub.com in the previous lesson.
- Go to
Settings>General. - Scroll to the bottom to the "Danger Zone" and click Delete this repository. Follow the confirmation steps.
- Now that the old one is gone, go back to VS Code and click Publish to GitHub again. It will now work without any conflicts.
-
Problem: The "Publish to GitHub" button is not there.
-
Reason: This could happen if your project wasn't initialized as a Git repository correctly, or if a remote is already configured somehow.
-
Solution: First, ensure you see your previous commits in the Source Control panel. If you do, the repository is initialized. If the button is still missing, open the Command Palette (⇧⌘P or Ctrl+Shift+P), type
Publish to GitHub, and run the command from there.
5. Mini Exercise
Time to put it all together. Your task is to sync your local project with the cloud.
- Open your
my-landing-pageproject in VS Code and navigate to the Source Control panel. - Use the Publish to GitHub feature.
- If prompted that the repository already exists, delete the one you made manually on GitHub.com and try again.
- Choose to publish it as a private repository.
- After it succeeds, click the link to Open on GitHub and verify that your
index.htmlandstylesfolder are now visible online.
6. Checklist Before Moving Ahead
- I understand that "pushing" means uploading my local commits to a remote repository.
- I have successfully used the "Publish to GitHub" feature in VS Code.
- I have authenticated VS Code with my GitHub account.
- My local
index.htmlfile andstylesfolder are now visible in a private repository on my GitHub.com account. - I can see my "Initial commit" in the repository's history on GitHub.com.
Excellent work! You've now completed the entire foundational Git and GitHub workflow. Your project is secure, version-controlled, and ready for the next stages of development and deployment.
A Look Ahead: With our version control foundation firmly in place, we're going to shift gears in the next module. Before we start using AI to generate code, it's crucial that you can read and understand the code it produces. Our next lessons will focus on "Code Literacy," where we'll break down the basic structure and elements of HTML and CSS. This will empower you to effectively review, debug, and refine the output from our AI tools.