Hello! In our last lesson, you successfully created the first two snapshots of your project's history using the 'stage and commit' process. You learned the core concept: committing is like naming a version in Figma, creating a permanent checkpoint.
Today, we're going to move beyond just performing the action and focus on mastering the tool you used: the VS Code Source Control panel.
1. What We Are Learning
This lesson is a deeper dive into the VS Code Source Control panel. You will learn how to use its features to visually review your work before saving it and how to be more selective about what you include in each commit. This gives you precise control over your project's history.
The learning outcome for this lesson is: Use the VS Code Source Control panel to stage and commit your first changes. We'll build on what you've already done to ensure you're confident and in control of this crucial workflow.
2. Why This Matters
Mastering the Source Control panel is like mastering the Layers or History panel in a design tool. It's where you organize your work, review changes before they become permanent, and build a clean, professional history.
As a designer, you know the importance of reviewing your work. The most powerful feature we'll explore today is the "diff" view, which gives you a side-by-side visual comparison of what's changed. It’s like an automated "spot the difference" for your code, ensuring no unintended changes slip through. This control allows you to create commits that represent single, logical ideas, making your project history easy to understand.
3. Step-by-Step Instructions
Let's start by creating a scenario with a few different changes. Make sure you have your my-landing-page project open in VS Code.
- In
index.html, add a new paragraph below your<h1>element.<p>Welcome to my very first webpage, built from scratch!</p> - In
styles/style.css, let's change the background color you added in the last module. Change it to something new, for example:body { background-color: #f0f2f5; /* A light grey */ } - Save both files.
Now, navigate to the Source Control panel by clicking the icon in the Activity Bar. You should see both index.html and style.css listed under "Changes". The 'M' next to them stands for Modified.
Part A: The Diff View - Visually Reviewing Your Work
Before we save anything, let's review our edits.
- In the Source Control panel, click on
index.html. - VS Code will open a "diff" (difference) editor. On the left, you see the file as it was in your last commit (the "before"). On the right, you see your current version with the new paragraph highlighted in green (the "after").
- Now, click on
style.cssin the Source Control panel. You'll see the same diff view. The old background color will be highlighted in red (removed), and the new one will be in green (added).
This visual review is your quality control step. It lets you see exactly what you're about to commit.
Part B: Staging Selectively
Let's say you're happy with the new paragraph in the HTML, but you're not sure about the new background color yet. You want to create a commit for just the text change. This is the primary purpose of the staging area.
- Go back to the Source Control panel.
- Hover your mouse over
index.htmlin the "Changes" list. - Click the
+(plus) icon that appears. It's labeled "Stage Changes".
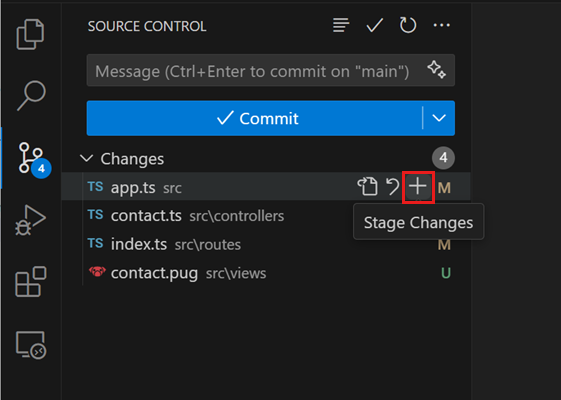
You'll see index.html jump up into a new section called "Staged Changes". The style.css file remains behind under "Changes". Your panel should now look similar to this, with changes in both sections.
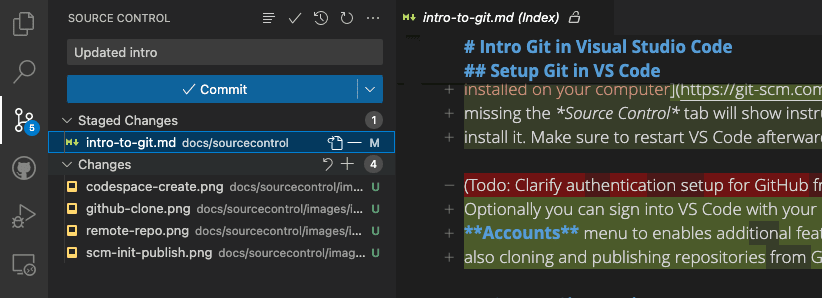
You have now told Git: "My next commit should only include the changes from index.html."
Part C: Committing Only the Staged Changes
Now, let's complete the process.
- In the Message box at the top of the panel, type a descriptive message for the change you staged. For example:
Add welcome paragraph to homepage. - Click the Commit checkmark button.
After you commit, index.html will disappear from the panel. It's now safely saved in your project's history. Crucially, style.css is still listed under "Changes", waiting for you to decide what to do with it.
For a video walkthrough of this exact process—making changes, staging them, and committing them using the VS Code interface—please watch the following clip.
Using Git with Visual Studio Code (Official Beginner Tutorial)
The official Visual Studio Code channel provides this excellent, quick tutorial. It demonstrates exactly what you just did: staging a file and committing it.
Watch from 01:18 to 02:08. Pay close attention to how the file moves from untracked/changed to 'staged' by clicking the plus icon, and then disappears after a message is added and the commit button is clicked.
4. What Could Go Wrong
-
"I accidentally clicked the
+on the 'Changes' header and staged everything!"- Reason: Clicking the
+on the header is a shortcut to stage all files. - Solution: No problem! Just hover over the "Staged Changes" header and click the
-(minus) icon that appears. This will "unstage" all the files, moving them back down to the "Changes" list so you can stage them one by one. You can also unstage individual files by clicking the-next to their name.
- Reason: Clicking the
-
"My diff view is inline, not side-by-side."
- Reason: If the VS Code window isn't wide enough, it automatically switches to an "inline" view to save space.
- Solution: This is just a display change. You can still see the red and green highlights showing what was removed and added. If you want the side-by-side view, just make the VS Code window wider.
5. Mini Exercise
You still have one file left in your "Changes" list: style.css. Let's give it its own, separate commit.
- Stage the
style.cssfile. - Write a clear, descriptive commit message for this change. Something like
Update page background color. - Commit the change.
Once you're done, your Source Control panel should be empty again, indicating that your working directory is clean and all changes have been saved to your local history.
To reinforce this entire workflow, the following guide provides a clear, step-by-step summary of staging and committing in VS Code.
Quickstart: use source control in VS Code
The official VS Code documentation provides a great quickstart guide. We'll focus on the section that perfectly summarizes the 'Stage and Commit' process.
Please read the section titled 'Step 3: Stage and commit'. This text reinforces everything we've just practiced: the two-step process, how to stage and unstage files, and how to write a commit message.
6. Checklist Before Moving Ahead
- I can open the "diff" view to visually compare my changes before committing.
- I know how to stage a single file from a list of multiple changes.
- I understand why I might want to commit only some of my current changes (to keep the history clean and logical).
- I have successfully staged and committed the
style.csschange in a separate commit.
Excellent work. You've now moved from simply doing a commit to purposefully controlling your commits. You can visually review your work and build a clean, professional project history one logical change at a time. This is a fundamental skill for any developer.
A Look Ahead: In our next lesson, we will finally get your project onto the internet (in a way). You'll create a repository on GitHub.com and "push" your local commit history to this remote, cloud-based repository. This is the key step to backing up your work and preparing it for collaboration and deployment.