Welcome back! In our last lesson, you officially turned your project folder into a Git repository. By clicking "Initialize Repository," you told Git to start watching your files. You saw them appear in the Source Control panel with a 'U' for "Untracked," meaning Git was aware of them but hadn't saved a snapshot yet.
Today, we're going to take that crucial next step: creating your first permanent snapshot.
1. What We Are Learning
This lesson is all about the most fundamental workflow in Git: the stage and commit process. You will learn how to select the changes you want to save (staging) and then store them permanently in your project's history with a descriptive message (committing).
2. Why This Matters
Right now, your repository is like a Figma file with only autosaves. The history exists, but it's unnamed and not organized. Committing is how you create deliberate, named versions of your work.
- Committing is like using the "Name this version" feature in Figma. It creates a labeled checkpoint that you can always return to.
- Staging is the step before you name the version. It lets you choose exactly which of your current edits should be included in that named version. This is incredibly powerful. Imagine you've fixed a typo on one page but also started a messy, incomplete redesign on another. Staging lets you create a clean commit named "Fix typo on homepage" without including the unfinished redesign.
This process creates a clean, understandable history of your project, making it easy to track changes, find bugs, and collaborate with others.
3. Step-by-Step Instructions
The Core Concept: Three Areas of Work
Before we do this in VS Code, it's essential to understand the three "zones" your changes move through.
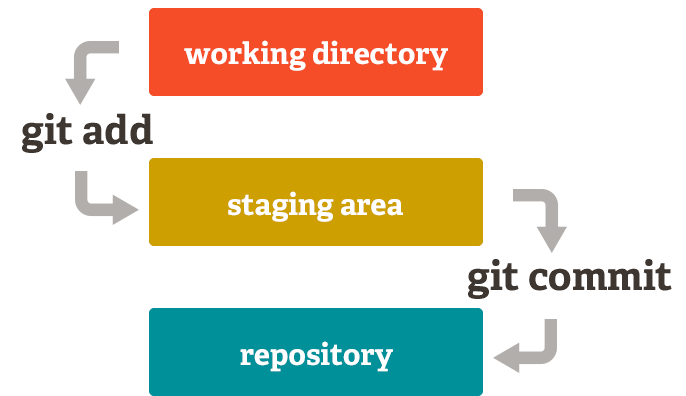
- Working Directory: This is your project folder where you edit files. It's the "live" version of your work.
- Staging Area: A waiting area where you place the specific changes you want to include in your next snapshot.
- Repository (.git folder): The permanent, historical record. Once something is committed, it's saved here.
To see this explained visually, please watch this short video.
Git Fundamentals: Staging area, repository, working directory, file states, and commits tutorial.
This video from The Modern Coder introduces the core components of Git. Focus on understanding the distinct roles of the Working Directory, the Staging Area, and the Repository.
Watch from 00:36 to 02:41. Pay attention to how changes move from your project folder (Working Directory) to the Staging Area, and finally into the permanent Repository.
This diagram shows the exact flow you just learned about:
A helpful analogy is online shopping:
- The Working Directory is the entire online store. You can browse and make changes (add items to your mental list).
- The Staging Area is your shopping cart. You add specific items you intend to buy. You can still add or remove items from the cart before checking out.
- The Repository is the checkout process. When you
commit, you are finalizing the purchase. The transaction is recorded in your order history permanently.
To explore this concept further through a great analogy for non-programmers, take a few minutes to read the following article.
Getting Git for Beginners | Analogy
This article from Ammon Shepherd uses the analogy of writing a book to explain why the staging area is so useful. It perfectly illustrates the need to create clean, focused snapshots of your work.
Read the sections 'Snapshots of the Past' and 'Staging Area, the Index'. Focus on the problem the author describes: wanting to save a fix in Chapter 1 without including the unfinished work in Chapter 3. This is the exact problem the staging area solves.
Making Your First Commit in VS Code
Let's apply this. Go back to VS Code, where your my-landing-page project is open.
Step 1: Stage Your Files
- Click on the Source Control icon (the branching road) in the Activity Bar.
- You'll see your files (
index.htmland thestylesfolder) listed under a "Changes" heading. The 'U' means they are Untracked. - Hover your mouse over the "Changes" heading. A
+icon will appear. Click it to Stage All Changes.
Clicking the '+' icon moves all your current changes to the 'Staged Changes' area, preparing them for the commit.
You will see your files jump up to a new section called "Staged Changes." You have now moved your files from the working directory to the staging area.
Step 2: Write a Commit Message
At the top of the Source Control panel, there is a text box labeled "Message". This is where you'll write the description for your snapshot. A good commit message is a short summary of the changes.
For this first commit, a standard message is:Initial commit
Type that into the message box.
Step 3: Commit the Changes
Click the checkmark icon at the top of the panel to commit your staged changes.
And that's it! The files will disappear from the panel. You have successfully created your first snapshot and saved it to your local repository. Your project's history has officially begun.
4. What Could Go Wrong
-
Error: "Please tell me who you are."
- Reason: This is a very common first-time setup step. Git requires every commit to be authored by a name and email. You only have to do this once on your computer.
- Solution: Open the integrated terminal in VS Code (View > Terminal) and run these two commands, replacing the placeholder text with your actual name and email.
git config --global user.name "Your Name"
git config --global user.email "you@example.com"
git config: This is the command to change Git's settings.--global: This tells Git to apply this setting for every repository on your computer, so you don't have to do it again.- After running these commands, try clicking the commit checkmark again. It should now work.
-
The commit button (checkmark) is greyed out or gone.
- Reason: You can only commit if there are files in the "Staged Changes" area.
- Solution: Make sure you've clicked the
+icon to stage your files first.
5. Mini Exercise
Let's practice the change -> stage -> commit loop one more time.
- Open
index.html. - Change the text inside the
<h1>tag from "Hello World" to something new, like "My Awesome Landing Page". Save the file. - Go back to the Source Control panel. You'll see
index.htmlis back in the "Changes" list, because you've modified it. - Stage the change by clicking the
+icon next to the file name. - Write a descriptive commit message. A good convention is to use the present tense, as if you're describing what the commit does. For example:
Update page heading text. - Commit the change by clicking the checkmark.
This video demonstrates a similar process of staging and committing only specific changes, showing the power of being selective.
Using Git & GitHub in VSCode: Stage, Commit, and Push
This clip from Max Rohowsky's tutorial shows how you can have multiple changes but choose to stage and commit only one of them, reinforcing why the staging area is so useful.
Watch from 11:43 to 14:36. Notice how he makes two changes but only stages one of them before committing. This is the core benefit of the staging area in action.
6. Checklist Before Moving Ahead
- I can explain the difference between the Working Directory, Staging Area, and Repository.
- I know that staging means selecting which changes I want to save in the next snapshot.
- I know that committing saves the staged changes permanently to the project's history.
- I have successfully made my "Initial commit".
- I have completed the mini-exercise and made a second commit with a descriptive message.
Fantastic work. You've now mastered the most frequent and important workflow in version control. You have a local history of your project with two distinct snapshots saved.
A Look Ahead: In our next lesson, we'll take this local history and put it on the cloud. You'll create a repository on GitHub.com and "push" your local commits to it. This is the key step to backing up your work and preparing it for deployment.