Welcome back! In our last lesson, we built the conceptual bridge between your design world and the developer world. You learned that version control isn't a scary new concept, but something you already use intuitively with Figma's version history. We translated terms like repository, commit, and branch into familiar design actions.
1. What We Are Learning
Today, we move from theory to practice. Our goal is to perform the very first action in any version-controlled project: initialize a Git repository.
We will take our existing my-landing-page project folder and officially tell Git, the version control system, to start watching it for changes. This is the digital equivalent of creating a new Figma file and enabling its version history.
2. Why This Matters
Right now, your project folder is just a collection of files on your computer. If you accidentally delete something or make a change you regret, there's no easy way to go back.
By initializing a Git repository, you are "activating" version control for that specific folder. Git creates a hidden sub-folder where it will store the entire history of your project. From this moment on, every change you make can be tracked, saved, and revisited. It’s the foundational step that gives you a safety net for all future work.
Think of it this way:
- Your
my-landing-pagefolder is the canvas. - Initializing a Git repository is like telling Figma, "Start recording the history for everything I do on this canvas."

3. Step-by-Step Instructions
We'll use VS Code's user-friendly interface to do this. There's no need for complex terminal commands; we'll let the editor do the work for us.
For a great visual walkthrough of what we're about to do, watch this short segment from a video by Max Rohowsky.
Using Git & GitHub in VSCode: Stage, Commit, and Push
This video shows exactly how to initialize a repository from within VS Code. Pay close attention to how the Source Control panel changes after the button is clicked.
Watch from timestamp 01:45 to 03:00. The video demonstrates opening a folder and clicking the 'Initialize Repository' button, which is precisely our goal for today.
Now, let's do it ourselves.
Step 1: Open Your Project in VS Code
First, make sure you have your my-landing-page project folder open in VS Code, just as we've done in previous lessons.
Step 2: Navigate to the Source Control Panel
On the left-hand Activity Bar in VS Code, click on the icon that looks like a split in the road. This is the Source Control panel.
- Why? This panel is the command center for all Git-related activities in VS Code. Instead of typing commands, you can click buttons here to track files, save versions, and more.
You should see a large blue button that says "Initialize Repository".
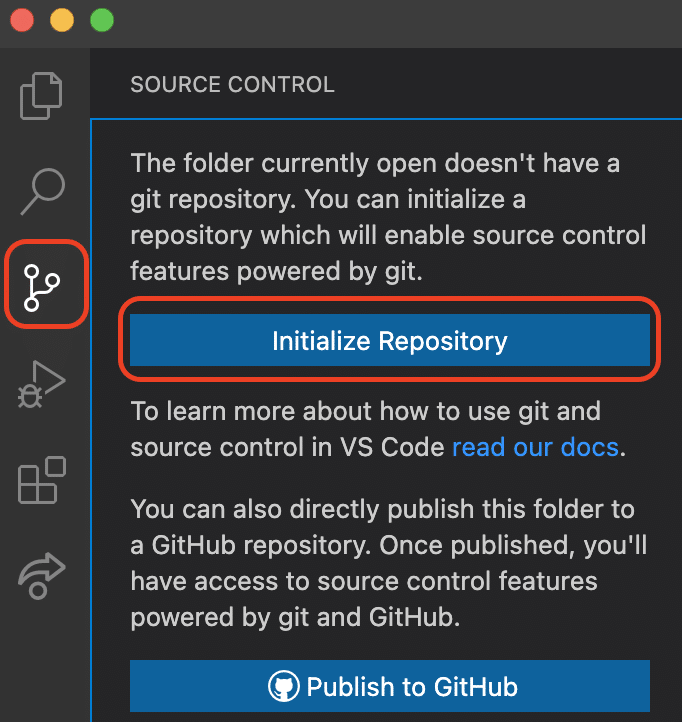
Step 3: Initialize the Repository
Click the "Initialize Repository" button.
That's it! You've just created your first Git repository.
Step 4: Observe the Changes
After you click the button, the Source Control panel will change.
- The "Initialize Repository" button will disappear.
- Your project files (
index.htmland thestylesfolder) will now be listed under a "Changes" section. - Next to each file, you will see the letter 'U'. This stands for Untracked.
- What does 'U' mean? It means Git now sees these files and is aware of their existence, but it hasn't saved them into the project's history yet. Think of them as new layers in Figma that you've created but haven't yet included in a named version. We'll learn how to do that in our next lesson.
By initializing the repository, you've essentially created a hidden .git folder inside your my-landing-page directory. This folder is Git's brain—it's where all the data about your project's history (your commits, branches, etc.) will be stored. You should never edit this folder directly.
4. What Could Go Wrong
-
"I don't see the 'Initialize Repository' button."
- Reason: This usually means the folder is already a Git repository. You might have clicked the button already. If you see your files listed under "Changes", you are all set!
- Another Reason: You might have opened a folder that is inside another Git repository. For our project, make sure you've opened the
my-landing-pagefolder directly.
-
"I clicked the button, but I see an error about Git not being found."
- Reason: This indicates that Git might not be installed correctly or that VS Code can't find it. Revisit our earlier lesson on installing Git and make sure it was completed successfully. Restarting VS Code after the installation can also help.
5. Mini Exercise
Time to put this into practice. This is your only task for today.
- Launch VS Code and open your
my-landing-pageproject folder. - Navigate to the Source Control panel on the left Activity Bar.
- Click the blue "Initialize Repository" button.
- Confirm that you now see
index.htmland thestyles/directory listed in the panel with a 'U' next to them.
6. Checklist Before Moving Ahead
- I have successfully initialized a Git repository in my
my-landing-pagefolder. - I can see my project files listed in the VS Code Source Control panel.
- I understand that the 'U' next to the files means they are "Untracked".
- I know that initializing created a hidden
.gitfolder that will store my project's history.
Excellent work! You've taken the first concrete step in using version control. Your project is no longer just a loose collection of files; it's now a repository with the power to track its own evolution.
A Look Ahead: In our next lesson, we'll learn about the most common workflow in Git: the "stage" and "commit" process. You'll save your first official snapshot of the project, which is the equivalent of creating a named version in Figma's history.