Hello! In our last lesson, you learned how to make those crucial "final 5%" manual edits to polish the text, colors, and spacing of your page. You've now experienced the full loop of generating code with AI and refining it with your designer's eye.
Before we can share your creation with the world, we need to perform one last, critical quality check.
1. What We Are Learning
Today, we're putting on our Quality Assurance (QA) hats. The goal is to validate that all links, images, and interactive elements work as expected. This is the final inspection to ensure a seamless user experience.
We'll cover three key validation checks:
- Verifying Images: Ensuring all images load correctly and are accessible.
- Testing Links: Making sure every link directs users to the right place.
- Validating Interactivity: Confirming that all buttons and links can be used by everyone, including those who rely on keyboard navigation.
2. Why This Matters
A beautiful design can be instantly undermined by a broken image or a link that leads to a "404 Not Found" page. It erodes user trust and makes a project feel unprofessional.
Analogy: This process is like the final user testing phase for a Figma prototype. Before you present to stakeholders, you click through every hotspot to make sure the flow is complete and nothing is broken. A broken link on a live website is the equivalent of a dead-end hotspot in a prototype—it stops the user journey cold.
This final check ensures your site is not just visually polished, but also functional, reliable, and accessible.
3. Step-by-Step Instructions
Let's go through our pre-launch checklist. We'll be using a combination of visual checks, browser tools you're already familiar with, and a couple of new techniques.
3_6.webp)
Step 1: Verify All Images Load Correctly
First, let's make sure all your visual assets are appearing as intended.
-
Visual Scan: With your page open via Live Server, simply scroll through and look. Do you see all the images you expect? Or do you see a broken image icon (it looks different in each browser, but it's usually a small, generic picture icon)?
-
Debugging a Broken Image: If you find a broken image, it's time to investigate. The browser's DevTools will tell us exactly what went wrong.
- Right-click anywhere on the page and select "Inspect" to open DevTools.
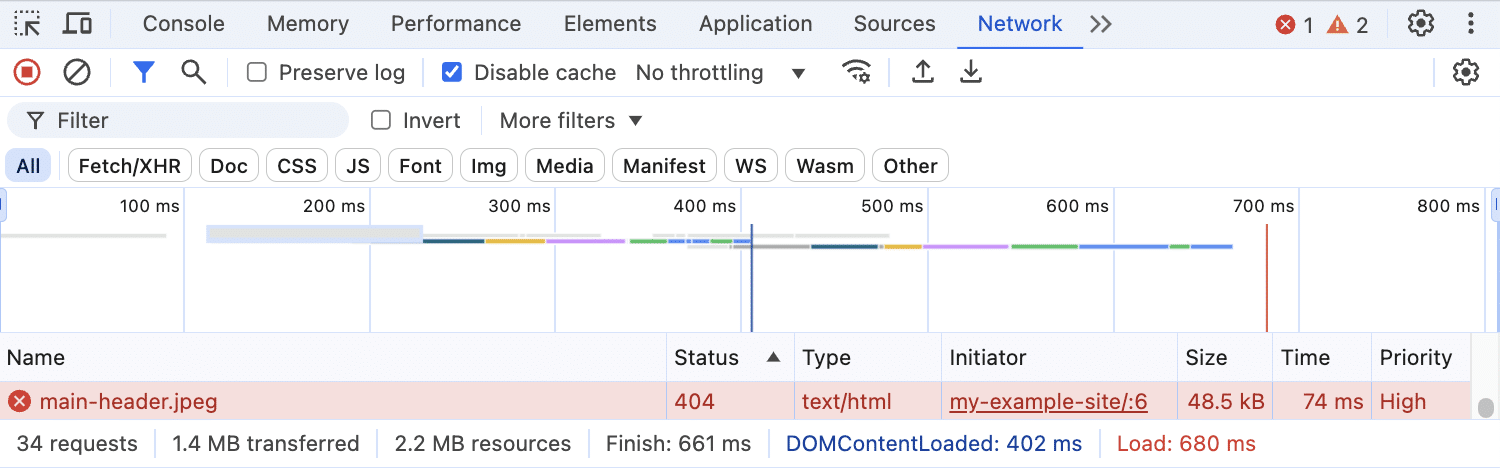
- Click on the "Network" tab.
- Refresh the page (
Cmd+RorCtrl+R). You'll see a list of all the files the browser is trying to load. - Look for any file that is highlighted in red. It will likely have a
404status, which means "Not Found."
-
Fixing the Path: A
404error for an image is almost always due to one of two things:- A typo in the file path: In your
index.htmlfile, find the<img>tag for the broken image. Look at itssrcattribute (e.g.,src="images/hero-image.png"). Does the path exactly match your folder structure and filename? Check for typos, and remember that paths are case-sensitive! - The file is in the wrong place: Did you save the image file in the correct folder (e.g., your
imagesfolder)?
- A typo in the file path: In your
-
Check for Accessibility (
alttext): Every image needs "alternative text." This text describes the image for screen readers (used by visually impaired users) and is also displayed if the image fails to load.- In
index.html, find your<img>tags. - Ensure each one has an
altattribute that briefly describes the image's content or purpose (e.g.,<img src="images/logo.png" alt="InnovateTech company logo">). - If an image is purely decorative, it should still have an alt attribute, but it can be empty:
alt="".
- In
For a quick refresher on the importance of alt text, review the "Images" section in this guide from Harvard.
Manual Testing for Accessibility
This guide, 'Manual Testing for Accessibility', provides best practices for content reviews. We'll focus on the 'Images' part.
Scroll down to the 'Images' subsection. It's a short but crucial reminder of what makes good alt text: it should convey the content and function of the image.
Step 2: Test All Links
Next, we'll verify that every link goes to the intended destination.
-
Manual Click-Through: The most straightforward method is to click every single link on your page. This includes navigation links, buttons, and any text links. Do they take you where you expect?
-
Automated Link Checking: If your page had dozens of links, clicking them all would be tedious. Developers use automated tools for this. We'll use a simple but powerful browser extension.
Let's install and run a link checker.
Check My Links: A Developer's Guide
The article 'Check My Links: A Developer's Guide' introduces a fantastic browser extension that automatically crawls the current page and tests every link. We'll install it and learn to read its report.
First, read the 'Installation Guide' to add the extension to your Chrome browser. Then, read 'Initiating a Link Check' and 'Understanding the Results' to learn how to run it and what the green and red color-coding means. You can skim or skip the other sections for now.
Once installed, click the "Check My Links" extension icon in your browser toolbar. It will scan your page and highlight all working links in green and broken ones in red. If you find any red links, go into your index.html file, find the corresponding <a> tag, and fix the URL in its href attribute.
Step 3: Validate Interactive Elements
Finally, let's ensure your site is usable for everyone by testing its keyboard accessibility. All interactive elements (links, buttons) must be reachable and usable without a mouse.
For this, we'll turn back to the excellent Harvard accessibility guide.
Manual Testing for Accessibility
This guide provides a clear, practical method for testing keyboard navigation. As a designer, you'll find this directly relates to universal design principles.
Read the section 'Keyboard Testing'. Pay close attention to the 'How to test with a keyboard' commands and the 'What to check for' bullet points. This will be your checklist.
Now, perform the test on your page:
- Click in the content area of your page, then put your mouse aside.
- Press the
Tabkey repeatedly. You should see a visual indicator (usually an outline) move sequentially through every link and button on your page. - Press
Shift + Tabto see the focus indicator move backward through the elements. - Navigate to a link or button with
Tab, and pressEnterto activate it.
What to check for:
- Logical Order: Does the
Tabkey move through elements in a predictable order (e.g., top to bottom, left to right)? - Visible Focus: Is there always a clear visual outline or highlight showing which element is currently selected? This is called the "focus state."
- No "Traps": Can you
Tabthrough everything and eventually loop back to the top? Or do you get stuck somewhere?
4. What Could Go Wrong
- An image shows a
404error in the Network tab.- Reason: The
srcpath in your<img>tag is incorrect. It's a typo or points to the wrong folder. - Fix: Carefully compare the
srcpath in yourindex.htmlwith your actual project folder structure and filename. Correct the path.
- Reason: The
- "Check My Links" marks a link as red (broken).
- Reason: The
hrefattribute in your<a>tag has a typo or an outdated URL. - Fix: Find the
<a>tag inindex.html. Copy-paste the correct, full URL into thehrefattribute (e.g.,href="https://www.google.com").
- Reason: The
- You can't
Tabto a button or link.- Reason: The AI may have used non-semantic HTML (e.g., a
<div>instead of a<button>). Not all HTML elements are "focusable" by default. - Fix: This is a perfect task for the AI. Prompt it: "Refactor the 'Learn More' button, which is currently a
div, into a semantic<button>element to ensure it is keyboard accessible."
- Reason: The AI may have used non-semantic HTML (e.g., a
- When you
Tabto an element, there's no visible outline.- Reason: The CSS might contain a rule like
outline: none;, which is a major accessibility issue. - Fix: Prompt the AI: "Add a clear and visible focus style for all interactive elements. It should be visible when navigating with the Tab key."
- Reason: The CSS might contain a rule like
5. Mini Exercise
It's time for the final inspection of your project. Run through this checklist on your landing page.
- Image Audit:
- Open your page and visually confirm all images are loading.
- If an image is broken, use the DevTools Network tab to identify the
404error and fix thesrcpath in your HTML. - Review every
<img>tag and ensure it has a descriptivealtattribute.
- Link Audit:
- Run the "Check My Links" extension.
- If any links are red, correct the
hrefattribute in the corresponding<a>tag.
- Interaction Audit:
- Navigate your entire site using only the
Tabkey. - Confirm you can reach every link and button.
- Confirm there is a clear, visible focus outline on every element you
Tabto.
- Navigate your entire site using only the
6. Checklist Before Moving Ahead
- I know how to use the DevTools Network tab to spot
404errors for missing images. - I understand the importance of
alttext for images and have added it to my page. - I have installed and used the "Check My Links" extension to validate all the links on my page.
- I can test my page's usability by navigating with the
Tab,Shift+Tab, andEnterkeys. - I understand that a visible focus state is essential for accessible navigation.
Congratulations! You have successfully built, refined, and validated your first webpage. It's not just a pretty design anymore; it's a functional, robust, and accessible piece of the web.
A Look Ahead
Your site is officially ready for its public debut. In our next lesson, we will enter the final phase of this project: deployment. You will learn how to take your local project folder, connect it to a hosting service called Vercel, and publish it to a live URL that you can share with anyone in the world.