Welcome back! In our last lesson, you successfully created a Vercel account and connected it to your GitHub profile. You've built the bridge between your code's home (GitHub) and its future live address on the internet (Vercel).
Today, we're going to tell Vercel exactly which project to bring to life. We'll select your landing page repository and prepare it for its first-ever deployment.
1. What We Are Learning
Today's learning outcome is to import your GitHub repository into Vercel to start the deployment process. We'll select the project, review the settings Vercel suggests, and get everything staged for the final step.
2. Why This Matters
Your GitHub account might contain many projects, just as your Figma account has many design files. You don't want to print every draft, only the final, approved version. Importing a repository is how you tell Vercel, "This is the one. This is the project I want to publish."
This step creates a permanent link between that specific GitHub repository and a new project inside Vercel. Once this link is established, Vercel can automatically watch for any changes and update your live website accordingly.
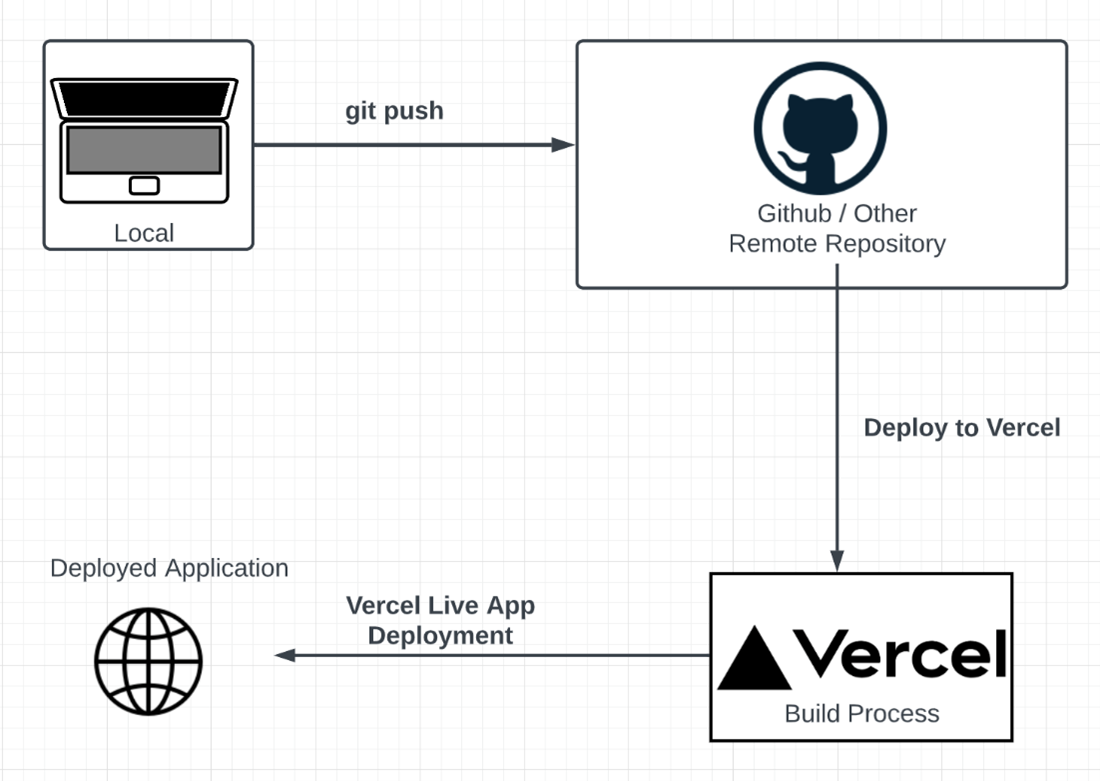
This diagram shows the workflow we are completing. In the last lessons, we've gone from our Local machine to GitHub. Today, we're making the connection from GitHub to Vercel.
3. Step-by-Step Instructions
Let's get your project imported. We'll start from your Vercel dashboard, which should be where you landed after the last lesson.
Step 1: Start a New Project
From your Vercel dashboard, look for a button to add a new project. It will likely be labeled "Add New..." or "Import Project". Click it, and from the dropdown, select "Project".
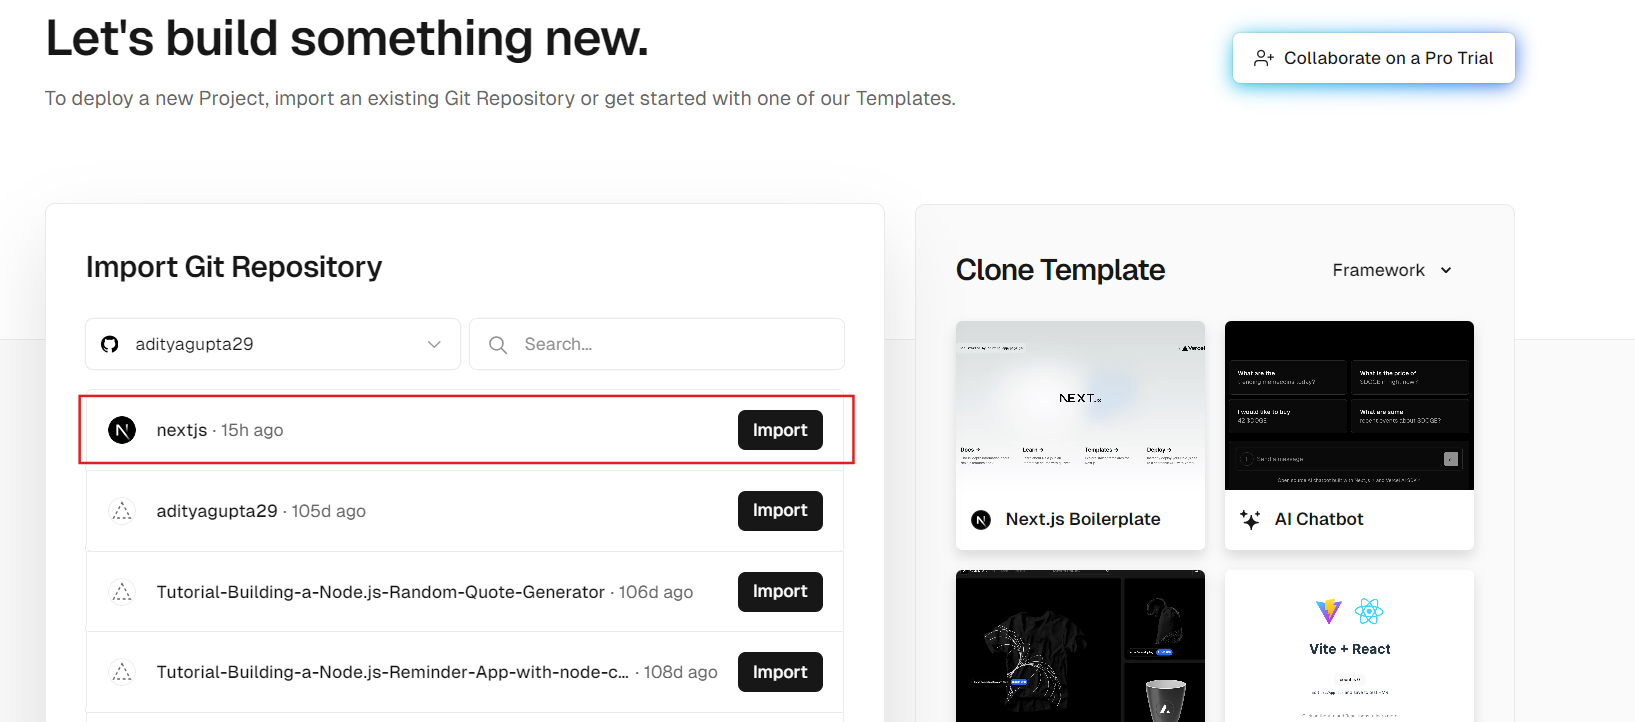
This will take you to the "Import Git Repository" page. Because you've already connected your GitHub account, you should see a list of your repositories.
Step 2: Import Your Repository
Find the repository for your landing page project in the list and click the "Import" button next to it.
This video clip demonstrates this exact action.
How to Host a Website for Free using Vercel and GitHub
This short clip from Andy's Tech Tutorials shows the process of finding and importing a repository, and then reviewing the configuration settings for a simple HTML project like ours.
Watch from 01:17 to 01:38. Notice how the user finds their project and clicks 'Import', then looks at the 'Framework Preset' on the next screen.
Step 3: Configure Your Project
After you click "Import," Vercel will take you to a "Configure Project" screen. This page can look intimidating, but for our simple project, the defaults are almost perfect.
Let's break it down:
- Project Name: Vercel automatically uses your repository's name. This is usually fine, so you can leave it as is.
- Framework Preset: This is where you tell Vercel what kind of code you're using. Vercel is smart and will likely detect that you have a simple project and select "Other". This is correct for a basic HTML, CSS, and JavaScript site.
- Build and Output Settings: You can ignore this entire section. These settings are for more complex projects that need a "build step" (like compiling code before it can be used). Our project doesn't need this.
- Environment Variables: You can also ignore this. This is for storing secret keys or configuration values, which we don't have.
Your only job on this screen is to ensure the "Framework Preset" is set to "Other".
Once you've confirmed that, you are ready. The next step would be to click the "Deploy" button. However, we will stop here for this lesson. Our goal was to import and get ready, and that's what we've done.
4. What Could Go Wrong
- Your repository isn't in the list.
- Reason: When you authorized Vercel, you might have chosen "Only select repositories" but didn't include this project.
- Fix: This is easy to resolve. Go to your GitHub account settings. Navigate to
Settings>Applications>Installed GitHub Apps>Vercel>Configure. Here, you'll find a "Repository access" section where you can add your landing page project to the list of repositories Vercel is allowed to see. After you save the changes, go back to Vercel and refresh the page. Your repository should now appear.
- Vercel chose the wrong Framework Preset.
- Reason: Sometimes Vercel's detection can be fooled if there are other files in your repository.
- Fix: Simply click the dropdown menu for "Framework Preset" and manually select "Other" from the list.
5. Mini Exercise
Time to do it yourself. Follow these steps to get your project ready for deployment.
- Log in to your Vercel dashboard.
- Click "Add New..." and select "Project".
- Find your landing page repository in the list.
- Click the "Import" button next to it.
- On the "Configure Project" screen, verify that the Framework Preset is set to "Other".
- STOP. Do not click the "Deploy" button yet. Confirm you are on this screen, ready for the next lesson.
6. Checklist Before Moving Ahead
- I understand that importing a repository tells Vercel which project I want to make live.
- I have successfully imported my landing page project from GitHub into Vercel.
- I am on the "Configure Project" screen in Vercel.
- I understand why the "Framework Preset" should be "Other" for my simple HTML and CSS project.
- I have not clicked "Deploy" yet and am ready for the next lesson.
Excellent work! You have successfully staged your project for deployment. Vercel now knows about your project, has access to the code, and is just waiting for the final command.
A Look Ahead
In our next lesson, we will complete the process. You'll click that "Deploy" button, watch Vercel build and launch your site, and receive the public URL to your live landing page. Get ready to see your work on the world wide web