Welcome back! We've just wrapped up our first module, "Foundations," where we built a strong conceptual map of how the web works. You now understand how browsers request pages, the roles of HTML, CSS, and JavaScript, and how domain names point to hosted websites.
Now we move from theory to practice. It's time to set up your digital workshop.
1. What We Are Learning
Today we begin Module 2: The Developer's Toolkit. Our first and most important goal is to install and navigate the Visual Studio (VS) Code editor interface. This piece of software will be your home base for the rest of this course.
2. Why This Matters
As a product designer, you spend your days in tools like Figma or Sketch. You have a canvas, a layers panel, an assets library, and a properties inspector. You know this environment inside and out.
VS Code is the developer's equivalent of Figma. It's a specialized editor built for writing, organizing, and managing code. While you could technically write code in a simple text file, using VS Code is like using Figma instead of MS Paint. It provides essential features that make the process manageable and efficient:
- Syntax Highlighting: Color-codes your code to make it readable.
- IntelliSense: Offers smart completions and suggestions as you type.
- Built-in Tools: Includes a terminal, version control integration, and more.
Learning to navigate this tool is the first step to becoming "code literate" and eventually managing the code generated by our AI tools.
3. Step-by-Step Instructions
Let's get your main tool installed and take a look around.
Step 1: Download and Install VS Code
First, we need to download the application. We will be using the "Stable" version, which is the most reliable public release.
This short video clip from the official Visual Studio Code channel will show you exactly where to go to download the editor. It also briefly explains the difference between the 'Stable' version and the 'Insiders' version (a test version with newer features).
Watch from the 0:12 to 01:17. Follow the instructions to download the 'Stable' version for your operating system (Mac or Windows).
Here's an image of the download page so you know you're in the right place.

Once the download is complete, open the file and follow the installation instructions. On a Mac, this is usually as simple as dragging the application into your "Applications" folder.
Step 2: A Tour of the Interface
Open VS Code for the first time. You'll likely see a "Welcome" tab. Let's get familiar with the main areas of the application. The layout might seem complex at first, but it's organized very logically, much like a design tool.
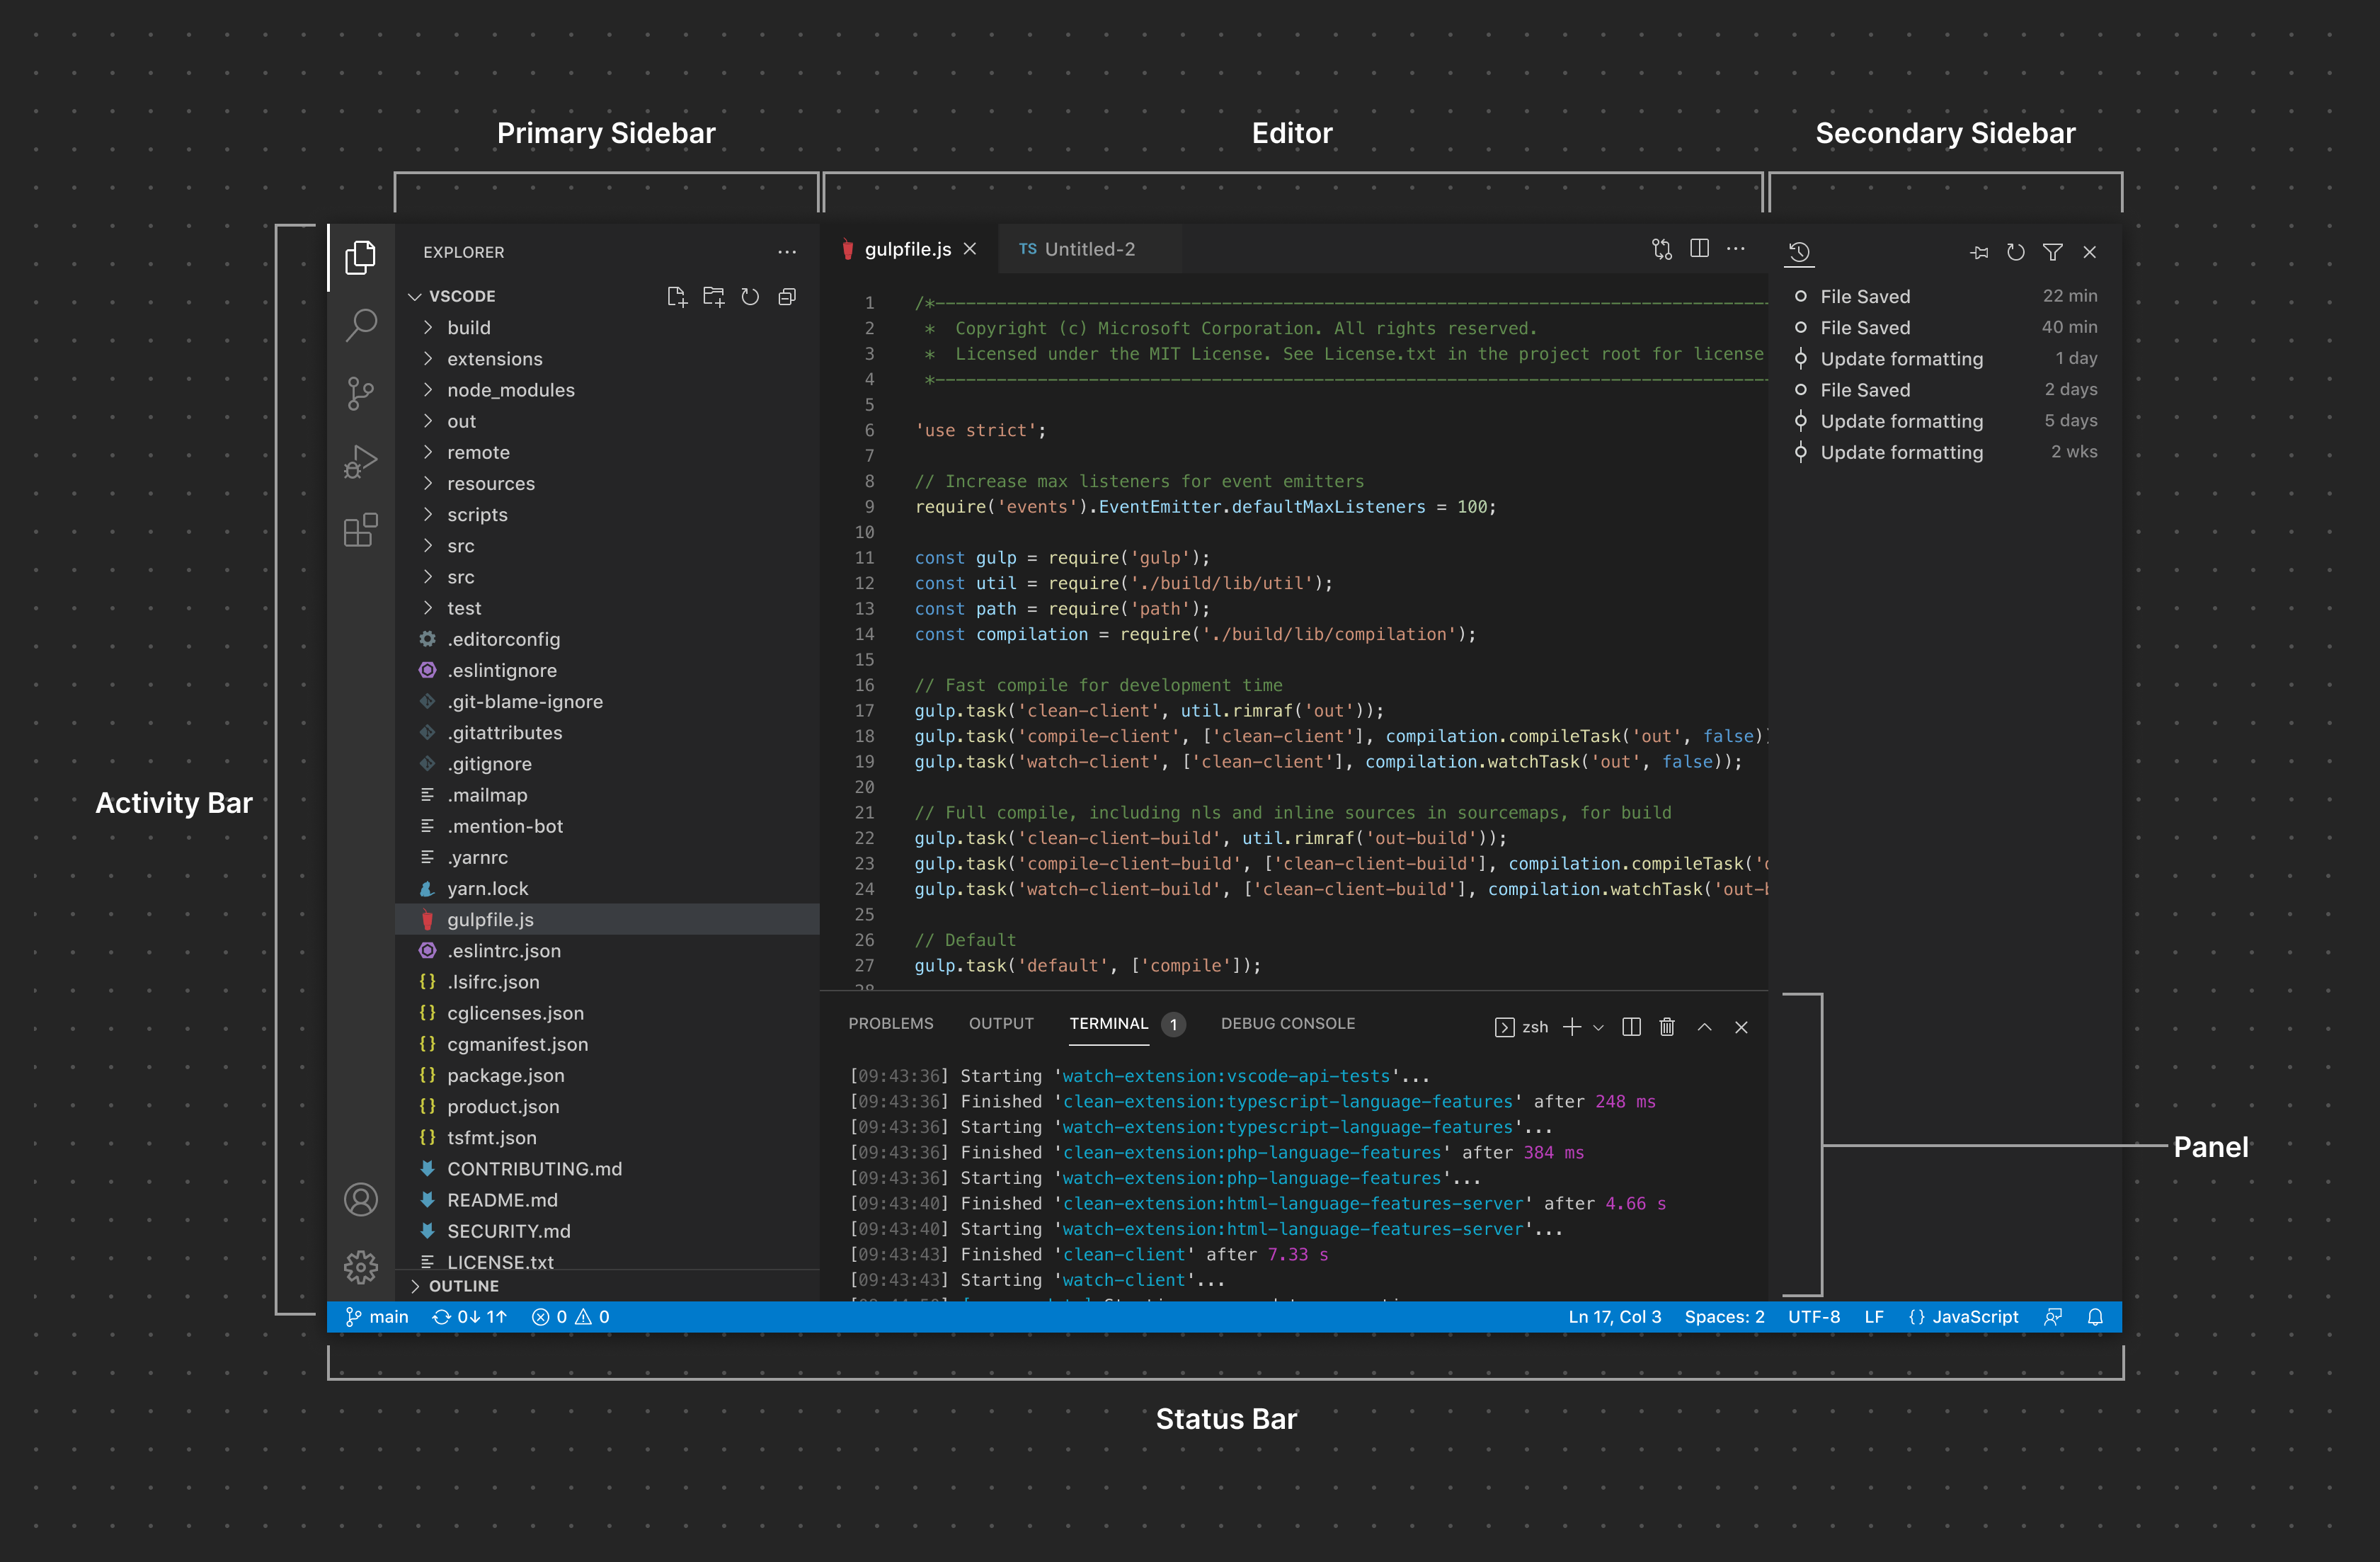
Let's map these areas to concepts you already know from design software:
- Activity Bar (Far Left): This is your main toolkit. It lets you switch between different high-level functions. For now, we only care about two icons:
- Explorer (top icon, looks like files): This is your file and folder list, similar to the Layers panel in Figma.
- Extensions (bottom icon, looks like blocks): This is the marketplace for plugins that add new features to VS Code.
- Primary Side Bar (Next to Activity Bar): This is the detailed view for whatever tool you've selected in the Activity Bar. When the Explorer is active, this bar shows your project's file structure.
- Editor (The large central area): This is your canvas. It's where you'll view and edit your code files. You can have multiple files open in different tabs here.
- Panel (Bottom area): This is an area for output, error messages, and most importantly, the integrated terminal. The terminal is a command-line interface that we'll use extensively in later lessons. You can show or hide this panel as needed.
- Status Bar (Very bottom): This thin bar gives you at-a-glance information about your project, much like the bottom bar in Figma might show your zoom level or pixel grid settings.
VS Code for Absolute Beginners
To see these parts in action, watch this quick walkthrough. The presenter does a great job of explaining each section of the user interface.
Watch from 01:38 to 02:47. Pay attention to how the presenter names and points to each part of the UI we just discussed.
4. What Could Go Wrong
- Installing the wrong program: Be careful not to download Visual Studio (a different, much larger application with a purple icon) instead of Visual Studio Code (the one we want, with a blue icon).
- Feeling overwhelmed: Don't worry about what every single button does. We will introduce features one by one as we need them. For now, just focus on identifying the five main areas described above.
- "Workspace Trust" Pop-up: When you open a folder, VS Code may ask, "Do you trust the authors of the files in this folder?". This is a security feature. Since you will be creating these folders and files yourself, it is always safe to click "Yes, I trust the authors."
5. Mini Exercise
The best way to get comfortable with a new tool is to start personalizing it. Your first task is to change the look and feel of your editor.
- Click the Extensions icon in the Activity Bar.
- In the search bar that appears, type
theme. - Browse through the list of "Color Themes" and find one you like (e.g., "One Dark Pro," "Material Theme," or "GitHub Theme" are popular).
- Click the "Install" button on a theme you like. VS Code will likely apply it automatically.
- If you install multiple themes, you can switch between them.
VS Code for Absolute Beginners
This video provides a perfect guide for this exercise. It shows you exactly how to find, install, and switch between different color themes and icon themes.
Watch from 16:40 to 19:11. Follow along to install a theme you find visually appealing. This is your workspace, so make it your own!
There's no right or wrong answer here—the goal is simply to get you comfortable navigating the interface to make a change.
6. Checklist Before Moving Ahead
- I have successfully downloaded and installed Visual Studio Code.
- I can identify the five main parts of the UI: Activity Bar, Side Bar, Editor, Panel, and Status Bar.
- I understand that the Explorer view is like a file/layer list.
- I was able to find the Extensions marketplace and install a new color theme.
Conclusion
Great work! You've installed the single most important tool for this course and taken your first steps in navigating its interface. You've set up your digital workshop, and now you know where the main tools are located.
A Look Ahead: In our next lesson, we will install Node.js. You won't be writing any Node.js code, but it's a critical piece of background technology. Think of it as the power supply for our workshop; it runs many of the tools we'll need, from our local development server to the AI code generators we'll use later.