Hello! Welcome back.
In our last lesson, we put the finishing touches on our design system by creating reusable design tokens, components, and variants. This organized structure is the "intelligent blueprint" that will guide our AI code generator.
Today, we'll tackle the final preparation step: getting all our visual assets ready for the web.
1. What We Are Learning
This lesson is all about exporting the images and icons from your Figma design in a way that makes them load fast and look sharp on a live website. You will learn:
- The difference between vector assets (like icons and logos) and raster assets (like photos).
- The correct file formats to use for each: SVG for vectors and WebP for rasters.
- How to export both formats from Figma, using its built-in tools and a simple plugin.
- The importance of naming your asset files correctly.
2. Why This Matters
This is the bridge between your design's visuals and your website's performance. The AI tools we will use generate the code that displays your assets, but they don't optimize the assets themselves. If we feed the AI a 10MB photograph, it will happily build a website that takes ages to load.
Think of it like this: in print design, you need high-resolution images to avoid blurriness. On the web, we need the opposite: the smallest possible file size that still looks great on all screens. This balance is key to a fast, professional website. By optimizing assets before we generate code, we ensure the final product is performant from the start.
There are two main categories of assets we need to handle differently:
- Vector Graphics (Icons & Logos): These are drawings made of mathematical paths. They are infinitely scalable without losing quality. For these, we use the SVG (Scalable Vector Graphics) format.
- Raster Graphics (Photos & Complex Illustrations): These are made of a grid of pixels. For these, we'll use WebP, a modern format that offers fantastic quality at a very low file size.
Let's dive into how to export each type.
3. Step-by-Step Instructions
Part 1: Exporting Vector Icons and Logos as SVG
SVG is the standard for icons and logos because the files are tiny and they can be resized to any dimension without becoming blurry. They can even be styled with code, which is a huge advantage.
First, let's learn about the fundamental image formats for the web and why we're choosing WebP and SVG.
How to Format Images for Your Website: A Figma + WebP
This article, 'How to Format Images for Your Website', gives a great, simple explanation of the different file types. It will help you understand why we choose certain formats for certain jobs.
Please read the section 'Understanding Image Basics', focusing on the subsections 'File Formats Explained Simply' and 'Dimensions vs File Size'. This will clarify why WebP and SVG are our main tools.
Now, let's see the basic process of exporting an SVG from Figma.
Create a Vector Icon & Export as SVG in Figma | Beginner-Friendly Tutorial
This short video demonstrates the basic mechanics of selecting a vector shape and using Figma's export panel to save it as an SVG.
Watch from 01:23 to 02:03. Notice how the user selects the object, navigates to the 'Export' panel on the right, chooses 'SVG' from the dropdown, and saves the file.
While the basic export is simple, there's a crucial step for ensuring your icons can be easily colored by code: Outlining Strokes.
If an icon is drawn with strokes (lines) instead of filled shapes, you must convert those strokes to shapes before exporting. This allows us to dynamically change the icon's color later.
Beyond the Libraries: Mastering Custom SVG for Scalable Frontend ...
This article, 'Mastering Custom SVG', explains the importance of this 'Outline Stroke' rule. It's a key professional practice for preparing icons.
Please read the section 'Securing Your Source — Export from Figma'. Focus on the parts titled 'Precise Artboard Alignment' and the '“Outline Stroke” Rule'.
To summarize the SVG export process:
- Select the icon's frame in Figma. Ensure it's tightly cropped with no extra space.
- Right-click the icon and select "Outline Stroke" (
Shift + Command + O). If the option is grayed out, it means your icon is already made of filled shapes, which is fine. - In the right-hand panel, go to the Export section.
- Click the
+icon, and choose SVG as the format. - Click the "Export..." button and save your file.
Part 2: Exporting Photos as WebP
Figma doesn't export to the modern WebP format by default, so we need a free community plugin. This is very common in developer workflows.
How to Format Images for Your Website: A Figma + WebP
Let's return to the 'How to Format Images' article. This next section will guide you through installing the necessary plugin and using it to resize and export your photos.
Please read through these three sections: 'Installing the WebP Exporter Plugin' 'Resizing Images in Figma' 'Exporting as WebP' Follow the steps to install the plugin (any popular 'WebP exporter' will do). Pay close attention to the concepts of resizing images to a standard width (like 2560px) before exporting and choosing a quality setting (80% is a great starting point).
To summarize the WebP export process:
- Find and install a WebP exporter plugin from the Figma Community.
- Select your photograph in Figma.
- In the Design panel on the right, check its dimensions. If it's a large background image, a good rule of thumb is to set the width to 2560px. Ensure the "constrain proportions" chain link is active so you don't stretch the image.
- Right-click on your canvas > Plugins > find and run your WebP exporter.
- Set the quality to 80% and export the image.
Part 3: Proper File Naming
This last step is simple but critical for organization and clean code.
How to Format Images for Your Website: A Figma + WebP
The final section from our guide covers how to name your files. This might seem trivial, but it has a real impact on code readability and even search engine optimization (SEO).
Read the section 'Naming Your Files Properly' and note the simple rules: descriptive, all lowercase, and using hyphens to separate words.
- Good:
homepage-hero-image.webp,icon-facebook.svg - Bad:
IMG_9872.webp,Final Icon v2.svg
4. What Could Go Wrong
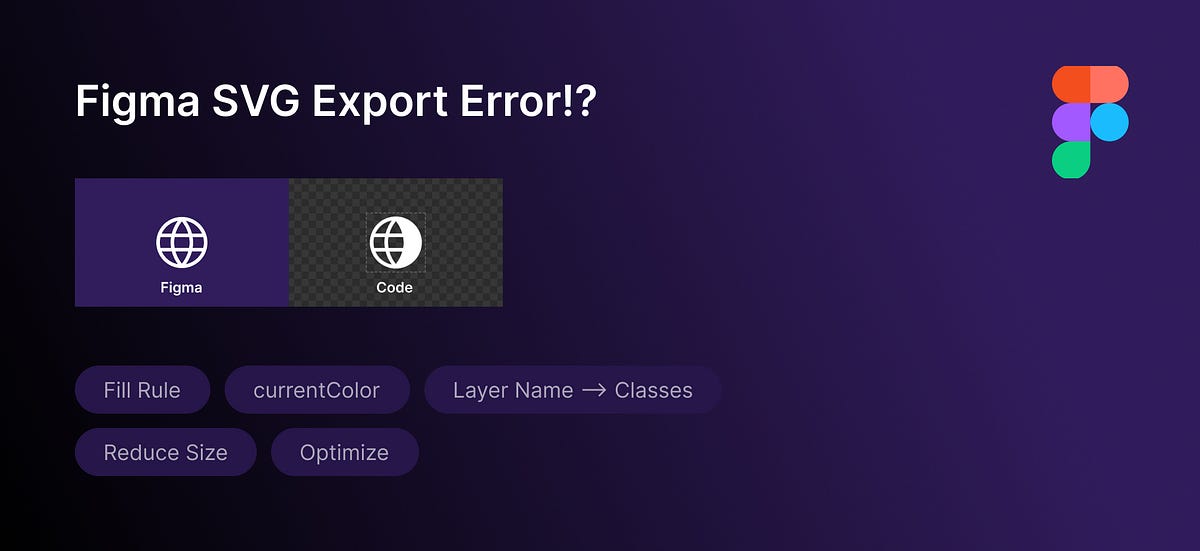
- Problem: "My exported SVG icon is missing parts or has black shapes."
- Cause: This is a classic symptom of strokes that weren't outlined or complex fill rules.
- Solution: Go back to Figma, select the icon, and use Outline Stroke (
Shift + Command + O). Re-export it. The image below shows what this kind of error can look like.
-
Problem: "My exported photo looks blurry or pixelated."
- Cause: You set the export quality too low in the WebP plugin.
- Solution: Export it again, but this time choose a higher quality like 85% or 90%.
-
Problem: "My logo has a white box around it on the website."
- Cause: You saved a logo that needs a transparent background as a JPEG or WebP. These formats don't always handle transparency well.
- Solution: For logos, stick with SVG. If it's a very complex logo that must be a raster format, use PNG, which is specifically designed for transparency.
5. Mini Exercise
Time to apply these concepts. Open a Figma project (either the one we've been working on or a new file).
-
Export an Icon as SVG:
- Find or create a simple icon (e.g., a search magnifying glass or a user profile icon).
- Select its frame. Right-click and choose Outline Stroke.
- Go to the Export panel, choose SVG, and export it with the name
icon-search.svg.
-
Export a Photo as WebP:
- Find a large photo in your design or drag one into Figma from your computer.
- If you haven't already, install a WebP exporter plugin from the Figma Community.
- Select the photo. In the Design panel, resize its width to 1920px (a good size for a content image).
- Run the WebP plugin, set the quality to 80%, and export it as
content-image-team.webp. - Check your work: Find the exported file on your computer and check its file size. Is it under 200KB? If so, great job!
6. Checklist Before Moving Ahead
- I can explain why I should use SVG for icons and WebP for photos.
- I know how to use "Outline Stroke" on an icon before exporting it as an SVG.
- I have installed a Figma plugin for exporting images as WebP.
- I understand why it's important to resize large images before exporting them.
- I have completed the exercise and successfully exported both a properly named
.svgand a reasonably sized.webpfile.
Amazing work! You've now completed all the necessary preparation in Figma. Your design file is no longer just a static picture; it's a highly organized, developer-friendly system ready for translation. The blueprint is drawn, the component library is built, and now all the raw materials (assets) are optimized and ready to go.
A Look Ahead: In our next lesson, we will leave Figma behind and move into the developer's environment. We'll set up the AI tools—GitHub Copilot in our code editor—and prepare to generate our very first lines of code from your impeccably organized design. The exciting part begins now