Hello! Welcome to the next phase of our journey.
In our last few lessons, we meticulously prepared our Figma design. We built a system of design tokens and components, and finally, we optimized and exported all our visual assets like icons and images. Your design file is no longer just a static picture; it's an intelligent, developer-ready blueprint.
Today, we shift our focus from the "what" (the design) to the "how" (the translation process). We're going to peek under the hood of the AI tools that will turn your design into code.
1. What We Are Learning
This lesson is a conceptual deep-dive into how AI code generators work. Our goal is to build a mental model of your new AI assistant, GitHub Copilot. You'll learn:
- How AI tools like GitHub Copilot "think" and interpret your instructions.
- What a "prompt" is and why crafting a good one is a skill.
- The critical role of "context" in getting accurate code.
- The two main ways you will interact with the AI: proactive suggestions and direct conversations.
This lesson's outcome is to explain how AI code generators like GitHub Copilot interpret prompts to create code.
2. Why This Matters
To use any powerful tool effectively, you need to understand its fundamental principles. You can't use Figma well without understanding concepts like frames, constraints, and components. The same is true for AI.
By understanding how the AI interprets your requests, you can give it better instructions, get more predictable results, and avoid common frustrations. This demystifies the process, transforming it from "magic" into a reliable workflow where you are in control. Think of this as learning the theory of mind for your AI assistant.
3. How the AI "Thinks": From Prompt to Code
Let's break down the process step-by-step.
Step 1: The "Brain" - A Large Language Model (LLM)
At the heart of tools like GitHub Copilot is a Large Language Model (LLM).
- Analogy: Imagine an immense digital library that contains almost all the public code ever written from websites like GitHub. The LLM has "read" this entire library and has learned the patterns, structures, and relationships within the code. GitHub Copilot is your super-fast AI librarian. It doesn't "understand" code like a human does; instead, it's an incredibly powerful pattern-matching engine. When you ask it to do something, it finds the most common and relevant patterns from its library and uses them to predict what the code should look like.
Step 2: The "Brief" - Your Prompt
A prompt is simply the instruction you give to the AI. The art of writing effective instructions is called prompt engineering.
- Analogy: As a designer, you know that giving a task to a junior designer requires a good brief. If you just say, "make a hero section," the result will be unpredictable. But if you say, "Create a hero section with a title, a subtitle, a call-to-action button, and a background image," you provide a clear path to a usable result. A prompt is a brief for your AI.
This diagram illustrates the key ingredients that go into a well-structured prompt.

Let's explore this concept from a designer's perspective.
Prompt engineering for designers: a practical guide
This article, 'Prompt engineering for designers', is written specifically for a design audience and does an excellent job of explaining the core ideas. It introduces the anatomy of a good prompt using the same junior designer analogy.
Please read the first two main sections: 'What prompt engineering is and what it is not' and 'Anatomy of a good prompt'. Focus on how clarity, context, and specificity in your request lead to better results.
Step 3: The "Secret Sauce" - Context
The AI doesn't just look at your prompt in isolation. It uses context to make its predictions more accurate. Context includes:
-
The code in your currently open file.
-
The names of your files (e.g.,
contact-page.html). -
The code you have highlighted.
-
Other files you have open in your editor.
-
The history of your conversation in a chat window.
-
Analogy: When you ask a colleague for feedback, they don't just listen to your question. They look at the Figma file you have open, the specific frame you're pointing at, and they remember the design problem you were discussing five minutes ago. The AI uses the files and code in your editor in the same way.
Watch this short clip to see a simple example of context in action.
Getting started with GitHub Copilot | Tutorial
In this clip from a GitHub tutorial, notice how the AI suggests code for email validation simply because the user named the file 'validate.py'. This is a perfect, basic example of how the AI uses context.
Watch from 06:26 to 07:41. See how the filename and a single line of code provide enough context for Copilot to generate a relevant code block.
Step 4: The "Conversation" - Two Ways to Interact
You'll primarily "talk" to Copilot in two ways, and it's useful to know when to use each.
-
Inline Suggestions ("Ghost Text"): This is the AI proactively helping as you type. It sees what you're writing and suggests the next few lines of code as greyed-out text. You can press
Tabto accept it.- Analogy: This is like Figma's autocomplete for design tokens. As you start typing
color-, it might suggestcolor-primary-500.
- Analogy: This is like Figma's autocomplete for design tokens. As you start typing
-
Copilot Chat: This is a direct, conversational interface. You open a chat panel and write a specific command, like "Create an HTML form with fields for name, email, and a message."
- Analogy: This is like having a direct conversation with your junior designer, giving them a specific task to complete.
The following video and image demonstrate these two modes clearly.
GitHub Copilot 101 - Essential features | Tutorial
This tutorial, 'GitHub Copilot 101', shows both interaction styles in practice. It will help you visualize the difference.
First, watch from 00:56 to 02:17 to see 'ghost text' (inline suggestions) being generated from a comment. Then, jump to 03:06 to 04:00 to see how a more complex request is handled using the Copilot Chat panel.
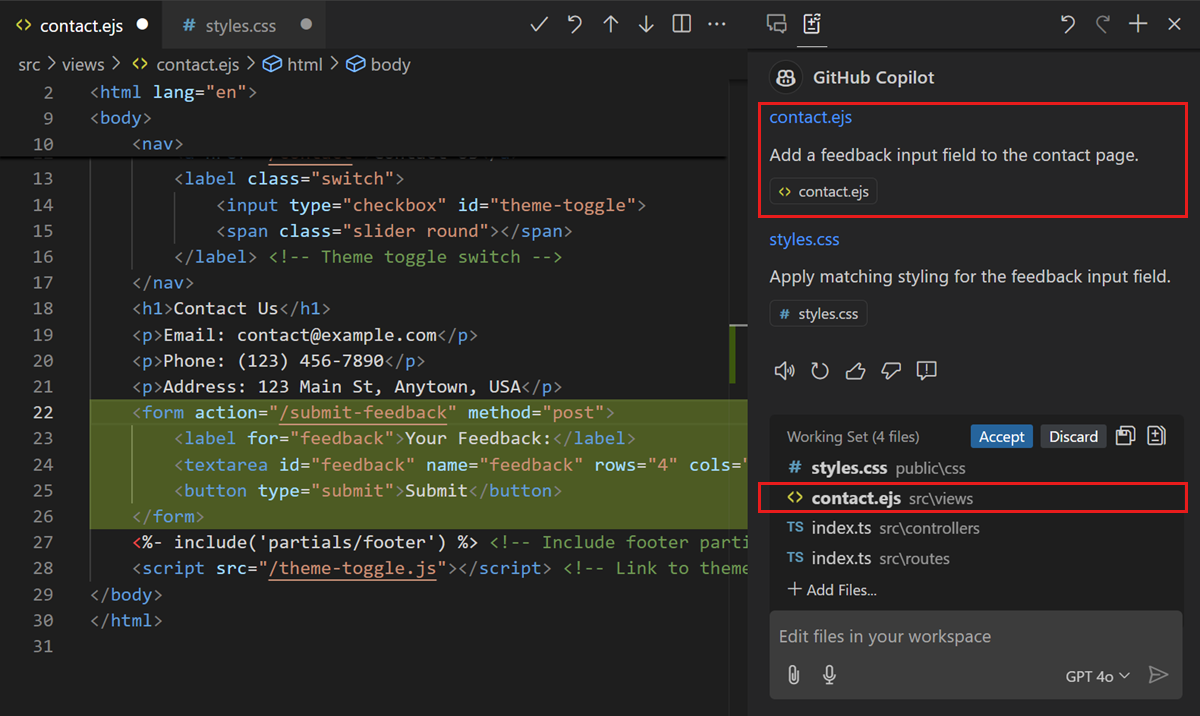
4. What Could Go Wrong (Common Misconceptions)
-
Misconception: "The AI understands what I mean to do."
- Reality: It only understands what you write. It's a literal machine. Vague prompts lead to generic or incorrect code. Your skill is in providing a clear, specific brief.
-
Misconception: "I got a different result than last time for the same prompt."
- Reality: This is normal and expected! LLMs are non-deterministic, meaning there's a controlled element of randomness. Think of it as asking two different designers the same request; you'll get two valid but distinct solutions. You can always ask it to try again if you don't like the first result.
-
Misconception: "The AI will always write perfect, bug-free code."
- Reality: The AI is an assistant. You are the senior professional in charge. You must always review, test, and approve its work, just as you would review the work of a junior designer.
5. Mini Exercise (Mental Model Check)
This is a thought exercise to check your understanding. No coding required!
Imagine you have an empty index.html file open in your code editor. You then type the following line of code (which is an HTML comment):
<!-- Create a simple header with a logo and three navigation links: Home, About, and Contact -->
Now, consider these questions:
- What do you think GitHub Copilot's inline "ghost text" suggestion would look like? Describe the kind of HTML elements you'd expect to see. (e.g.,
<header>,<img>,<nav>). - What is the most important piece of context the AI is using to generate its suggestion?
- What's a piece of context that is missing? What other information could you provide (perhaps in a follow-up prompt) to get a more accurate result?
Take a moment to think through your answers before checking them below.
- Answer 1: You'd expect to see an HTML structure like a
<header>tag containing an<img>tag for the logo and a<nav>tag. Inside the<nav>, you would likely see a<ul>(unordered list) with three<li>(list item) elements, each containing an<a>(anchor/link) tag with the text "Home," "About," and "Contact." - Answer 2: The most important piece of context is the HTML comment you wrote. It's the direct instruction.
- Answer 3: Missing context includes the actual filename for the logo (
logo.svg?), the specific pages the links should point to (/about.html?), and any styling information (e.g., "the links should be on the right side"). Providing this would result in much better code.
6. Checklist Before Moving Ahead
- I can explain that an AI code generator is a pattern-matching tool (an LLM), not a "thinking" brain.
- I can describe a "prompt" using the analogy of a creative brief for a junior designer.
- I can list at least two examples of "context" that the AI uses to generate code (e.g., open files, comments).
- I understand the difference between proactive inline suggestions and having a direct conversation in a chat window.
- I understand that the AI's output needs to be reviewed and is not always perfect or consistent.
Excellent work. You now have the foundational mental model for how to work effectively with your AI coding partner. You understand that it's a powerful but literal tool that responds to clear instructions and context.
A Look Ahead: In our next lesson, we'll get hands-on. We will create an OpenAI account to get our "API key" (the key to the AI's library) and then install and configure GitHub Copilot right inside your code editor, VS Code. The setup begins