In our last lesson, we explored how Stateless Address Autoconfiguration (SLAAC) allows devices to join a network automatically. We now shift our focus from this automated process to one that gives you precise, manual control over how traffic flows.
This lesson addresses how to configure and verify IPv6 static routes. Just as with IPv4, static routes are essential for telling a router how to reach networks that are not directly connected. You will learn to configure the three primary types of static routes: default routes for general traffic, network routes for specific subnets, and host routes for individual devices. We will also explore the different ways to specify the path, which is a crucial skill for building stable and predictable networks.
The Foundation of IPv6 Routing
Before a router can forward any IPv6 packets between different networks, two things must be true:
- The global command
ipv6 unicast-routingmust be enabled. As we saw in previous lessons, this command activates the entire IPv6 routing process on the device. - The router must have a path to the destination network in its IPv6 routing table, which you can view with
show ipv6 route.
While we previously saw how a default route can be learned automatically via SLAAC, static routing involves manually creating these entries. This provides explicit control but requires manual updates if the network topology changes.
The video below offers an excellent introduction to IPv6 static routing. It clarifies how IPv6 routing, while conceptually similar to IPv4, operates as a separate process with its own routing table. It also introduces the different ways a static route can be defined.
Free CCNA | IPv6 Part 3 | Day 33 | CCNA 200-301 Complete Course
This video from Jeremy's IT Lab covers the fundamentals of IPv6 static routing, from enabling the feature to the different syntaxes used for configuration.
Please watch the following segments: Introduction to IPv6 Static Routing (from 22:32 to 23:53): This section serves as a good reminder of the ipv6 unicast-routing command. Routing Table Buildup (from 24:12 to 25:32): Observe how connected and local routes are automatically populated, just as they are in IPv4. Command Syntax (from 25:40 to 26:43): Pay close attention to the breakdown of the ipv6 route command structure. Route Types (from 26:43 to 28:57): This segment explains the key differences between directly attached, recursive, and fully specified static routes. Ethernet Caveat (from 29:09 to 29:59): This is a critical point specific to IPv6—directly attached static routes are not functional on Ethernet interfaces.
Methods for Defining a Static Route
As the video explained, there are three primary ways to define an IPv6 static route based on what information you provide about the next hop.
-
Recursive Static Route: You specify only the next-hop router's Global Unicast Address (GUA). The router must perform a recursive lookup—a second search in its routing table—to find which interface to use to reach that next-hop address.
ipv6 route 2001:DB8:0:3::/64 2001:DB8:0:12::2 -
Directly Attached Static Route: You specify only the local router's outgoing interface. As noted, this method is suitable for point-to-point links (like a serial interface) but will not work on multi-access media like Ethernet for IPv6. The router will accept the command but will not forward packets.
ipv6 route 2001:DB8:0:3::/64 Serial0/0/0 -
Fully Specified Static Route: You specify both the outgoing interface and the next-hop address. This is the most explicit and often recommended method, as it avoids the recursive lookup and works reliably on all interface types, including Ethernet.
ipv6 route 2001:DB8:0:3::/64 GigabitEthernet0/0 2001:DB8:0:12::2
A special consideration arises when using a link-local address (LLA) as the next hop. Because LLAs are only unique on their specific link, you must use a fully specified route that includes the outgoing interface. The router cannot determine which interface to use from the LLA alone.
Free CCNA | IPv6 Part 3 | Day 33 | CCNA 200-301 Complete Course
This short segment from the same video specifically addresses the requirement for a fully specified route when using a link-local next-hop.
Please watch the explanation from 32:31 to 33:20.
The following reading provides a helpful table summarizing these methods and shows detailed configuration examples.
This article from NetworkAcademy.IO provides a concise summary of the different types of static routes and detailed explanations for the most common configuration methods.
Start by reviewing the table, which neatly summarizes the different configuration types. Then, read through "Method 1", "Method 2", and "Method 3" to see the command syntax for configuring fully specified and recursive routes using both link-local and global unicast next-hop addresses.
Configuration and Verification in Practice
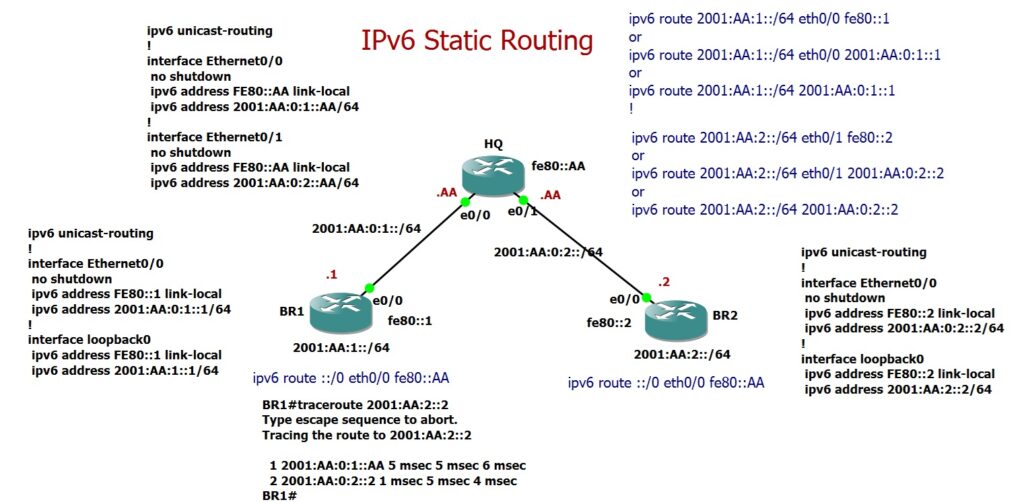
Now let's apply these concepts to configure the three main categories of static routes: network, default, and host. The following image provides a complete topology that we can refer to.
1. Network Route
A network route directs traffic destined for an entire subnet (e.g., a /64 prefix). In the topology above, to enable communication between the loopback networks on BR1 and BR2, the HQ router needs routes to both.
On HQ, to reach BR2's loopback network 2001:AA:2:2::/64, you could configure a fully specified route pointing to BR2's GUA on the connecting link:
HQ(config)# ipv6 route 2001:AA:2:2::/64 Ethernet0/1 2001:AA:0:2::2
Alternatively, using BR2's link-local address (fe80::2) as the next hop is also very common:
HQ(config)# ipv6 route 2001:AA:2:2::/64 Ethernet0/1 fe80::2
2. Default Route
A default route (::/0) is a catch-all that matches any destination not explicitly found in the routing table. It's often used on edge or branch routers to forward all outbound traffic to a central location or an ISP.
The following diagram illustrates a classic scenario where a Branch router uses a default route to send all traffic to the HQ router, which handles connectivity to the broader internet.
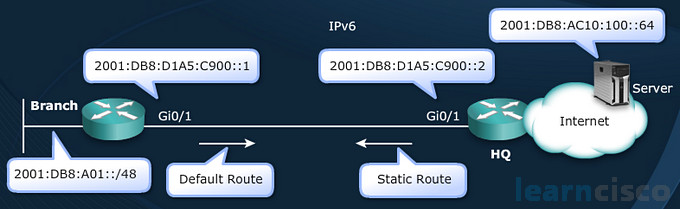
To configure a default route on the Branch router pointing to HQ's address 2001:DB8:D1A5:C900::2, the command would be:
Branch(config)# ipv6 route ::/0 2001:DB8:D1A5:C900::2
3. Host Route
A host route is a route to a single IPv6 address, specified with a /128 prefix length. This is useful for directing traffic to a specific server or critical device with maximum precision.
For example, to create a route on R1 specifically to the host 2001:DB8:2:2::2, you would use:
R1(config)# ipv6 route 2001:DB8:2:2::2/128 2001:DB8:12:12::2
The following article walks through clear, step-by-step examples for configuring each of these three route types.
How to configure IPv6 Static Route
This guide from NetworkLessons.com provides practical examples for configuring static network, default, and host routes, showing the syntax for all three next-hop specification methods (outgoing interface, GUA, and LLA).
Please read through the following sections: Static route for a prefix Static default route Static host route Focus on how the ipv6 route command is adapted for each use case.
Verification
Once configured, verification is a two-step process:
-
Check the routing table: Use
show ipv6 route staticorshow ipv6 routeand look for an entry beginning withS. This confirms the route is installed. The entry will show the destination prefix, administrative distance/metric[1/0], the next hop, and sometimes the outgoing interface.R1# show ipv6 route ... S 2001:AA:2:2::/64 [1/0] via FE80::2, Ethernet0/1 -
Test connectivity: Use
pingandtraceroutewith IPv6 addresses to confirm end-to-end reachability. As shown in the "IPv6 Static Routing Configuration Example" image, thetraceroute 2001:AA:2:2::2command from BR1 successfully shows the path through HQ to BR2.
A Note on Floating Static Routes
What if you have a backup path you only want to use if the primary path fails? This is achieved with a floating static route. It's a regular static route configured with a higher Administrative Distance (AD). Since routers prefer routes with the lowest AD, this backup route "floats" above the primary route and is only installed in the routing table if the primary route disappears.
You can set the AD by adding a number at the end of the command:R1(config)# ipv6 route 2001:DB8:0:3::/64 2001:DB8:0:13::3 210
Here, the AD of 210 makes this route less preferred than a route learned via a dynamic protocol like OSPF (AD 110) or another static route with the default AD of 1.
Conclusion
In this lesson, you have moved from automated configuration to manual, explicit path control in IPv6. By mastering static routing, you gain the ability to precisely dictate how traffic traverses your network, a foundational skill for any network engineer.
Key Takeaways:
- IPv6 static routing is configured with the
ipv6 routecommand, which requiresipv6 unicast-routingto be enabled globally. - You can create network routes (
/64), default routes (::/0), and host routes (/128). - Routes can be specified in three ways: recursive (next-hop GUA only), directly attached (interface only, not for Ethernet), or fully specified (interface and next-hop).
- When using a link-local address (LLA) as the next hop, you must also specify the outgoing interface.
- Verification involves
show ipv6 routeto check the table andping/tracerouteto test connectivity. - A floating static route uses a higher administrative distance to create a backup path.
Our next lesson will build on this foundation by exploring how networks can learn routes automatically. We will configure OSPFv3, the primary link-state dynamic routing protocol used for IPv6, allowing routers to discover topology and calculate the best paths without manual intervention.