Welcome to the first lesson in our module on dynamic IPv6 routing. In our previous work, you mastered the art of manual path control by configuring IPv6 static routes. This gave you precise, explicit command over traffic flow. Now, we will pivot to a more scalable and automated approach by exploring dynamic routing, where routers intelligently discover the network topology on their own.
This lesson focuses on configuring OSPFv3 (Open Shortest Path First version 3), the primary link-state routing protocol for IPv6 networks. You will learn the fundamental steps to enable single-area OSPFv3 on Cisco routers, a core skill for managing modern networks. We will cover the key differences from its IPv4 counterpart, OSPFv2, and explore the modern, interface-centric configuration model that makes OSPFv3 both powerful and efficient.
OSPFv3: Key Concepts and Differences
While OSPFv3 serves the same purpose as OSPFv2—to build a loop-free topology map and calculate the shortest path to all destinations—it was redesigned specifically for IPv6. This introduces a few critical distinctions.
1. The Router ID (RID)
Perhaps surprisingly, OSPFv3 still uses a 32-bit number in dotted-decimal format (like an IPv4 address) for its Router ID. The RID must be unique for each router within the OSPF domain. In a pure IPv6 environment where no IPv4 addresses are configured, the router cannot automatically generate an RID. Therefore, it is essential to either manually configure the RID or ensure the router has a configured IPv4 address (typically on a loopback interface) from which to derive it.
The following video segment explains this concept and demonstrates the best practice of creating a loopback interface to serve as a stable source for the RID.
FREE CCNA Lab 057: OSPFv3 for IPv6
This clip from Jeremy's IT Lab explains why an IPv4-formatted Router ID is still necessary in OSPFv3 and how to configure loopback interfaces to provide them.
Please watch the section covering Router IDs and loopbacks. Notice how an IPv4 address is configured on the loopback interface solely for the purpose of generating the RID.
2. Interface-Centric Configuration
The most significant operational difference from OSPFv2 is the removal of the network command. Instead of defining which networks to advertise from the global OSPF configuration mode, OSPFv3 is enabled directly on each interface that should participate in the routing process. This makes the configuration more explicit and less prone to errors from incorrectly defined network statements. All IPv6 prefixes configured on an active OSPFv3 interface are advertised automatically.
Configuring Single-Area OSPFv3
The configuration process is logical and straightforward. It involves initializing the OSPFv3 process globally and then activating it on the desired interfaces. Let's use the topology below as our reference.
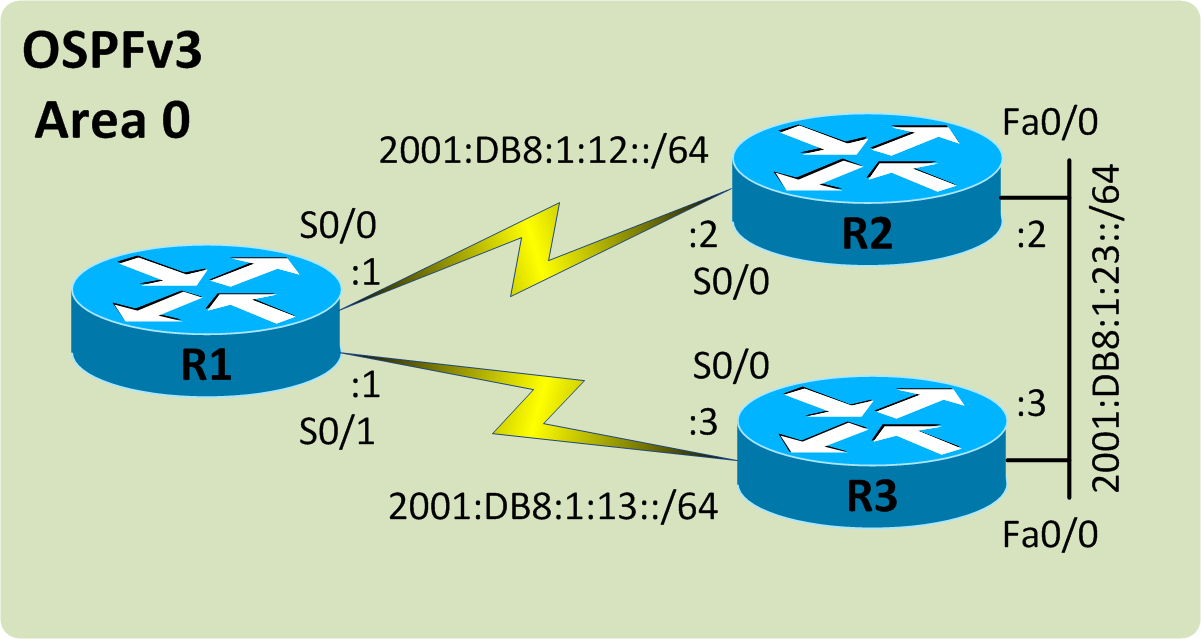
The following guide provides a detailed, step-by-step lab for configuring this exact topology. We will focus on the core configuration part.
8.3.3.6 Lab - Configuring Basic Single-Area OSPFv3 Answers
This lab from ITExamAnswers.net walks through the entire process of setting up a single-area OSPFv3 network. We'll concentrate on the OSPFv3-specific commands.
Please read through Part 2: Configure OSPFv3 Routing. Pay close attention to these two steps: Step 1, which shows how to create the OSPFv3 process and manually assign the router ID. The command is ipv6 router ospf <process-id>. Step 2, which demonstrates the crucial interface-level command: ipv6 ospf <process-id> area <area-id>.
To summarize the process from the reading:
- Enable IPv6 Unicast Routing:
R1(config)# ipv6 unicast-routing - Start the OSPFv3 Process and Set the RID:
R1(config)# ipv6 router ospf 1
R1(config-rtr)# router-id 1.1.1.1
(The process ID1is locally significant and does not need to match on other routers.) - Enable OSPFv3 on Interfaces:
R1(config)# interface Serial0/0/0
R1(config-if)# ipv6 ospf 1 area 0
R1(config-if)# interface Serial0/0/1
R1(config-if)# ipv6 ospf 1 area 0
You would repeat this process on R2 and R3 with their respective router IDs and interfaces. Once the interfaces sharing a link are both configured for the same OSPFv3 area, they will attempt to form a neighbor adjacency and exchange routing information.
Passive Interfaces: Securing and Optimizing OSPF
You don't want your routers sending OSPF Hello packets into your LAN, where there are no other routers to form adjacencies with. Doing so is inefficient and a potential security risk. The passive-interface command prevents OSPF packets from being sent out of a specified interface, while still allowing the network on that interface to be advertised to other routers.
This is typically configured on all LAN-facing interfaces (like GigabitEthernet0/0 in our example topology).
8.3.3.6 Lab - Configuring Basic Single-Area OSPFv3 Answers
This section of the same lab guide explains the purpose and configuration of passive interfaces in OSPFv3.
Please read through Part 3: Configure OSPFv3 Passive Interfaces. Focus on the two methods presented: Configuring a single interface as passive using passive-interface G0/0. Making all interfaces passive by default with passive-interface default and then selectively enabling interfaces with no passive-interface. This is a common practice for enhanced security.
An Alternative: The Address Family Approach
Modern Cisco IOS offers a more integrated way to configure OSPFv3, known as the address family approach. This allows a single OSPFv3 process to handle routing for both IPv4 and IPv6 simultaneously. For a network engineer familiar with both protocol stacks, this can simplify administration by consolidating routing configurations.
While our current focus is purely on IPv6, understanding this modern alternative is valuable. The configuration is slightly different, using router ospfv3 <id> to start the process and then entering address-family sub-configuration modes.
2 Ways to Configure OSPF for IPv6 on Cisco Routers
This video by Kevin Wallace Training demonstrates the powerful OSPFv3 address family feature, which unifies IPv4 and IPv6 routing under a single process.
Watch the segment from 04:57 to 08:19 to see how this works. Notice the structure: A main router ospfv3 1 process is created. address-family ipv4 and address-family ipv6 sub-modes are used. Commands like passive-interface can be applied globally to affect both families. Interfaces are enabled using a slightly different command: ospfv3 <process-id> ipv4 area 0 or ospfv3 <process-id> ipv6 area 0.
This method is a powerful tool in dual-stack environments and showcases the evolution of router operating systems.
Conclusion
In this lesson, you have learned the essential steps to configure single-area OSPFv3 for IPv6. We have moved beyond the manual world of static routes into the automated domain of dynamic routing protocols. You now understand the fundamental configuration model of OSPFv3 and how it differs from its predecessor.
Key Takeaways:
- OSPFv3 is the standard link-state protocol for IPv6, but it still relies on a 32-bit Router ID in IPv4 format, which must be configured manually in a pure IPv6 network.
- The configuration is interface-centric. The
networkcommand is gone; instead, you enable OSPF directly on interfaces using theipv6 ospf <process-id> area <area-id>command. - Using passive interfaces on LAN segments is a critical best practice for efficiency and security.
- Modern IOS offers an address family configuration model that can manage both IPv4 and IPv6 routing within a single OSPFv3 process, simplifying administration in dual-stack networks.
In our next lesson, we will shift our focus from configuration to verification. You will learn how to use a suite of show commands to confirm that OSPFv3 neighbor adjacencies have formed correctly and that your IPv6 routing table is being populated with dynamically learned routes.