In our last session, you successfully configured single-area OSPFv3, taking a significant step from manual static routing to automated, dynamic route discovery. Having set up the protocol, the next logical and crucial step is verification. A network engineer's mantra is "trust, but verify," and in this lesson, you will master the commands to do just that.
Today, we will focus on confirming that your OSPFv3 configuration is operating as intended. You will learn how to use a suite of show commands on a Cisco router to inspect the OSPFv3 process, validate that neighbor adjacencies have been successfully formed, and check that IPv6 routes are being correctly learned and installed in the routing table. This process of verification is fundamental to both deploying and troubleshooting any routing protocol.
Initial Verification: Is OSPFv3 Running Correctly?
Before diving into neighbor relationships and routes, your first step should always be to confirm that the OSPFv3 process is active and configured on the correct interfaces. Two commands are essential for this initial check.
The show ipv6 protocols command provides a high-level summary of all IPv6 routing protocols running on the router. It's the quickest way to see if OSPFv3 is enabled, its process ID, its Router ID, and which interfaces are participating.
The show ipv6 ospf interface brief command gives a concise, tabular view of every interface on which OSPFv3 is enabled. This is an extremely useful command for quickly assessing the status of all your OSPF-enabled links at a glance.
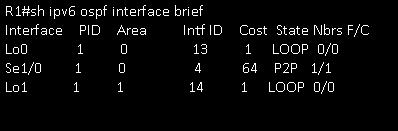
In the image above, you can see:
- The
Se1/0interface is in Area 0, has a cost of 64, and is in aP2P(Point-to-Point) state. - Crucially, the
Nbrs F/Ccolumn shows1/1, meaning it has one neighbor, and that neighbor is in theFULLadjacency state. This is exactly what you want to see. - The
Lo0andLo1loopback interfaces have0/0neighbors, which is expected as they are not connected to other routers.
Verifying Neighbor Adjacencies
For two OSPFv3 routers to exchange routing information, they must first form a neighbor adjacency. This process involves exchanging Hello packets to discover each other and then proceeding through several states until they are fully synchronized. The goal is to reach the FULL state.
The primary command to check this is show ipv6 ospf neighbor. The following video provides a practical demonstration of using verification commands, including the neighbor check.
FREE CCNA Lab 057: OSPFv3 for IPv6
This clip from Jeremy's IT Lab walks through the essential commands to verify an OSPFv3 configuration.
Please watch the segment from 06:20 to 07:22. The instructor demonstrates show ipv6 protocols, show ipv6 ospf, and most importantly, show ipv6 ospf neighbor. Pay close attention to the output of the neighbor command and the information it provides.
As you saw in the video, the show ipv6 ospf neighbor command provides critical details:
- Neighbor ID: The Router ID of the neighboring router.
- Pri: The OSPF priority of the neighbor's interface, used for DR/BDR election.
- State: The adjacency state.
FULLis the desired state for a successful adjacency. On Ethernet links, you will see suffixes like/DR,/BDR, or/DROTHER. - Dead Time: A countdown timer. If no Hello packet is received from the neighbor before this timer expires, the adjacency is torn down.
- Interface: The local router interface through which this neighbor is reachable.
If you don't see a neighbor that you expect, or if the state is stuck in something other than FULL (like INIT or 2-WAY), it points to a problem like mismatched OSPF area IDs, mismatched timers, or a firewall blocking OSPF packets (which use multicast address FF02::5).
Verifying the IPv6 Routing Table
Once routers have formed a full adjacency, they exchange Link-State Advertisements (LSAs) to build a complete map of the network. The router then runs the Shortest Path First (SPF) algorithm to calculate the best route to each destination and install it in the IPv6 routing table.
To see the fruits of this labor, you will use the show ipv6 route ospf command. This filters the routing table to show only the routes learned via OSPF.
The following reading from Cisco Press provides excellent examples of the key verification commands and their outputs.
Open Shortest Path First Version 3 (OSPFv3) - Cisco Press
This article provides a comprehensive look at the commands used to verify an OSPFv3 configuration, complete with sample outputs from a multi-router topology.
Please read the entire section titled OSPFv3 Verification. As you read, focus on the sample outputs for these three commands: show ospfv3 ipv6 neighbor: Note the output details for R3, which has two neighbors in a FULL state. show ospfv3 interface brief: Observe how this gives a quick summary for all of R3's interfaces. show ipv6 route ospf: This is the final validation. Pay special attention to the line via FE80::2, GigabitEthernet0/2. This highlights a key aspect of OSPFv3: the next-hop address for a learned route is the neighbor's link-local address.
Let's break down an entry from the show ipv6 route ospf output:
O 2001:DB8::2/128 [110/1] via FE80::2, GigabitEthernet0/2
O: The route was learned via OSPF (intra-area). You might also seeOIfor inter-area routes.2001:DB8::2/128: The destination IPv6 prefix.[110/1]: The first number, 110, is the Administrative Distance (AD) for OSPF. The second number, 1, is the metric or cost of the route.via FE80::2: The next-hop address to reach the destination. As noted in the reading, OSPFv3 uses link-local addresses for next-hop resolution on multi-access and point-to-point links.GigabitEthernet0/2: The exit interface on the local router to forward packets toward the destination.
The following video further reinforces this process, showing how to check the routing table and confirm connectivity.
Cisco CCNA Packet Tracer Ultimate labs: OSPFv3 IPv6 Lab. Answers Part 1
In this video, David Bombal configures two routers and then systematically verifies the results, including the final check of the routing table and end-to-end connectivity.
Watch these two segments: First, watch from 05:44 to 06:08 where he checks the neighbor status with show ipv6 ospf neighbor before the second router is configured, showing an empty table. Then, skip to 08:19 to 09:47. Here, after configuring the second router, he re-checks the neighbor table, sees the FULL state, and then uses show ipv6 route to find the OSPF-learned route. He makes the excellent point of correlating the link-local next-hop address to the neighbor's interface.
Conclusion
You have now learned the essential workflow for verifying an OSPFv3 deployment. This process moves from a high-level check of the protocol's status down to the specifics of neighbor states and the final routing table entries. Mastering these show commands is non-negotiable for any network engineer working with dynamic routing.
Key Takeaways:
- Start verification with
show ipv6 protocolsto ensure OSPFv3 is running. - Use
show ipv6 ospf interface brieffor a quick, comprehensive view of all OSPF-enabled interfaces and their neighbor counts. - The
show ipv6 ospf neighborcommand is critical for confirming adjacencies. The desired state isFULL. - The final proof of success is in the routing table. Use
show ipv6 route ospfto confirm that routes are being learned. - A key characteristic of OSPFv3 is its use of link-local addresses as the next-hop for routes learned from neighbors on shared segments.
In our next lesson, we will put this knowledge to the test. We will begin troubleshooting common IPv6 connectivity issues, using tools like ping and traceroute for IPv6 to diagnose and resolve problems when the verification steps you learned today reveal an issue.