Welcome to our next lesson. In our last session, we explored the Neighbor Discovery Protocol (NDP), focusing on how Router Advertisement (RA) messages allow routers to announce their presence and share network details. Today, we'll harness that mechanism to achieve one of IPv6's most powerful features.
This lesson focuses on Stateless Address Autoconfiguration (SLAAC). You will learn how a client device can automatically generate its own globally unique IPv6 address using the information provided by a local router, without needing a state-tracking server like DHCP. By the end of this session, you'll be able to configure a Cisco router to enable SLAAC on a client-facing interface and verify that a client has successfully autoconfigured its address.
What is "Stateless" Autoconfiguration?
Before we dive into the process, it's important to understand the term "stateless." In the context of address assignment, it means that no central server keeps a record, or "state," of which device has been assigned which address.
- Stateful Assignment (like DHCP): A server maintains a database of available addresses, leases addresses to clients for a specific duration, and tracks every assignment.
- Stateless Assignment (SLAAC): Each client is responsible for creating its own address based on a network prefix advertised by a router. The router doesn't track which client uses which specific address. This approach is designed for simplicity and scalability.
The SLAAC Process: A Step-by-Step Guide
The SLAAC process is a direct application of the NDP functions we covered previously. When an IPv6-enabled client device joins a network, it performs the following steps to acquire a global unicast address (GUA):
- Generate a Link-Local Address: The client first creates a link-local address (in the
FE80::/10range) to communicate on the local segment. As we've seen, this is often done using the EUI-64 method, which derives the address from the interface's MAC address. - Perform DAD: The client runs Duplicate Address Detection (DAD) by sending a Neighbor Solicitation to its own new link-local address to ensure it's unique on the link.
- Send a Router Solicitation (RS): Now able to communicate locally, the client sends an RS message to the all-routers multicast address (
FF02::2), asking for network information. - Receive a Router Advertisement (RA): A router on the link responds with an RA message. This RA contains the network prefix (e.g.,
2001:DB8:ACAD::/64) and flags indicating the available addressing methods. For basic SLAAC, the 'A' (Autoconfiguration) flag for the prefix will be set. - Construct the Global Unicast Address: The client takes the
/64prefix from the RA and appends its own 64-bit interface ID (the same one it likely used for its link-local address) to form a complete 128-bit GUA. - Perform DAD Again: The client performs DAD on its newly created GUA to confirm its uniqueness before starting to use it for global communication.
The following diagram illustrates this interaction. The router sends an RA containing the network prefix, and the client host combines this prefix with its own interface identifier to create its address.
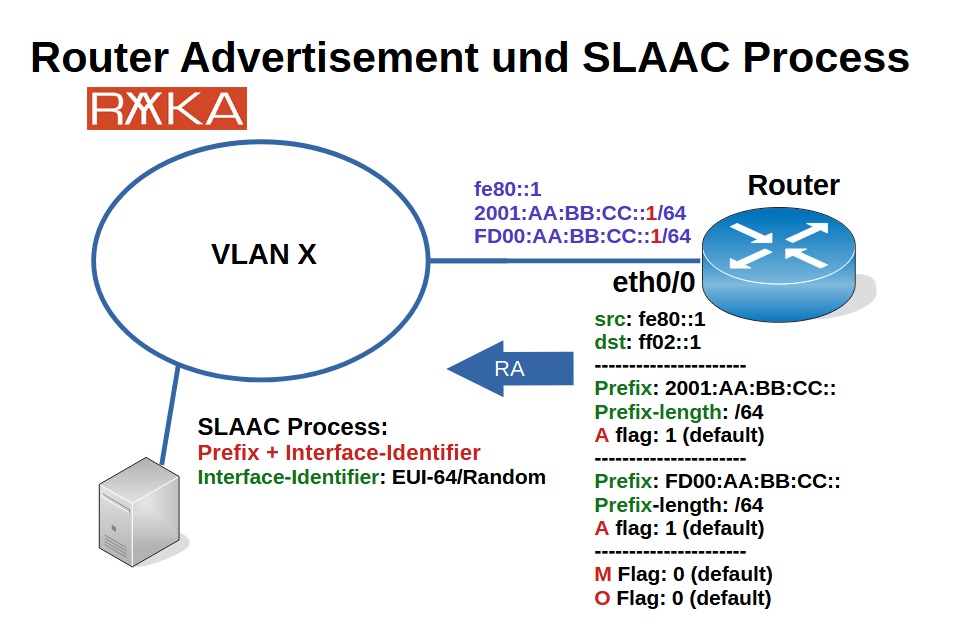
For a more detailed textual walkthrough of this sequence, the following reading is highly recommended.
IPv6 Stateless Address Auto-configuration (SLAAC)
This article from NetworkAcademy.IO provides a clear, five-step explanation of the entire SLAAC process, from generating a link-local address to performing DAD on the final global unicast address.
Please read the section How does SLAAC work?. Pay close attention to how the client uses RS and RA messages to learn the prefix and then combines it with its interface ID.
A common method for a client to generate its 64-bit interface ID is EUI-64. This process converts the interface's 48-bit MAC address into a 64-bit ID by inserting the hex value FFFE in the middle and flipping the 7th bit. The following video demonstrates this, then shows the full SLAAC process in action using Packet Tracer.
IPv6 SLAAC and EUI-64 Basics in Packet Tracer
This video from danscourses first explains how a PC automatically generates its interface ID from a MAC address using EUI-64 and then demonstrates the live RS/RA exchange that constitutes the SLAAC process.
First, watch the segment from this point, where the presenter shows how the PC's link-local address is derived from its MAC address via EUI-64. Next, watch from this section to see the core of the process. You'll see the PC send an RS message and receive an RA, then automatically form its full global IPv6 address.
Configuring and Verifying SLAAC on Cisco IOS
Now, let's put this into practice. To enable SLAAC for clients, you don't configure SLAAC itself; rather, you configure the router's interface to provide the necessary information via Router Advertisements.
The setup is surprisingly simple. For a router to send RAs that enable SLAAC, two conditions must be met:
- IPv6 routing must be enabled globally on the router.
- The client-facing interface must have a global unicast IPv6 address configured.
Let's imagine a topology where Router R1 is connected to R2. R1 will act as the network's gateway, and R2 will act as a client host.
On the Router (R1):
First, enable IPv6 routing. This command "activates" the IPv6 protocol stack for routing and enables the sending of RAs.
R1(config)# ipv6 unicast-routing
Next, configure the interface connected to the client network with a global unicast address. This defines the prefix that will be advertised to clients.
R1(config)# interface GigabitEthernet0/1
R1(config-if)# ipv6 address 2001:DB8:A:1::1/64
R1(config-if)# no shutdown
That's it for the router side. By default, with ipv6 unicast-routing on and an address configured, the router will automatically start sending RA messages on that interface, advertising the 2001:DB8:A:1::/64 prefix.
On the Client (R2):
To make R2 act as a client and use SLAAC, you use the autoconfig keyword.
R2(config)# interface GigabitEthernet0/1
R2(config-if)# ipv6 address autoconfig
R2(config-if)# no shutdown
R2 will now perform the SLAAC process we described: send an RS, receive the RA from R1, and generate its own GUA.
The following image perfectly summarizes this lab setup and the expected output.

Verification Commands
After configuring the client, you can verify its operation:
-
Check the Interface: Use
show ipv6 interfaceon the client (R2) to see the automatically configured address. You should see a global unicast address that starts with the prefix from R1 (2001:DB8:A:1::) and ends with an interface ID generated by R2 (likely via EUI-64). The output will explicitly state "Stateless address autoconfig enabled". -
Check the Routing Table: Use
show ipv6 routeon the client (R2). You should see a default route (::/0) pointing to the link-local address of the advertising router (R1). The client learned this automatically from the RA message, establishing R1 as its default gateway.
IPv6 Stateless Address Auto-configuration (SLAAC)
This section provides the exact Cisco IOS commands needed to enable SLAAC from the router's perspective and the show ipv6 interface command to verify the parameters being advertised.
Read the section Configuring SLAAC on Cisco routers. It reinforces the two key configuration steps on the router and shows you what to look for in the verification output.
The DNS Problem and Modern Solutions
There is a classic drawback to pure SLAAC: it does not provide clients with the IP address of a DNS server. Without DNS, a user cannot resolve domain names like www.cisco.com to an IP address.
Originally, this was solved using flags in the RA message:
- M flag (Managed):
M=1tells the client to get its address and all other info from a stateful DHCPv6 server (ignoring SLAAC). - O flag (Other):
M=0, O=1tells the client to use SLAAC for its address but contact a stateless DHCPv6 server for "other" information, like DNS servers. This is called Stateless DHCPv6.
However, a more modern and streamlined solution exists: Recursive DNS Server (RDNSS), defined in RFC 8106. This allows the router to include DNS server addresses directly within the RA message itself, eliminating the need for any form of DHCPv6 just to provide DNS information.
You can configure this on a Cisco router like so:
R1(config-if)# ipv6 nd ra dns server 2001:4860:4860::8888
This command adds Google's public IPv6 DNS server address to the outgoing RAs on this interface. This is now the preferred method for providing DNS information in a pure SLAAC environment.
Navigating IPv6 Address Configuration: SLAAC, Stateful DHCPv6 ...
This blog post discusses the pros and cons of SLAAC and shows the modern configuration for including DNS information directly in Router Advertisements.
First, read the introduction Understanding SLAAC for a good summary of its advantages and limitations. Then, review the commands in the section Configuring SLAAC to see how to implement the RDNSS option.
Conclusion
In this lesson, we bridged the gap between the theory of Neighbor Discovery and its practical application in address assignment. You have seen how SLAAC leverages RS and RA messages to provide a simple, scalable method for IPv6 clients to join a network without manual configuration or a DHCP server.
Key Takeaways:
- SLAAC is a stateless mechanism allowing hosts to auto-configure a global unicast address.
- The process relies on a client learning the network prefix from a router's RA message and combining it with its own interface ID.
- On a Cisco router, you enable SLAAC for clients by simply enabling
ipv6 unicast-routingand configuring a GUA on the client-facing interface. - On a client device,
ipv6 address autoconfigtriggers the SLAAC process. - Verification involves
show ipv6 interfaceto see the new address andshow ipv6 routeto confirm the automatic installation of a default route. - While classic SLAAC does not provide DNS info, the modern RDNSS option allows DNS server addresses to be included directly in RA messages.
In our next lesson, we will shift our focus from automatic configuration to manual control. You will learn how to configure and verify IPv6 static routes, giving you precise control over traffic flow between different IPv6 networks.