Welcome back to your course. In our last session, we took the first step in implementing Quality of Service by classifying traffic with class-map and ACLs. We established how to tell the router what traffic we're interested in. Now, we'll build directly on that foundation to complete the process.
This lesson focuses on the second and third steps of the Modular QoS CLI (MQC) framework. You will learn how to create a policy-map to define an action—specifically, marking traffic with Differentiated Services Code Point (DSCP) values. We will then activate this policy by applying it to a router interface. By the end of this lesson, you will be able to configure a complete, basic QoS policy that identifies and re-marks traffic according to your specifications.
The MQC Workflow: From Classification to Action
In the previous lesson, we established the three-stage structure of MQC. Let's visualize how these components connect.

As you can see, the class-map is the foundation. A policy-map then links one or more of these classes to specific actions. Finally, the service-policy command makes the entire policy live on a network interface.
Step 2: Defining a QoS Policy with policy-map
Once you have a class-map that identifies your target traffic, the next step is to create a policy-map to define what to do with that traffic. A policy-map is a container for rules that apply QoS features to different classes.
Within a policy map, for a specific class, you can configure various actions. For this lesson, our action is marking, which involves changing a value in the IP header to signal its priority to other devices in the network. The command for this is set.
We will focus on the set dscp command, which modifies the 6-bit DSCP field in the IP header. As we discussed in a previous module, these values represent standard-based Per-Hop Behaviors (PHBs).
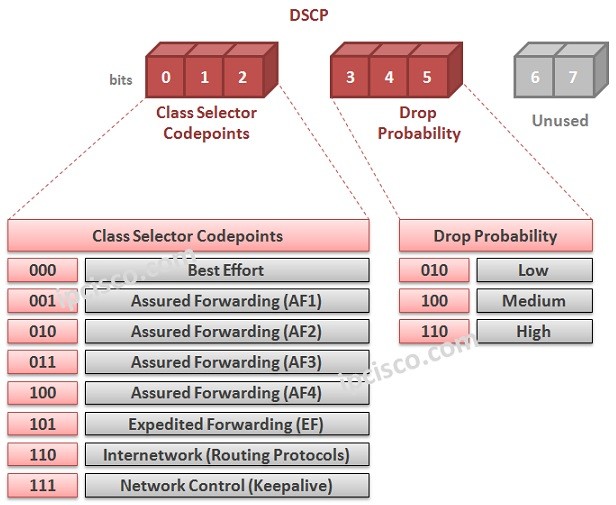
The following reading provides a clear, practical walkthrough of creating a policy to mark traffic. It demonstrates how to classify traffic, associate it with a policy map, and then use both the set precedence and set dscp commands.
QoS Marking on Cisco IOS Router - NetworkLessons.com
This article from NetworkLessons.com shows the complete MQC workflow for marking both Telnet and HTTP traffic with different values.
Read the article starting from the Configuration section. Follow the examples for both Telnet (using set precedence) and HTTP (using set dscp). Pay close attention to the syntax and the clear, three-step process: ACL -> class-map -> policy-map.
Step 3: Applying and Verifying the Policy
A policy-map does nothing until it is attached, or "applied," to an interface. This is done with the service-policy command from interface configuration mode.
A critical detail is specifying the direction:
service-policy input <policy-map-name>: Applies the policy to traffic entering the interface.service-policy output <policy-map-name>: Applies the policy to traffic leaving the interface.
Choosing the correct direction is essential. For instance, if you want to mark traffic coming from users before it gets routed elsewhere, you would apply the policy on the input of the LAN-facing interface.
Once applied, you need to verify that it's working. The show policy-map interface command is your primary tool. It provides statistics for each class within the policy, including how many packets have matched the criteria and how many have had an action (like marking) applied to them.
The next reading walks you through this final activation and verification step.
This article from NetworkAcademy.IO, which we consulted in the last lesson, provides concise CLI examples for defining a policy map and applying it to an interface.
Please review the section The policy-map command, which shows how to link the class-maps to the marking action. Then, read the next section, The service-policy command, to see how the policy is applied and, importantly, how to interpret the output of the verification command.
A Practical Demonstration
Now let's see these concepts in a live lab environment. The following video demonstrates the entire process: classifying ICMP traffic using NBAR, creating a policy-map to mark it with a new DSCP value (af11), applying the policy to an input interface, and finally, verifying the change using Wireshark.
Since you are pursuing a degree in network engineering, paying attention to verification with a packet analyzer like Wireshark is a valuable skill. It provides definitive proof that the configuration is having the intended effect on the packets themselves.
QoS Configuration on Cisco Device | DSCP, Traffic Policing | Lab with GNS3 and Ostinato | CCNA, CCNP
This video from KBTrainings With Guy Bisuku provides a clear, end-to-end demonstration of marking traffic using MQC.
Watch the segment from Configuring MQC. The instructor performs the three key steps: Creates a class-map using NBAR (match protocol icmp). Creates a policy-map that uses the class to set dscp af11. Applies the service-policy to the input interface. Next, watch the verification part from Verifying with Wireshark. Here, he captures traffic after it has passed through the router and shows that the DSCP field in the IP header of ICMP packets has indeed been changed to AF11, while voice traffic remains untouched.
Conclusion
In this lesson, we completed our exploration of a fundamental QoS task: classification and marking. You have moved from simply identifying traffic to actively modifying it to signal its priority.
Key Takeaways:
- The MQC workflow consists of three steps: classify (
class-map), define policy (policy-map), and apply (service-policy). - A
policy-maplinks traffic classes to specific QoS actions. - The
set dscp <value>command, used within apolicy-map, is the primary method for marking traffic at Layer 3. - A policy is inactive until it is applied to an interface in a specific direction (
inputoroutput) using theservice-policycommand. - Verification is done with
show policy-map interface, which displays packet counters for each class, confirming that traffic is being matched and acted upon.
You now have the skills to build the foundation of a QoS policy. In our next lesson, we will build upon this by implementing queuing policies. Having classified and marked our traffic, we will learn how to give our high-priority packets preferential treatment in times of network congestion using techniques like Low Latency Queuing (LLQ).