In our previous lessons, you learned how to use the Modular QoS CLI (MQC) to classify traffic with class-map and then mark it with a specific DSCP value using a policy-map. We have successfully told the router what our important traffic is and labeled it for priority treatment. Now, we will take the final, crucial step: telling the router how to treat that traffic when network links become congested.
This lesson addresses the core purpose of QoS: managing congestion. You will learn to implement a queuing policy, specifically Low Latency Queuing (LLQ), to give preferential treatment to real-time traffic like voice or video. By the end of this session, you will be able to configure a policy that not only classifies and marks traffic but also places it in a dedicated priority queue to ensure it gets sent first.
Why Queuing Matters: Managing Congestion
When a router's interface receives traffic faster than it can transmit it—for example, when traffic from a 1 Gbps LAN is funneled onto a 100 Mbps WAN link—congestion occurs. The router must buffer the excess packets in a queue. By default, this is a single, First-In, First-Out (FIFO) queue. In a FIFO system, a large file transfer can fill the queue, causing voice packets to be delayed or dropped, resulting in poor call quality.
To solve this, QoS queuing mechanisms create multiple queues for different types of traffic, managed by a scheduler. This allows the router to make intelligent decisions about which packets to send next.
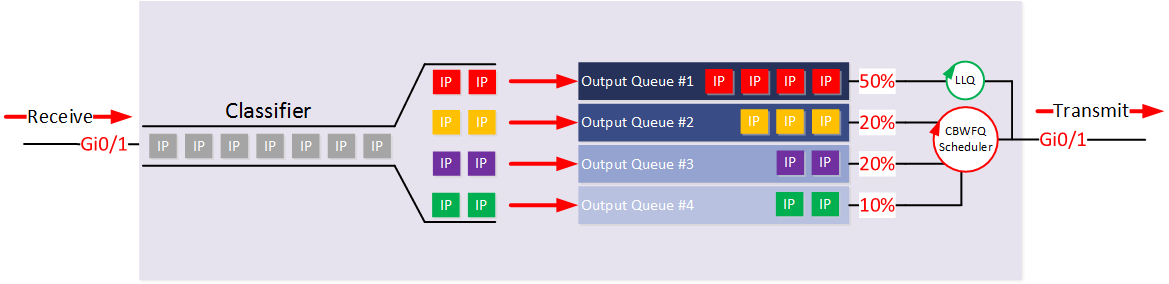
One of the most common queuing methods is Class-Based Weighted Fair Queuing (CBWFQ). CBWFQ allocates a guaranteed minimum amount of bandwidth to different classes of traffic during congestion. It's "fair" because it ensures no single class is starved, but it doesn't provide the immediate, strict priority that real-time traffic needs.
The following video provides a conceptual overview of how a scheduler uses multiple queues to manage traffic.
Free CCNA | QoS (Part 2) | Day 47 | CCNA 200-301 Complete Course
This clip from Jeremy's IT Lab explains the shift from a single queue to multiple queues managed by a scheduler and introduces CBWFQ.
Watch the segment from Multiple Queues to understand how a router classifies traffic into different queues. Then, continue from CBWFQ for a brief explanation of how this "fair" queuing method works.
Introducing Low Latency Queuing (LLQ)
For traffic like voice, which is highly sensitive to delay and jitter, "fair" isn't enough; it needs to be first. This is where Low Latency Queuing (LLQ) comes in. LLQ enhances CBWFQ by adding a strict priority queue. Any traffic placed in this queue is serviced first by the scheduler, before any of the other CBWFQ queues are touched.
Think of it as a carpool lane on a congested highway. While other cars wait in their lanes (the CBWFQ queues), cars in the carpool lane (the priority queue) get to bypass the traffic.

To prevent the priority queue from starving all other traffic (a situation where a constant stream of voice packets would prevent any other data from ever being sent), LLQ includes a built-in policer. You must define a maximum amount of bandwidth that the priority traffic can consume. If the traffic in the priority queue exceeds this limit, the excess packets are dropped.
The next video uses the carpool analogy to explain this concept very clearly.
Configuring Quality of Service (QoS) with MQC
In this clip, Kevin Wallace introduces LLQ and explains its function using an intuitive analogy.
Please watch from the explanation of Low Latency Queuing. Pay close attention to how it provides priority but also includes a limit to prevent starvation of other traffic.
Implementing an LLQ Policy
Configuring LLQ uses the same MQC framework you're already familiar with. The key difference is the command used within the policy-map. Instead of using set to mark traffic, you will use the priority command to place it in the strict priority queue.
The steps are:
class-map: Identify the traffic to be prioritized (e.g.,match dscp ef).policy-map:- Select the class map for your priority traffic.
- Use the
priority <bandwidth_in_kbps>orpriority percent <percentage>command. This both enables the strict priority queue and sets the maximum bandwidth it can consume. - Configure other, non-priority classes with the
bandwidthcommand for CBWFQ treatment.
service-policy: Apply the policy to an interface in theoutputdirection. Queuing is an egress function, managing traffic as it leaves an interface.
The following reading provides a complete, step-by-step guide to configuring an LLQ policy that prioritizes voice traffic.
QoS LLQ (Low Latency Queueing) on Cisco IOS
This article from NetworkLessons.com demonstrates a full LLQ configuration, from classification to application and verification.
Begin by reviewing the classification step in the class-map section, where traffic is identified based on DSCP values. Next, carefully study the policy configuration. This is the core of the lesson. Notice how the priority 2000 command is used for the VOICE class, while the bandwidth 1000 command is used for the CALL_SIGNALING class. This perfectly illustrates the combination of LLQ and CBWFQ in a single policy. Finally, see how the policy is activated on the interface in the service-policy section.
To reinforce the configuration, let's watch a practical demonstration of the priority command being configured. The instructor provides an excellent explanation of what the command does.
Configuring Quality of Service (QoS) with MQC
This segment from Kevin Wallace Training shows the configuration of the priority command within a policy-map.
Watch from the configuration of the priority command. The key takeaway is his explanation: "give this traffic as much as 768K... but no more, but let it go first." This concisely summarizes the function of LLQ.
Verification
Once your policy is applied, you can verify its operation using the show policy-map interface <interface_name> command. The output will show you the classes, the queuing strategy applied to each (priority or bandwidth), and packet counters. Seeing the packet count for your priority class increase is confirmation that traffic is being correctly classified and queued.
The final section of the NetworkLessons article you just read demonstrates this verification.
QoS LLQ (Low Latency Queueing) on Cisco IOS
This part of the article shows how to verify your configuration.
Please read the entire Verification section. Observe the outputs of show class-map and show policy-map. Finally, see how the instructor generates traffic and then checks the policy-map statistics to confirm that packets have matched the correct classes.
Conclusion
In this lesson, you have moved beyond simply marking traffic to actively controlling how it is handled during periods of congestion. By implementing Low Latency Queuing, you can provide the strict priority needed to protect real-time applications like VoIP from delay and jitter.
Key Takeaways:
- Queuing is essential for managing network congestion by creating separate buffers for different traffic types.
- CBWFQ provides guaranteed bandwidth to traffic classes but does not offer strict priority.
- LLQ enhances CBWFQ by adding a strict priority queue, ensuring latency-sensitive traffic is always sent first, up to a configured limit.
- The
prioritycommand, used inside apolicy-map, enables LLQ and sets the maximum bandwidth for the priority class, acting as a policer to prevent starvation of other queues. - Queuing policies are applied to an interface in the
outputdirection using theservice-policycommand.
You now have the skills to build a complete QoS policy that classifies, marks, and queues traffic. In our next lesson, we will consolidate this knowledge by focusing on the final step of the MQC framework: applying a QoS service policy to an interface and verifying its operation using show commands in various scenarios.