Hello again! In our last lesson, we added a significant layer of polish to the user experience by implementing Astro's View Transitions API, giving your site the fluid feel of a single-page application. This concluded our module on Styling and Professional Design.
Today, we begin a new and crucial module: SEO and Web Accessibility. A premium website for an accounting firm must not only look and feel professional but also be easily discoverable by potential clients and accessible to all users. SEO (Search Engine Optimization) is the foundation of that discoverability.
This lesson focuses on our first SEO learning outcome: to create a reusable SEO component to manage meta tags, canonical URLs, and Open Graph data. By centralizing this logic, we'll create a maintainable and powerful system for controlling how search engines and social media platforms see your site, directly contributing to your goal of an SEO-optimized, production-ready website.
Part 1: Why SEO Meta Tags Matter
Before we write any code, let's understand what we're building and why it's important. When a search engine like Google "crawls" your website, it reads the HTML to understand its content and purpose. Special tags in the <head> of your document, called meta tags, provide explicit instructions and summaries for these crawlers.
The three key types of metadata we'll manage today are:
-
Core Meta Tags: The
titleanddescriptionare the most critical. They are often what users see in a search engine results page. A compelling title and description can significantly increase the chances of a user clicking on your link. -
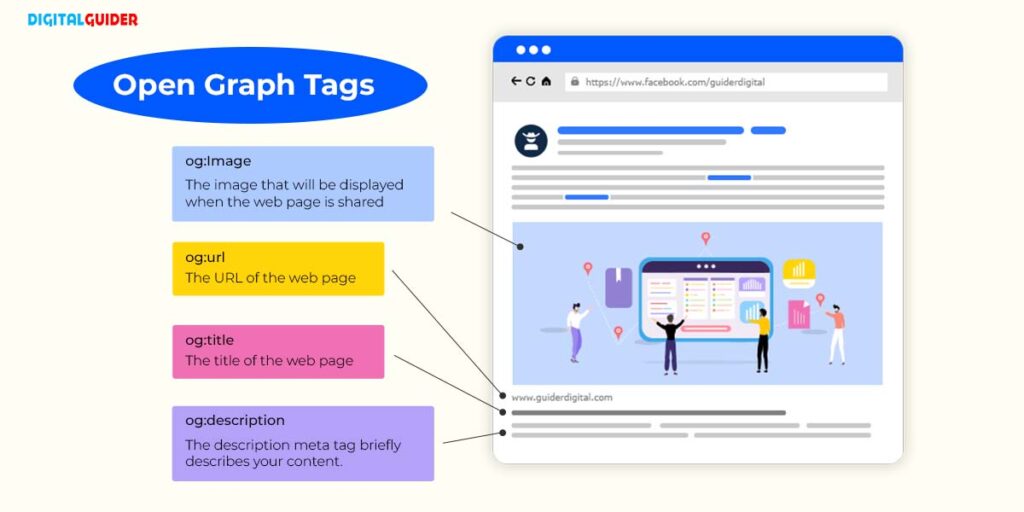
Open Graph (OG) Tags: These tags control how your content appears when shared on social media platforms like Facebook, LinkedIn, or X (formerly Twitter). A rich preview with a title, description, and image looks far more professional and engaging than a plain link. Since building trust is key for an accounting firm, ensuring your brand is presented well on social media is vital.
-
Canonical URLs: Sometimes, the same content can be accessible through multiple URLs (e.g.,
yoursite.com/services/andyoursite.com/services?source=ad). This can confuse search engines, leading to "duplicate content" issues that can harm your ranking. A canonical tag tells search engines which URL is the "preferred" version to index.
To get a clear picture of what Open Graph does, watch the first few minutes of this video.
The Open Graph Protocol - Why And How You Should Use it On Your Website
This video from ProgrammingPercy gives a fantastic, non-technical overview of what the Open Graph protocol is and why it's so important for making your shared links look professional.
Watch the first 1 minute and 23 seconds of the video to understand the problem Open Graph solves and how it transforms a boring link into an engaging preview.
As the video shows, these tags make a huge difference. This image breaks down exactly how the meta tags map to the final shared preview.
And here's a visual explanation of how a canonical tag helps consolidate your content's authority.

Part 2: Building a Reusable <SEO /> Component
Manually adding all these tags to every page is tedious and error-prone. A much better approach, which aligns with your experience in component-based development, is to create a single, reusable <SEO /> component. This component will take in page-specific data as props and generate the complete set of meta tags.
This approach follows the Don't Repeat Yourself (DRY) principle, making your site easier to maintain and update.
Step 1: Create the Component and Define Props
First, create a new file at src/components/SEO.astro.
Inside this file, we'll start by defining the props it will accept. These will be the dynamic pieces of information that change from page to page.
// src/components/SEO.astro
---
interface Props {
  title: string;
  description: string;
  image?: string; // An optional image for Open Graph
  noindex?: boolean; // An optional flag to tell crawlers not to index a page
}

const { title, description, image, noindex = false } = Astro.props;
---

<!-- Meta tags will go here -->
Here, we're using a TypeScript interface to define the shape of our props, which is a great practice for type safety. We've defined title and description as required, while image and noindex are optional.
Step 2: Establish Default Site-Wide Information
Not every page will have a unique image, and we need a default title and description for pages where we might forget to specify them. A great pattern for this is to store site-wide information in a central JSON file.
Create a new folder src/data and a file inside it named site.json.
// src/data/site.json
{
  "title": "ProAccountants | Expert Financial Services",
  "description": "Your trusted partner for comprehensive accounting, tax planning, and financial advisory services. Let us help you achieve your financial goals.",
  "image": "/images/social-preview.jpg"
}
(You'll need to create a default social preview image at public/images/social-preview.jpg. A good size is 1200x630 pixels).
Now, let's update our SEO.astro component to import and use this default data.
// src/components/SEO.astro
---
import siteData from '../data/site.json';

interface Props {
  title?: string;
  description?: string;
  image?: string;
  noindex?: boolean;
}

const {
  title,
  description,
  image,
  noindex = false
} = Astro.props;

// Use page-specific data if available, otherwise fall back to site defaults
const effectiveTitle = title ? `${title} | ${siteData.title}` : siteData.title;
const effectiveDescription = description ?? siteData.description;
const effectiveImage = new URL(image ?? siteData.image, Astro.site);

// Construct the canonical URL for the current page
const canonicalURL = new URL(Astro.url.pathname, Astro.site);
---

<!-- Meta tags will go here -->
A few key things are happening here:
- We import
siteData. - We've made
titleanddescriptionoptional in ourPropsbecause we can now fall back to the defaults. effectiveTitle: If a page provides a title, we format it asPage Title | Site Title. Otherwise, we just use the site title.effectiveDescription: We use the nullish coalescing operator (??) as a clean shorthand. Ifdescriptionis not provided (isnullorundefined), it usessiteData.description.effectiveImageandcanonicalURL: We useAstro.siteandAstro.urlto construct absolute URLs, which are required for canonical and Open Graph tags. Important: For this to work, you must set thesiteproperty in yourastro.config.mjsfile.
// astro.config.mjs
import { defineConfig } from 'astro/config';

export default defineConfig({
  // ... other integrations
  site: 'https://your-production-domain.com', // Replace with your actual domain
});
Step 3: Generate the Meta Tags
Now we can use our processed variables to render the HTML tags inside the component, below the frontmatter script.
// src/components/SEO.astro
---
// ... (all the code from Step 2)
---
<!-- Primary Meta Tags -->
<title>{effectiveTitle}</title>
<meta name="description" content={effectiveDescription} />

<!-- Canonical URL -->
<link rel="canonical" href={canonicalURL} />

<!-- Robots Meta Tag -->
{noindex && <meta name="robots" content="noindex" />}

<!-- Open Graph / Facebook -->
<meta property="og:type" content="website" />
<meta property="og:url" content={canonicalURL} />
<meta property="og:title" content={effectiveTitle} />
<meta property="og:description" content={effectiveDescription} />
<meta property="og:image" content={effectiveImage} />

<!-- Twitter -->
<meta name="twitter:card" content="summary_large_image" />
<meta name="twitter:url" content={canonicalURL} />
<meta name="twitter:title" content={effectiveTitle} />
<meta name="twitter:description" content={effectiveDescription} />
<meta name="twitter:image" content={effectiveImage} />
This code block now generates a comprehensive set of SEO tags using our dynamic data. The following article provides a concise reference for this component structure.
Creating an SEO-Optimized Astro Template
The article 'Creating an SEO-Optimized Astro Template' from the official Astro blog provides a great example of an SEO component. We are building a similar, slightly more robust version.
Quickly review the code under the heading 'Creating a Component'. Notice how it accepts props and uses them to render various meta tags. This reinforces the pattern we are implementing.
Part 3: Integrating the <SEO /> Component into Your Layout
With our component built, the final step is to use it. The best place for a site-wide component like this is in your base layout.
Open src/layouts/BaseLayout.astro and modify it as follows:
- Import the
SEOcomponent. - Add the
<SEO />component inside the<head>tag. - Pass props from the page's frontmatter to the component.
// src/layouts/BaseLayout.astro
---
import SEO from '../components/SEO.astro'; // 1. Import
import Header from '../components/Header.astro';
import Footer from '../components/Footer.astro';
// ... other imports

const { title, description, image, noindex } = Astro.props; // Or use `const { frontmatter } = Astro.props;`
---
<html lang="en">
  <head>
    <meta charset="utf-8" />
    <meta name="viewport" content="width=device-width" />
    <meta name="generator" content={Astro.generator} />

    <SEO {title} {description} {image} {noindex} /> {/* 2 & 3. Add component and pass props */}

    <!-- ... other head elements like styles, view transitions, etc. -->
  </head>
  <body>
    <Header />
    <main>
      <slot />
    </main>
    <Footer />
  </body>
</html>
Now, any page that uses BaseLayout can define its SEO properties in its frontmatter. For example, your about.astro page might look like this:
// src/pages/about.astro
---
import BaseLayout from '../layouts/BaseLayout.astro';
---
<BaseLayout
  title="About Our Firm"
  description="Learn about the history, mission, and expert team at ProAccountants, dedicated to your financial success for over 20 years."
>
  <h1>About Us</h1>
  <p>Our firm's story...</p>
</BaseLayout>
When Astro builds the "About" page, it will pass the title and description to BaseLayout, which then passes them to <SEO />. The component will generate the perfect set of meta tags for that specific page. If you were to omit the description, the component would automatically use the default from site.json.
Test your understanding!
You are creating a "Thank You" page that users are redirected to after submitting the contact form. This page should not appear in Google search results. How would you configure this page's frontmatter to achieve this, using the <SEO /> component we just built?
Show answer
In the frontmatter of src/pages/thank-you.astro, you would pass the noindex prop to the layout.
// src/pages/thank-you.astro
---
import BaseLayout from '../layouts/BaseLayout.astro';
---
<BaseLayout
  title="Thank You"
  description="We have received your message and will be in touch shortly."
  noindex={true}
>
  <h1>Message Sent!</h1>
  <p>Thank you for contacting us.</p>
</BaseLayout>
The noindex={true} prop will be passed down to the <SEO /> component, which will then render the <meta name="robots" content="noindex" /> tag, instructing search engines not to include this page in their search results.
Conclusion
Fantastic work! You have just implemented a core feature for any production website. By creating a reusable, data-driven SEO component, you've made your project significantly more maintainable and powerful. This centralized approach ensures every page on your site has robust, accurate metadata for search engines and social media.
Key Takeaways:
- Essential Tags:
title,description,canonical, and Open Graph (og:) tags are critical for discoverability and professional presentation. - Component-Driven SEO: Centralizing logic in a reusable
<SEO />component is a clean, scalable, and DRY approach. - Props for Page-Specifics: Pass page-specific metadata like
titleanddescriptionas props from your pages and layouts. - Defaults for Robustness: Use a global data file (e.g.,
site.json) to provide sensible fallback values, ensuring no page is left without basic SEO information. - Absolute URLs are Key: Always use
Astro.siteto generate full, absolute URLs for canonical and Open Graph tags.
Up Next:
Now that our pages can present themselves effectively to crawlers, the next logical step is to give search engines a map of our entire site. In the next lesson, we will learn how to generate an XML sitemap automatically during the build process, making it even easier for search engines to find, crawl, and index all your content.