Hello! Welcome back.
In the last lesson, you mastered Django migrations, learning how to translate your Python models into a database schema. You now have a tasks_task table in your database, ready to hold data. However, so far, our Task model exists in isolation.
For our task manager app to be useful, a task needs to belong to a specific user. Similarly, we might want to categorize tasks with tags like "Work," "Personal," or "Urgent." This requires creating relationships between different pieces of data.
This lesson is all about building those connections. You'll learn how to establish relationships between models using ForeignKey and ManyToManyField. These are the fundamental tools for creating a well-structured and interconnected web application.
1. The One-to-Many Relationship: ForeignKey
The most common type of relationship is "one-to-many." Think about it in the context of our project:
- One user can have many tasks.
- But one task belongs to only one user.
This is a classic one-to-many relationship. Django represents this using a ForeignKey field.
To get a clear conceptual overview, let's start with a short video.
Database Relationships | One To Many & Many to Many | Django (3.0) Crash Course Tutorials (pt 6)
The video "Database Relationships" by Dennis Ivy provides a clear, concise explanation of the one-to-many relationship concept using a customer-and-order example.
Watch from 00:27 to 01:28. Pay attention to how the orders table holds a reference (a foreign key) to the customers table to link an order to a specific customer. This is exactly what we're about to do with tasks and users.
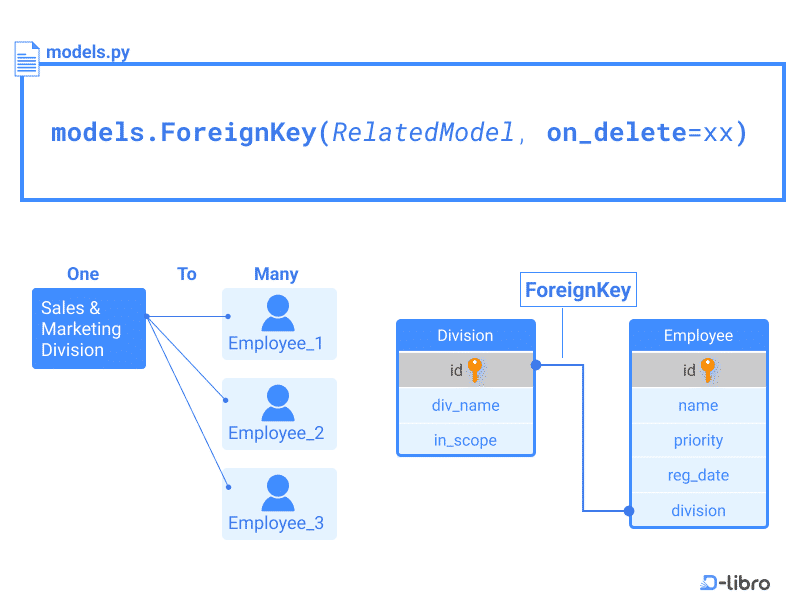
As the video explained, the "many" side of the relationship holds a key that points to the "one" side. In our case, the Task model will hold a key pointing to the User model.
This diagram shows the concept visually:
Implementing ForeignKey
Let's add this relationship to our Task model. We'll link it to Django's built-in User model, which handles authentication for us (we'll cover that in detail later).
First, you need to import the User model at the top of your tasks/models.py file.
from django.contrib.auth.models import User
Now, add the ForeignKey field to your Task model.
# tasks/models.py

from django.db import models
from django.utils import timezone
from django.contrib.auth.models import User # Add this import

class Task(models.Model):
    title = models.CharField(max_length=200)
    description = models.TextField(null=True, blank=True)
    completed = models.BooleanField(default=False)
    created_at = models.DateTimeField(auto_now_add=True)
    due_date = models.DateField(null=True, blank=True)
    user = models.ForeignKey(User, on_delete=models.CASCADE, null=True, blank=True) # Add this line

    def __str__(self):
        return self.title

    class Meta:
        ordering = ['created_at']
Note: For now, we're adding null=True and blank=True. This makes the user optional for now, which simplifies things as we build. Later, we'll make it mandatory.
The on_delete Parameter
The on_delete=models.CASCADE part is crucial. It tells Django what to do if the user associated with a task is deleted.
models.CASCADE: If the user is deleted, delete all of their tasks as well. This is a common and logical default for this kind of relationship.
There are other options, like models.SET_NULL (which would set the task's user field to NULL) or models.PROTECT (which would prevent the user from being deleted if they still have tasks). The MDN documentation provides a good summary of these options.
Apply Your Changes
Now that you've modified your model, you need to update the database. You already know how to do this from our last lesson!
-
Generate the migration file:
python manage.py makemigrations tasksDjango will detect the new
userfield and create a new migration file. -
Apply the migration:
python manage.py migrateThis command will execute the
ALTER TABLEstatement to add the newuser_idcolumn to yourtasks_tasktable in the database.
2. The Many-to-Many Relationship: ManyToManyField
What if a relationship can go both ways? For example:
- One task could have many tags (e.g., "Urgent", "Work").
- One tag could be applied to many different tasks.
This is a "many-to-many" relationship. Django handles this with a ManyToManyField.
Database Relationships | One To Many & Many to Many | Django (3.0) Crash Course Tutorials (pt 6)
Let's return to the Dennis Ivy video to understand the concept behind many-to-many relationships.
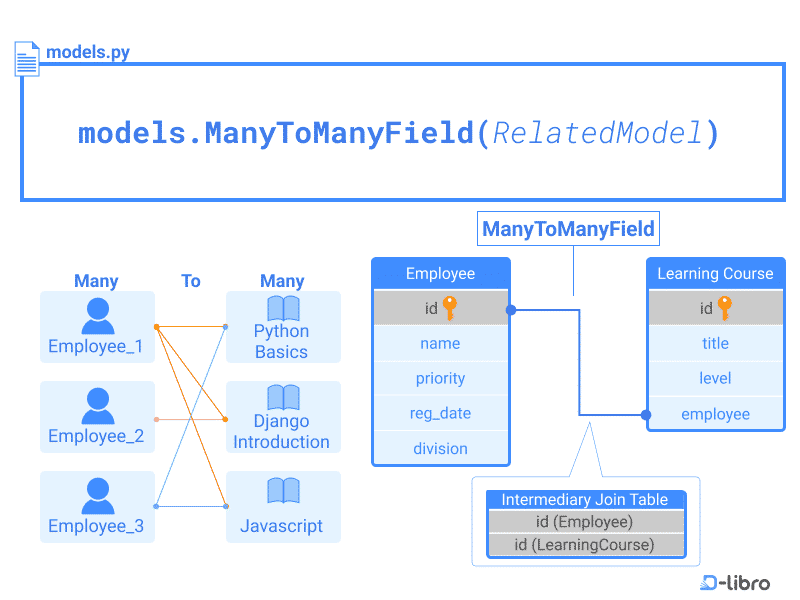
Watch from 01:28 to 04:49. The key takeaway is that a many-to-many relationship requires a third, intermediate table (or "join table") to keep track of the connections. The good news is, Django creates and manages this table for you automatically!
As the video showed, Django abstracts away the complexity of the intermediary table. All you need to do is define the relationship in your model.
This diagram shows the concept:
Implementing ManyToManyField
To implement this, we first need a model for our tags. Create a new Tag model in tasks/models.py. Then, add the ManyToManyField to your Task model.
Your tasks/models.py file should now look like this:
# tasks/models.py

from django.db import models
from django.utils import timezone
from django.contrib.auth.models import User

# Add the new Tag model
class Tag(models.Model):
    name = models.CharField(max_length=100)

    def __str__(self):
        return self.name

class Task(models.Model):
    title = models.CharField(max_length=200)
    description = models.TextField(null=True, blank=True)
    completed = models.BooleanField(default=False)
    created_at = models.DateTimeField(auto_now_add=True)
    due_date = models.DateField(null=True, blank=True)
    user = models.ForeignKey(User, on_delete=models.CASCADE, null=True, blank=True)
    tags = models.ManyToManyField(Tag, blank=True) # Add this line

    def __str__(self):
        return self.title

    class Meta:
        ordering = ['created_at']
We added blank=True to the ManyToManyField to indicate that a task is not required to have a tag.
For a final walkthrough of putting these relationships into code, the following resource provides an excellent, practical example.
Django Tutorial Part 3: Using models
The Mozilla Developer Network (MDN) guide on Django models is a fantastic reference. Let's look at how they build a Book model with relationships to Author and Genre.
Read the sections "Book model" and "BookInstance model". Notice how ForeignKey is used to link a book to a single author, and ManyToManyField is used to link a book to multiple genres. This is a direct parallel to how we're linking a task to a single user and multiple tags.
Apply Your Changes (Again!)
You've now introduced a whole new model (Tag) and a new relationship. Let's get the database up to speed.
-
Generate the migration file:
python manage.py makemigrations tasksYou will see output indicating that the
Tagmodel has been created and thetagsfield has been added toTask. -
Apply the migration:
python manage.py migrateDjango will now create two new tables:
tasks_tag(for theTagmodel) andtasks_task_tags(the intermediary table to manage the many-to-many relationship).
Test your understanding!
Imagine you want to add a Project model to your application. A single task can only belong to one project, but a single project can contain many tasks.
Which field type would you add to your Task model to represent this relationship, ForeignKey or ManyToManyField?
Show answer
You would use a ForeignKey. The relationship described is "one-to-many" (one project has many tasks). A ForeignKey is placed on the "many" side of the relationship. So, you would add project = models.ForeignKey(Project, ...) to your Task model.
Conclusion
You have just taken a massive step forward in designing your application's data structure. By connecting models, you can represent the complex, real-world relationships that exist in your data. This is the foundation upon which you'll build queries and display interconnected information to your users.
Key Takeaways:
- One-to-Many Relationships are for when one object can be related to many other objects, but those objects can only relate back to the first one. This is implemented with
models.ForeignKey. - Many-to-Many Relationships are for when objects from two models can be cross-associated freely. This is implemented with
models.ManyToManyField, and Django automatically creates a "join table" to manage it. - The
on_deleteparameter is a critical part ofForeignKey, defining what happens to related objects when one is deleted.models.CASCADEis a common choice. - Any change to your models, including adding relationships, requires you to run the
makemigrationsandmigrateworkflow.
Preview of the Next Lesson:
Our models are now defined and interconnected. But how do we actually create, read, update, and delete tasks? In the next lesson, we will dive into the Django ORM's query capabilities. You'll learn how to perform these CRUD (Create, Retrieve, Update, Delete) operations, finally allowing you to interact with the database through your Python code.