Hello! Welcome back to your Django journey.
In our last lesson, you did some excellent work structuring the heart of our application by defining models and establishing relationships between them using ForeignKey and ManyToManyField. We now have the blueprints for our Task, Tag, and User data, and the database schema is ready.
However, a database schema is just an empty container. To bring our task manager to life, we need to interact with it: add tasks, find them, mark them as complete, and clear them out.
This lesson focuses on exactly that. You will learn how to perform Create, Retrieve, Update, and Delete (CRUD) operations using the Django Object-Relational Mapper (ORM). This is where you'll stop just defining data and start manipulating it, all using Python code.
The Django ORM: Your Python-to-SQL Translator
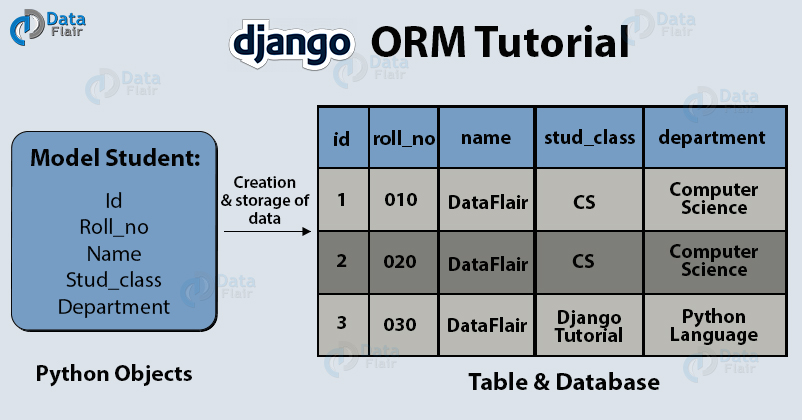
Before we dive in, let's clarify what the ORM is. The Object-Relational Mapper is a powerful feature in Django that acts as a bridge between your Python objects (your models) and the relational database tables. Instead of writing raw SQL queries, you use Python methods, and Django translates them into SQL for you.
This concept is visualized well in the following diagram:
For this lesson, we'll perform all our operations in the Django shell, an interactive console that gives us direct access to our project's components. To open it, navigate to your project's root directory (where manage.py is) in your terminal and run:
python manage.py shell
Once inside the shell, you can import your models to start working with them:
# In the Django shell
>>> from tasks.models import Task, Tag
>>> from django.contrib.auth.models import User
Now, let's get to the CRUD operations.
1. CREATE: Adding New Data to the Database
There are two primary ways to create a new object and save it to the database.
Method 1: Instantiate the model and call .save()
This is a two-step process: you create a Python object first, then explicitly save it.
# In the Django shell
>>> # First, let's create a user to own the task
>>> user1 = User.objects.create(username='alice')

>>> # Now, create a task instance
>>> task1 = Task(title='Learn Django ORM', description='Complete the CRUD lesson.', user=user1)

>>> # The object exists in Python, but not in the database yet.
>>> # Now, save it.
>>> task1.save()
Method 2: Use the .create() manager method
This is a more concise, one-step method that creates and saves the object in a single command. The objects attribute on a model is called a "manager," and it's your main entry point for database queries.
# In the Django shell
>>> # This one line does the same as the four lines above
>>> task2 = Task.objects.create(title='Build a portfolio project', user=user1)
The following video provides a clear demonstration of both of these creation methods.
Django ORM - Querying and Creating Records / Working with Foreign Keys
The video "Django ORM - Querying and Creating Records" by BugBytes shows how to create new records in the database. It covers both the .save() and .create() methods.
Watch the following segments: Creating with .save() (03:00 - 06:49): Pay attention to how a model instance is created and then saved. Creating with .create() (11:54 - 13:18): Notice how this is a more direct way to achieve the same result. Creating with Foreign Keys (16:20 - 18:29): This is a crucial section that shows how to pass a full object (like our user1 object) to create a relationship, just as we did in the code example.
2. RETRIEVE: Querying for Data
Once you have data, you need ways to retrieve it. Django's ORM offers a rich API for this. The results of most queries come back as a QuerySet, which you can think of as a "smart" list of objects.
Here are the most common methods for retrieval:
all(): Retrieves all objects of a model.>>> all_tasks = Task.objects.all() >>> print(all_tasks) <QuerySet [<Task: Learn Django ORM>, <Task: Build a portfolio project>]>filter(**kwargs**): Retrieves a subset of objects that match your criteria.>>> # Get all incomplete tasks >>> incomplete_tasks = Task.objects.filter(completed=False) >>> print(incomplete_tasks) <QuerySet [<Task: Learn Django ORM>, <Task: Build a portfolio project>]>exclude(**kwargs**): The opposite offilter(); retrieves all objects except those that match your criteria.get(**kwargs**): Retrieves a single, unique object. This is strict: if it finds zero objects or more than one, it will raise an error. It's best used with unique identifiers like the primary key (id).>>> first_task = Task.objects.get(id=1) >>> print(first_task.title) 'Learn Django ORM'
For a comprehensive walkthrough of these methods, this article provides clear, text-based examples.
How to Perform CRUD Operations with Django Models
The article "How to Perform CRUD Operations with Django Models" on freeCodeCamp offers a concise guide. Let's focus on the 'READ' section.
Read the section titled "READ". It clearly explains the difference between get() for single objects and filter() for multiple objects, using a Task model that's very similar to ours.
Test your understanding!
Using the Django shell and the Task objects you created earlier, write a single query to find all tasks that are assigned to the user alice AND are not yet completed.
Show answer
You can chain multiple conditions in a single filter() call.
# In the Django shell
>>> # First, make sure you have the user object
>>> alice = User.objects.get(username='alice')

>>> # Now, filter for tasks belonging to alice that are incomplete
>>> Task.objects.filter(user=alice, completed=False)
3. UPDATE: Modifying Existing Data
Updating records follows a similar pattern to creating them.
Method 1: Retrieve, modify, and .save()
This is ideal for updating a single object. You fetch it, change its attributes in Python, and then call .save() to write the changes back to the database.
# In the Django shell
>>> task_to_complete = Task.objects.get(id=1)
>>> task_to_complete.completed = True
>>> task_to_complete.save()

>>> # Verify the change
>>> print(Task.objects.get(id=1).completed)
True
Method 2: Use .update() on a QuerySet
This is for bulk updates. It's much more efficient than looping through objects and saving them one by one, as it translates to a single SQL UPDATE statement.
# In the Django shell
>>> # Let's create another incomplete task for 'alice'
>>> Task.objects.create(title='Drink water', user=User.objects.get(username='alice'))

>>> # Now, mark all of alice's tasks as complete in one go
>>> tasks_for_alice = Task.objects.filter(user__username='alice')
>>> tasks_for_alice.update(completed=True)
2
# The method returns the number of rows updated.
Note the user__username syntax. The double underscore (__) lets you query across relationships.
The following video explains both single and bulk updates very clearly.
Django ORM - Updating and Deleting QuerySets / ForeignKey on_delete behaviour
Let's watch "Django ORM - Updating and Deleting QuerySets" by BugBytes to see updating in action.
Watch these two parts: Updating a Single Instance (00:49 - 03:54): See how to fetch an object, change it, and save it. Updating a QuerySet (06:54 - 15:21): This is a deep dive into the powerful .update() method for bulk changes. Pay close attention to how much more efficient this is.
4. DELETE: Removing Data
Finally, to remove records from your database, you can use the .delete() method.
- On a single object instance:
>>> task_to_delete = Task.objects.get(id=2) >>> task_to_delete.delete() (1, {'tasks.Task': 1}) # The output shows 1 total object was deleted, specifically 1 from the 'tasks.Task' model. - On a QuerySet (for bulk deletion):
>>> # Delete all completed tasks
>>> Task.objects.filter(completed=True).delete()
Remember the on_delete=models.CASCADE we set on our Task's user field? If you were to delete a user, this setting would automatically delete all tasks associated with that user. The .delete() method intelligently handles these relationship rules.
This final video clip demonstrates the delete operation and revisits the important on_delete behaviors.
Django ORM - Updating and Deleting QuerySets / ForeignKey on_delete behaviour
The same BugBytes video also has an excellent section on deletion.
Watch these segments: Deleting a Single Instance & on_delete (15:21 - 21:33): This is a fantastic explanation of how on_delete=models.CASCADE works in practice when you delete a parent object. Deleting a QuerySet (21:33 - 23:29): See how to efficiently delete multiple records at once.
Conclusion
You now have the fundamental skills to manipulate data in your Django application. Using just a handful of Python methods, you can perform all four essential CRUD operations. This knowledge is the bedrock of building any dynamic web application where data is constantly being created, read, updated, and deleted.
Key Takeaways:
- CRUD stands for Create, Retrieve, Update, and Delete.
- You use the Django ORM and the model manager (
.objects) to interact with the database. - Create:
MyModel.objects.create(...)or create an instance and call.save(). - Retrieve:
.all(),.filter(...),.exclude(...), and.get(...). Most return aQuerySet. - Update: For single objects, retrieve, modify, and call
.save(). For bulk updates, use.update()on aQuerySet. - Delete: Call
.delete()on a single object instance or on aQuerySet.
Preview of the Next Lesson:
Working in the shell is great for learning and testing, but our users won't see that. In the next lesson, "Query the database using methods like filter(), get(), exclude(), and order_by()," we will take these powerful querying skills and apply them inside our Django views. You'll learn how to fetch data from the database and pass it to a template, making the first step toward displaying your application's data on a real web page.