Hello! Welcome back.
In the last lesson, you successfully set up your Django project and created your first app, tasks. You now have a working project structure and know how to run the development server. However, right now, the only page you can see is Django's default welcome page.
This lesson directly addresses the next step: configuring URL patterns to route requests to views. We'll learn how Django acts as a traffic controller for your website, taking an incoming URL from a user's browser and directing it to the correct piece of Python code (a "view") to generate a response. By the end of this lesson, you will have created your first custom web pages.
1. The Request-Response Cycle: How Django Finds Your Page
Before we start coding, let's build a mental model of how Django handles a web request. When a user enters a URL in their browser, Django doesn't magically know which code to run. It follows a clear, predictable process.
- A user requests a URL (e.g.,
http://127.0.0.1:8000/about/). - Django receives the request and looks at the path (
/about/). - It consults its main URL configuration file (the "URLconf," which is your project's
urls.py) to find a matching pattern. - Once a pattern matches, Django calls the associated view function.
- The view function processes the request and returns an HTTP response (like a simple message, a full HTML page, or a redirect).
- Django sends this response back to the user's browser.
The following diagram illustrates this flow, with the URL Dispatcher (urls.py) playing the central role.
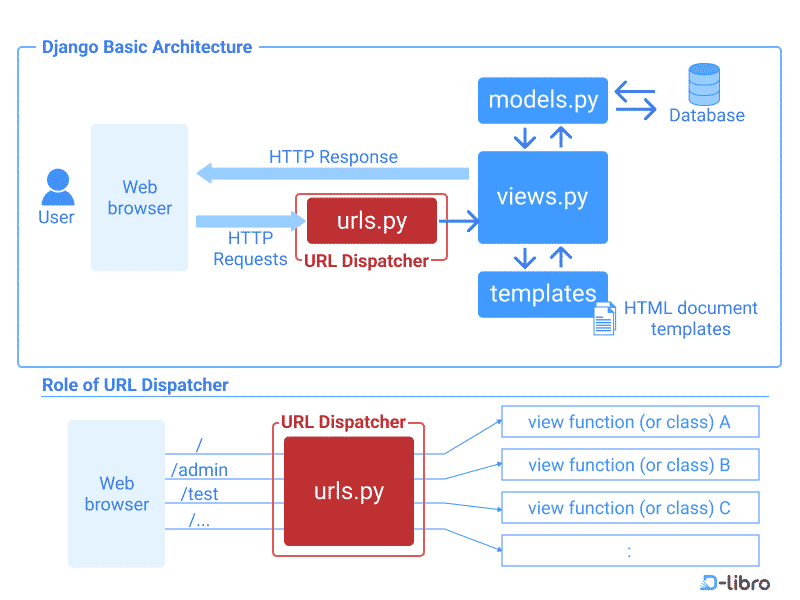
To see a quick animated version of this concept, watch the beginning of the following video.
Django Tutorial #3 - URLs and Views
The video "Django Tutorial #3 - URLs and Views" by Net Ninja provides an excellent animated diagram explaining the relationship between URLs and Views.
Watch from the beginning to 01:39. Focus on the triangle relationship: Browser Request -> urls.py -> views.py -> Browser Response.
2. Creating a Simple View
Before we can create a URL route, we need a destination—a view function. A view is simply a Python function that takes a web request and returns a web response.
Let's create two very simple views in our tasks app.
- Open the file
tasks/views.py. - It's currently almost empty. Add the following code:
# tasks/views.py

from django.http import HttpResponse

def index(request):
    return HttpResponse("This is the task manager homepage.")

def about(request):
    return HttpResponse("This is the about page.")
Here's what this code does:
from django.http import HttpResponse: We import theHttpResponseclass, which allows us to send a simple text-based response back to the browser.def index(request): ...: We define a function namedindex. All view functions must accept at least one argument, conventionally namedrequest. This object contains information about the incoming request.return HttpResponse(...): The view returns an instance ofHttpResponse, which in this case contains a simple string.
We now have two views, index and about, ready to be connected to URLs.
3. Configuring URL Patterns
Now for the main event: connecting URLs to our views. A key best practice in Django is to make apps self-contained. This means our tasks app should manage its own URLs. The main project will simply point traffic for a certain path (like /tasks/) to the app.
This creates a two-level structure:
- Project
urls.py: The main traffic controller. It usesinclude()to delegate to app-specific URL files. - App
urls.py: Manages the URLs for that specific app.
The following article explains this concept and the syntax for defining URL patterns very clearly.
Django URL patterns – how they work and how to use them
The article "Django URL patterns" from Hostinger provides a comprehensive guide to how Django routing works. We will focus on the sections explaining the core concepts.
Read the sections "How do URL patterns work in Django?" and "How do I create a URL pattern in Django?". Pay close attention to: The distinction between Project-level vs. app-level URLs. The use of the include() function. The three arguments of the path() function: route, view, and name.
Step 1: Modifying the Project's urls.py
Let's apply what you just read. We will tell our main project to hand off any request for the root URL (/) to our tasks app.
- Open
config/urls.py. - Import the
includefunction alongsidepath. - Modify the
urlpatternslist to look like this:
# config/urls.py

from django.contrib import admin
from django.urls import path, include # Make sure to import 'include'

urlpatterns = [
    path('admin/', admin.site.urls),
    path('', include('tasks.urls')), # Add this line
]
This new line tells Django: "For any URL that matches the empty string '' (which is the base URL of our site), include the URL patterns defined in the tasks.urls module."
Step 2: Creating the App's urls.py
Django is now looking for a file named tasks/urls.py, but it doesn't exist yet. Let's create it.
- In your
tasksdirectory, create a new file namedurls.py. - Add the following code to this new file:
# tasks/urls.py

from django.urls import path
from . import views # Import views from the current app directory

urlpatterns = [
    path('', views.index, name='index'),
    path('about/', views.about, name='about'),
]
Let's break down the path() function:
path('', views.index, name='index'):- Route
'': This matches the empty path. Since our project'surls.pyalready matched''and included this file, this pattern will handle the root URL of the site (e.g.,http://127.0.0.1:8000/). - View
views.index: When the route matches, Django will call theindexfunction from ourviews.pyfile. - Name
'index': We give this URL a unique name. This is a crucial best practice that allows us to refer to this URL elsewhere in our code without hardcoding the path. We will see the benefits of this later.
- Route
path('about/', views.about, name='about'): This maps the URL/about/to ouraboutview.
Your server (if it's still running) will have automatically reloaded. If not, start it now with python3 manage.py runserver.
Now, test your work!
- Go to
http://127.0.0.1:8000/. You should see: "This is the task manager homepage." - Go to
http://127.0.0.1:8000/about/. You should see: "This is the about page."
Success! You have configured your first URL routes.
Test your understanding!
Imagine you need to add a "contact" page to your site. What are the two files you would need to modify, and what single line of code would you add to each?
Show answer
tasks/views.py: You would need to add a new view function.def contact(request): return HttpResponse("This is the contact page.")tasks/urls.py: You would add a newpathtourlpatterns.path('contact/', views.contact, name='contact'),
4. A Glimpse of Dynamic URLs
Our current URLs are static. But for your task manager, you'll need dynamic URLs that can represent specific items, like tasks/1/ or tasks/5/.
Django handles this with path converters. These are special placeholders in your URL route that capture a piece of the URL and pass it to your view as an argument.
For a quick overview of how this works, read the following section from the Hostinger article.
Django URL patterns – how they work and how to use them
This section introduces the concept of capturing values from a URL.
Read the subsections "Dynamic URL patterns and parameters" and "URL routing with views". Focus on the syntax for path converters like <int:post_id> and see how the captured value is passed as an argument to the view function.
For example, if we were to create a detail page for a task, the URL pattern in tasks/urls.py might look like this (you don't need to add this code now):
# A future URL pattern
path('tasks/<int:task_id>/', views.task_detail, name='task-detail'),
And the corresponding view in tasks/views.py would look like this:
# A future view function
def task_detail(request, task_id):
    # We can now use the task_id variable to find the correct task in the database
    return HttpResponse(f"You are viewing task number {task_id}.")
If a user visits /tasks/15/, Django would call views.task_detail(request, task_id=15). We will use this exact pattern extensively when we build our task manager.
Conclusion
In this lesson, you bridged the gap between a user's request and your application's logic. You learned how to map URLs to views, creating your first real pages.
Key Takeaways:
- Django uses a URLconf (
urls.py) to map URL patterns to view functions. - It's a best practice to keep project-level and app-level URLs separate using
include(). - The
path()function is used to define a URL route, its corresponding view, and a uniquename. - Naming your URLs is crucial for creating maintainable and scalable applications.
- Path converters like
<int:name>allow for the creation of dynamic URLs that can handle variable data.
Preview of the Next Lesson:
Today, our views returned very simple HttpResponse objects. In the next lesson, "Create function-based views to handle HTTP requests and return responses," we will explore views in greater depth. You'll learn how to replace these simple text responses with full, dynamic HTML pages by using Django's template system.