Hello! Welcome to the first lesson of our "Django Core Concepts" module.
In the previous module, we built a strong foundation in Object-Oriented Python, learning how to create well-structured, maintainable classes. You now understand how to represent your objects clearly using __str__ and __repr__, a skill that will be invaluable for debugging as we build our web application.
Now, we're ready to transition from pure Python to web development. This lesson addresses the learning outcome: Set up a Django project and create a Django app. This is the first and most fundamental step in building any Django-powered website. We'll create the skeleton for our future Task Management application, establishing the file and folder structure that Django uses to organize a web project.
1. Projects vs. Apps: The Django Philosophy
Before we write any code, it's important to understand Django's core organizational concept: the distinction between a project and an app.
- A Project is the entire web application. It holds the configuration, settings, and URL mappings that apply to the whole site. Think of it as the house that contains everything.
- An App is a self-contained module within the project that provides a specific piece of functionality. For example, a project might have separate apps for user authentication, a blog, and a payment system. Think of an app as a specific room in the house, like the kitchen or the bedroom.
Our goal today is to build the "house" (the Django project) and then create the first "room" (a Django app that will eventually manage our tasks).
For a quick conceptual overview, let's hear this distinction explained by Programming with Mosh.
Django Tutorial for Beginners – Build Powerful Backends
This short clip from the video "Django Tutorial for Beginners" explains what Django apps are and why a project is structured as a collection of them.
Watch from 22:02 to 23:25. Focus on the analogy of apps on your mobile phone and the list of INSTALLED_APPS that comes with a new Django project.
2. Step 1: Preparing Your Development Environment
Every professional Python project starts with a clean, isolated environment. This prevents dependencies from one project from conflicting with another. We'll use Python's built-in venv module for this.
The following reading provides a clear, step-by-step guide to setting up this environment and installing Django.
How to Create a Django Project
This guide from Real Python, "How to Create a Django Project", details the standard commands for setting up a virtual environment and installing packages.
Read Step 1: Prepare Your Environment and Step 2: Install Django and Pin Your Dependencies. Follow the commands in your terminal to: Create a project folder (e.g., task_manager). Create a virtual environment inside it named venv. Activate the virtual environment. Install Django using pip. Create a requirements.txt file.
To summarize the key commands from that reading (assuming a macOS/Linux terminal):
mkdir task_manager && cd task_manager- Create and enter your project directory.python3 -m venv venv- Create the virtual environment.source venv/bin/activate- Activate it. You'll see(venv)in your prompt.pip install django- Install the Django framework.pip freeze > requirements.txt- Save your project's dependencies to a file. This is crucial for collaboration and deployment.
3. Step 2: Creating the Django Project
With Django installed, you can now generate the project boilerplate. We will use a single, concise video to walk through the main commands for creating both the project and the first app.
Watch the following video to see how to create the project structure.
Python Django Tutorial for Web Applications (Step-by-Step Setup in 25 Minutes)
This clip from the video "Python Django Tutorial for Web Applications" by Code with Josh provides a fast, practical walkthrough of the startproject and startapp commands.
Watch from 03:52 to 06:37. The presenter will use the django-admin startproject command to create the main project files. Pay attention to: The use of a . at the end of the command to avoid an extra folder level. The description of the key files generated: manage.py and the files inside the project configuration folder (settings.py, urls.py).
Let's do this for our own project. In your terminal (inside the task_manager folder with the virtual environment activated), run the following command:
# We'll name our project configuration 'config'
django-admin startproject config .
The . is important; it tells Django to create the files in the current directory (task_manager) rather than creating an extra, unnecessary parent folder. Your folder structure should now look like this:
task_manager/
├── venv/
├── config/
│   ├── __init__.py
│   ├── asgi.py
│   ├── settings.py
│   ├── urls.py
│   └── wsgi.py
└── manage.py
manage.py: Your command-line utility for interacting with your Django project. You'll use this for almost everything, from running the server to creating apps.config/: The package containing your project's configuration.settings.py: Contains all your project's settings, like database configuration, installed apps, and more.urls.py: The "table of contents" for your site, mapping URL patterns to their corresponding logic.
4. Step 3: Creating Your First Django App
Now that we have the project "house," let's create the "room" that will handle our tasks. We'll call this app tasks.
Let's continue with the same video to see this in action.
Python Django Tutorial for Web Applications (Step-by-Step Setup in 25 Minutes)
This next section of the same video demonstrates how to create an app within your project.
Watch from 06:37 to 08:50. The presenter will use python manage.py startapp to generate the app folder and will explain the purpose of the files inside.
Run the command in your terminal:
python3 manage.py startapp tasks
This creates a new folder named tasks with its own set of files. Your project structure now looks like this:
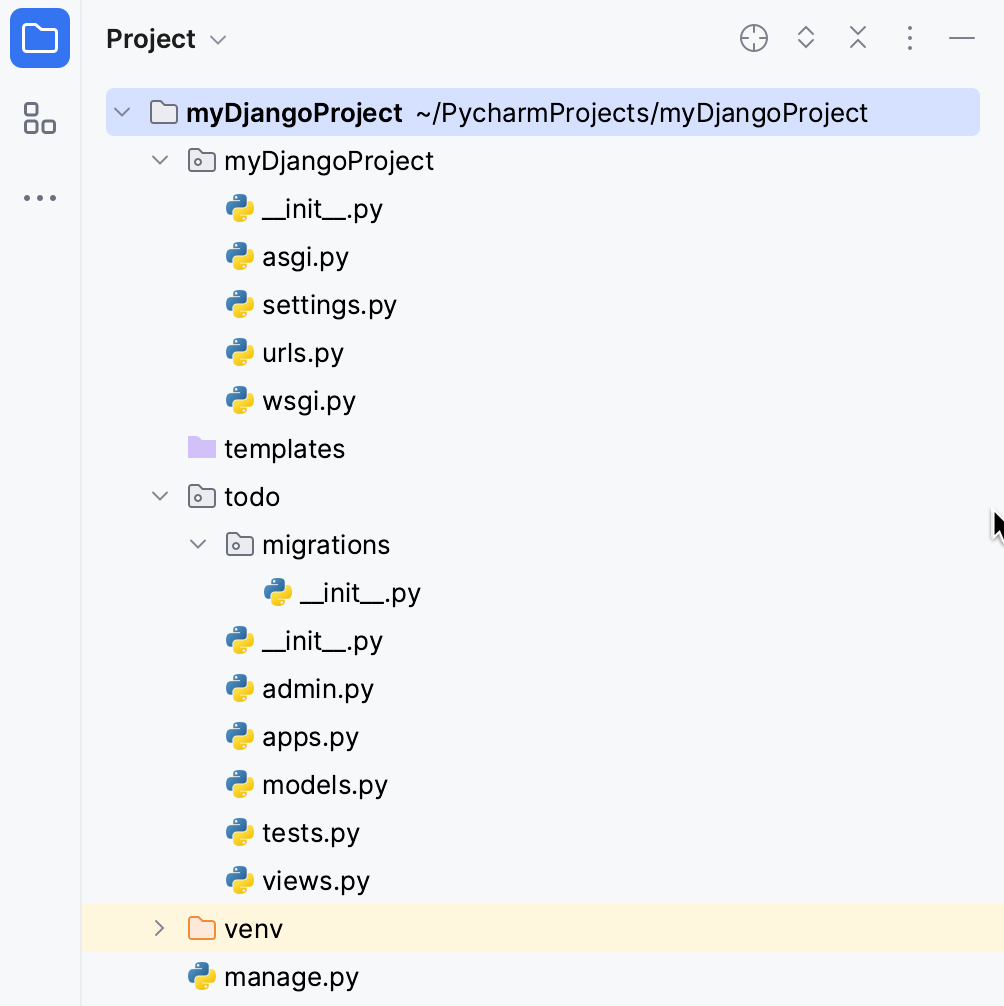
The key files in the tasks app folder are:
models.py: Where you will define your database structure (e.g., aTasktable with columns fortitle,description, anddue_date).views.py: Where you'll write the logic to handle web requests and define what the user sees.admin.py: For configuring how your models appear in Django's built-in admin interface.
5. Step 4: Registering the App and Verifying the Setup
You've created the app, but the Django project doesn't automatically know it exists. You must "register" it.
-
Register the App: Open
config/settings.py. Find theINSTALLED_APPSlist and add your new app. It's best practice to add the app's configuration class, which lives intasks/apps.py.# config/settings.py INSTALLED_APPS = [ 'django.contrib.admin', 'django.contrib.auth', 'django.contrib.contenttypes', 'django.contrib.sessions', 'django.contrib.messages', 'django.contrib.staticfiles', # My Apps 'tasks.apps.TasksConfig', # Add this line ] -
Run Initial Migrations: Django comes with built-in apps (like
authandadmin) that need database tables. Let's create them. This process is called running migrations.python3 manage.py migrate -
Run the Development Server: Finally, let's make sure everything works by starting the development server.
python3 manage.py runserver
Now, open a web browser and go to http://127.0.0.1:8000/. You should see a "The install worked successfully! Congratulations!" page. This confirms your project is set up correctly!
Test your understanding!
Based on the files Django generated, which file would you edit to accomplish each of the following tasks?
- Change the project's database settings.
- Define the data fields for a
Task(e.g.,title,completed). - Write the Python function that decides what happens when a user visits the homepage.
Show answer
- Change database settings:
config/settings.py - Define
Taskdata fields:tasks/models.py - Write homepage logic:
tasks/views.py(and you would connect it viaconfig/urls.py, which we'll cover next!)
Conclusion
Congratulations, you have successfully set up a Django project! This is a significant first step. You now have a working skeleton for your web application and understand how Django organizes code into projects and apps.
Key Takeaways:
- A Django project is the main container for your web application's settings and configurations.
- A Django app is a smaller, modular component that handles a specific feature.
- Key commands for setup are:
django-admin startproject <project_name> .python3 manage.py startapp <app_name>
- New apps must be registered in the
INSTALLED_APPSlist insettings.py. python3 manage.py runserverstarts a development server to let you test your site locally.
Preview of the Next Lesson:
Our site is running, but it doesn't do anything yet. In our next lesson, we will bring it to life. We will learn how to configure URL patterns to route requests to views. You'll write your first view—a Python function that takes a web request and returns a web response—and create your very first custom webpage.