Hello! Welcome back to building our task manager application.
In the previous lesson, you successfully implemented the "Read" functionality using ListView. You created a dashboard where users can see a list of all their tasks, which we populated using the CreateView from the lesson before. We now have the 'C' and 'R' of our CRUD (Create, Read, Update, Delete) operations in place.
Today, we'll tackle the 'U' by implementing the "Update" functionality. This lesson focuses on the learning outcome: Build the 'Update' functionality to edit an existing task using UpdateView. You'll learn how to create a view that presents a form pre-filled with an existing task's data, allowing the user to modify and save it.
Introducing UpdateView
Much like CreateView and ListView, UpdateView is another one of Django's powerful generic Class-Based Views (CBVs). Its purpose is to handle the logic for displaying a form to edit an existing model instance and processing the submitted changes.
It is remarkably similar to CreateView, but with one key difference: CreateView makes a new object, while UpdateView must first fetch an existing object from the database to edit. This means our URL will need to specify which task to update.
To get a clear overview of how UpdateView works and how it compares to CreateView, let's watch a short video.
Learn Django Class Based Views - UpdateView - Theory and Examples
The video 'Learn Django Class Based Views - UpdateView' by Very Academy clearly explains the core purpose of UpdateView and its main distinction from CreateView.
Watch from the beginning to 03:47. Focus on how the presenter explains that UpdateView's primary job is to first retrieve the specific object that needs to be updated before presenting the form.
As you saw, UpdateView handles the crucial step of calling self.get_object() behind the scenes to load the correct item from the database, which then populates the form fields for editing.
Step 1: Creating the TaskUpdate View
Let's begin by adding the TaskUpdate view to your app's views.py file. This class will look very similar to the TaskCreate view you've already built.
# your_app/views.py
from django.views.generic.edit import UpdateView
from django.urls import reverse_lazy
# ... other imports ...

from .models import Task
# ... other views like TaskList, TaskCreate ...

class TaskUpdate(LoginRequiredMixin, UpdateView):
    model = Task
    fields = ['title', 'description', 'completed']
    success_url = reverse_lazy('tasks')
Let's quickly review the components:
LoginRequiredMixin: As always, this ensures only logged-in users can access this page.UpdateView: The generic view we are inheriting from.model = Task: We tell the view which model it will be operating on.fields = ['title', 'description', 'completed']: These are the model fields that will be displayed in the form for editing.success_url = reverse_lazy('tasks'): After a successful update, the user will be redirected back to the main task list.
Step 2: Configuring the URL Pattern
UpdateView needs to know which specific task to edit. The standard way to do this is by passing the object's primary key (pk) in the URL.
Open your app's urls.py and add a new path for our TaskUpdate view.
# In your_app/urls.py
from django.urls import path
from .views import TaskList, TaskCreate, TaskUpdate # Import TaskUpdate

urlpatterns = [
    path('', TaskList.as_view(), name='tasks'),
    path('task-create/', TaskCreate.as_view(), name='task-create'),
    path('task-update/<int:pk>/', TaskUpdate.as_view(), name='task-update'), # New URL
]
Notice the new pattern: task-update/<int:pk>/.
<int:pk>is a path converter. It tells Django to match an integer in this part of the URL and pass it to the view as a keyword argument namedpk(primary key).UpdateViewautomatically uses thispkto fetch the correctTaskobject from the database.
Step 3: Creating the Form Template
By convention, UpdateView looks for a template named <model_name>_form.html. In our case, that would be task_form.html. Since the form for creating a task and updating a task is often identical, we can reuse the same template.
However, it's good practice to have separate templates if you want to customize them, for instance, by changing the title or submit button text. Let's create a new template for updating.
First, update your TaskUpdate view in views.py to point to a specific template:
# your_app/views.py
class TaskUpdate(LoginRequiredMixin, UpdateView):
    model = Task
    fields = ['title', 'description', 'completed']
    success_url = reverse_lazy('tasks')
    template_name = 'your_app/task_update.html' # Specify the template name
Now, create the task_update.html file inside your your_app/templates/your_app/ directory.
Get Done ✅ : A step-by-step guide in building a Django To ...
The 'Get Done ✅' guide provides a perfect, simple template for an update form. We'll use this as our base.
Locate section '6.7 task_update.html' and use the provided HTML code for your task_update.html file. Notice how it's a standard form with {% csrf_token %} and {{ form.as_p }}.
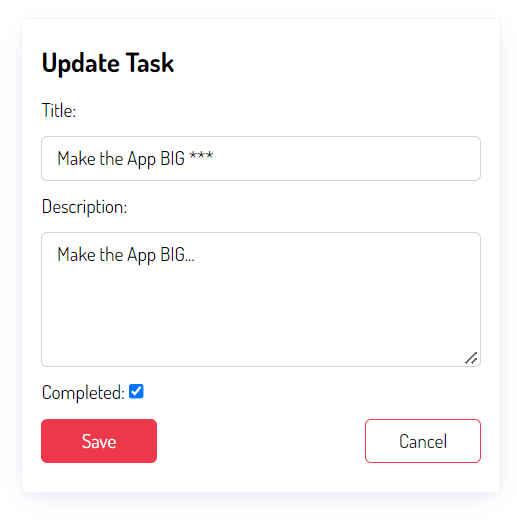
Your task_update.html file should look like this:
<!-- your_app/templates/your_app/task_update.html -->
{% extends 'base.html' %} {# Make sure this points to your base template #}
{% block content %} {# Or whatever your content block is named #}
<h2>Update Task</h2>
<form method="post">
    {% csrf_token %}
    {{ form.as_p }}
    <button type="submit">Save</button>
    <a href="{% url 'tasks' %}">Cancel</a>
</form>
{% endblock content %}
When this template is rendered, Django will automatically fill the form fields with the data from the task being edited.
Step 4: Adding an "Edit" Link to the Task List
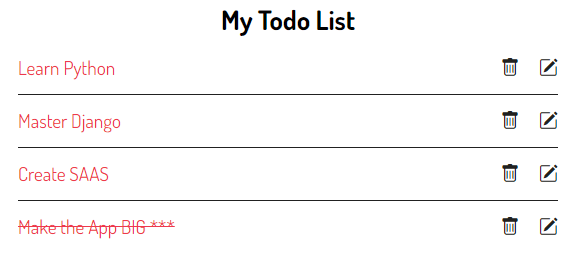
The final piece is to provide a way for users to get to the update page. We need to add an "Edit" link next to each task in our task_list.html template.
Open your_app/templates/your_app/task_list.html and modify the loop that displays the tasks.
<!-- your_app/templates/your_app/task_list.html -->
...
{% for task in tasks %}
    <li>
        <strong>{{ task.title }}</strong>
        <!-- Add the edit link here -->
        <a href="{% url 'task-update' task.pk %}">Edit</a>
    </li>
{% endfor %}
...
The key part is <a href="{% url 'task-update' task.pk %}">Edit</a>.
{% url 'task-update' ... %}: This uses theurltemplate tag to generate the correct URL for our update view.task.pk: We pass the primary key of the current task in the loop as an argument to the URL tag. This fills in the<int:pk>part of our URL pattern. For a task withid=5, this will generate the URL/task-update/5/.
A Crucial Security Enhancement
We have a potential security flaw. As it stands, any logged-in user could guess a URL like /task-update/5/ and edit a task that doesn't belong to them. We must prevent this.
Just as you did with ListView in the previous lesson, you can override the get_queryset() method to ensure a view only operates on objects belonging to the current user.
Update your TaskUpdate view in views.py one last time:
# your_app/views.py
class TaskUpdate(LoginRequiredMixin, UpdateView):
    model = Task
    fields = ['title', 'description', 'completed']
    success_url = reverse_lazy('tasks')
    template_name = 'your_app/task_update.html'

    def get_queryset(self):
        """
        Ensure that the user can only update their own tasks.
        """
        owner = self.request.user
        return self.model.objects.filter(user=owner)
By adding this get_queryset method, UpdateView will now be restricted. When it tries to fetch an object using a pk from the URL, it will only look within the set of tasks owned by the current user. If a user tries to access /task-update/5/ but task 5 belongs to someone else, the filter() will come up empty, and Django will correctly raise a 404 Not Found error.
Test your understanding!
In TaskUpdate, why do we override get_queryset() instead of just checking self.request.user == self.get_object().user inside another method?
Show answer
While you could perform the check in another method (like dispatch() or get_object()), overriding get_queryset() is the Django-recommended "best practice." It leverages the framework's existing data-fetching logic. By constraining the QuerySet before the object is fetched, you ensure that the view never even has a chance to access an object it shouldn't. This is considered a cleaner and more robust security pattern that integrates seamlessly with the CBV's lifecycle.
Conclusion
Fantastic work! You have now implemented the "Update" functionality, a core feature of any data-driven application. Users can now edit their existing tasks, and you've done so in a secure way that respects data privacy.
Key Takeaways:
UpdateViewis the generic CBV for editing existing model instances.- It's very similar to
CreateViewbut requires a primary key (pk) in the URL to identify which object to fetch. - The form in an
UpdateViewtemplate is automatically pre-populated with the object's current data. - You must override
get_queryset()in views that modify specific objects (UpdateView,DeleteView) to ensure users can only act on their own data.
Preview of the Next Lesson:
We have now covered Create, Read, and Update. The final piece of our core CRUD functionality is Delete. In the next lesson, you will build the 'Delete' functionality for tasks using DeleteView, including a confirmation step to prevent accidental deletions.