Hello! Welcome back to our project.
In our last session, we successfully implemented the "Update" functionality using UpdateView, allowing users to edit their tasks. With Create, Read, and Update operations now in place, we're just one step away from completing the core functionality of our task manager.
This lesson focuses on the final piece of the puzzle: Build the 'Delete' functionality for tasks using DeleteView, including a confirmation step. This will complete the CRUD (Create, Read, Update, Delete) cycle for our application.
Understanding DeleteView
Just like the other generic views you've used, DeleteView is a Class-Based View (CBV) provided by Django to handle a common task: deleting a specific object from the database.
It follows a simple and safe two-step process:
- GET Request: When a user first navigates to the delete URL,
DeleteViewdisplays a confirmation page. This is a crucial user experience feature to prevent accidental deletions. - POST Request: If the user confirms the deletion (e.g., by clicking a "Delete" button inside a form), the view receives a POST request, deletes the object from the database, and then redirects to a success URL.
This workflow directly implements the "confirmation step" required by our learning outcome.
Step 1: Creating the TaskDelete View
Let's start by adding the TaskDelete view to your app's views.py file. It will look very similar to the TaskUpdate view.
How to Create a CRUD App With Django Class-Based Views
The article 'How to Create a CRUD App With Django Class-Based Views' provides a clear and direct example of implementing DeleteView. We will use this as our guide.
In the article from MakeUseOf, find the section titled 'Create a View to Handle Delete Operations'. Read the short explanation and observe the code for TaskDeleteView.
Based on the resource, add the following to your_app/views.py:
# your_app/views.py
from django.views.generic.edit import DeleteView
from django.contrib.auth.mixins import LoginRequiredMixin
# ... other imports ...

from .models import Task
# ... other views like TaskList, TaskCreate, TaskUpdate ...

class TaskDelete(LoginRequiredMixin, DeleteView):
    model = Task
    success_url = reverse_lazy('tasks')
    template_name = 'your_app/task_confirm_delete.html'
Let's break down these attributes:
model = Task: Tells the view which model it operates on.template_name: We explicitly name the template for our confirmation page. By convention, if you don't specify this, Django looks for<model_name>_confirm_delete.html.success_url = reverse_lazy('tasks'): This is mandatory. After deleting the object, Django needs to know where to redirect the user. We send them back to the main task list. Unlike withUpdateView, you can't rely on the object itself to determine the URL, because by the time the redirect happens, the object no longer exists in the database.
Step 2: Creating the Confirmation Template
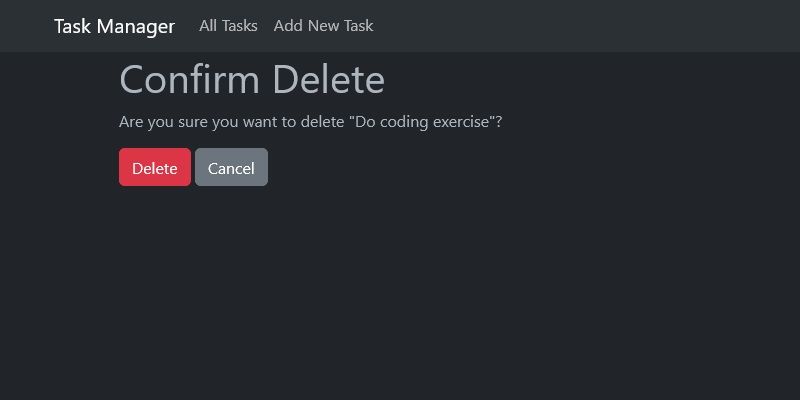
Now, we need to create the task_confirm_delete.html template. This page will ask the user to confirm their action.
How to Create a CRUD App With Django Class-Based Views
Let's use the template provided in the 'How to Create a CRUD App' article. It contains all the necessary elements for a confirmation page.
Locate the 'Delete Task Template' section and use the provided HTML code to create your task_confirm_delete.html file inside your your_app/templates/your_app/ directory.
Your task_confirm_delete.html file should look like this:
<!-- your_app/templates/your_app/task_confirm_delete.html -->
{% extends 'base.html' %} {# Or your base template file #}
{% block content %}

<h2>Confirm Delete</h2>
<p>Are you sure you want to delete "{{ object.title }}"?</p>

<form method="post">
    {% csrf_token %}
    <button type="submit">Delete</button>
    <a href="{% url 'tasks' %}">Cancel</a>
</form>

{% endblock content %}
Notice these key parts:
{{ object.title }}:DeleteViewpasses the object being deleted to the template context, by default asobject. We use this to show the user exactly what they are deleting.<form method="post">: The form is crucial. Clicking the "Delete" button will submit this form via POST, triggering the deletion logic in the view.{% csrf_token %}: A required security tag for any POST form in Django.<a href="{% url 'tasks' %}">Cancel</a>: Provides an easy way for the user to back out without deleting anything.
Step 3: Configuring the URL Pattern
Like UpdateView, DeleteView needs to know which task to delete. We'll add a URL pattern that includes the task's primary key (pk).
Open your app's urls.py file and add the path for TaskDelete:
# In your_app/urls.py
from django.urls import path
from .views import TaskList, TaskCreate, TaskUpdate, TaskDelete # Import TaskDelete

urlpatterns = [
    path('', TaskList.as_view(), name='tasks'),
    path('task-create/', TaskCreate.as_view(), name='task-create'),
    path('task-update/<int:pk>/', TaskUpdate.as_view(), name='task-update'),
    path('task-delete/<int:pk>/', TaskDelete.as_view(), name='task-delete'), # New URL
]
The pattern task-delete/<int:pk>/ works just like it did for the update view, capturing the ID from the URL and passing it to the view.
Step 4: Adding a "Delete" Link to the Task List
Finally, let's add a "Delete" link next to each task in task_list.html so users can initiate the process.
Open your_app/templates/your_app/task_list.html and add the link inside your for loop:
<!-- your_app/templates/your_app/task_list.html -->
...
{% for task in tasks %}
    <li>
        <strong>{{ task.title }}</strong>
        <!-- Add the delete link here -->
        <a href="{% url 'task-update' task.pk %}">Edit</a>
        <a href="{% url 'task-delete' task.pk %}">Delete</a>
    </li>
{% endfor %}
...
The new link, <a href="{% url 'task-delete' task.pk %}">Delete</a>, uses the url template tag to dynamically generate the correct URL for each task's delete page.
Step 5: Securing the DeleteView
We have the same security concern we addressed with UpdateView. Any logged-in user could guess a URL like /task-delete/7/ and delete a task that isn't theirs.
We will apply the exact same security pattern by overriding the get_queryset() method. This is a powerful demonstration of how you can reuse logic across your class-based views.
Update your TaskDelete view in views.py:
# your_app/views.py
class TaskDelete(LoginRequiredMixin, DeleteView):
    model = Task
    success_url = reverse_lazy('tasks')
    template_name = 'your_app/task_confirm_delete.html'

    def get_queryset(self):
        """
        Ensure users can only delete their own tasks.
        """
        owner = self.request.user
        return self.model.objects.filter(user=owner)
By adding get_queryset, you are filtering the set of objects the DeleteView is allowed to operate on. If a user tries to access the delete URL for an object they don't own, the queryset will be empty, and Django will correctly return a 404 Not Found page, preventing unauthorized deletions.
Test your understanding!
What would happen if you forgot to add the <form method="post"> element to your task_confirm_delete.html template, but kept the "Delete" button?
Show answer
Without a form, clicking the "Delete" button would do nothing. DeleteView requires a POST request to trigger the actual deletion. A button outside a form doesn't submit any data to the server. The user would be stuck on the confirmation page, unable to complete the action.
Conclusion
Congratulations! You have now implemented the full range of CRUD operations for your task manager. Users can create, read, update, and—most importantly—safely delete their tasks.
Key Takeaways:
DeleteViewis Django's generic CBV for deleting objects.- It uses a two-step GET/POST workflow to provide a confirmation step, which is best practice for destructive actions.
- A confirmation template (e.g.,
task_confirm_delete.html) containing a<form method="post">is required. - The
success_urlattribute is mandatory for redirection after a successful deletion. - You must override
get_queryset()to ensure users can only delete their own data, preventing a major security vulnerability.
Preview of the Next Lesson:
With all the core CRUD functionality in place, our application is highly functional. In the next lesson, we will focus on refining the user experience by implementing a user-specific dashboard that will serve as the main landing page, tying everything together cleanly.