Hello! Welcome back to our journey building a full-stack task manager with Django.
In the last lesson, you successfully implemented the "Create" part of our application using CreateView. You built a form that allows users to add new tasks and correctly associates those tasks with the logged-in user. We ended by setting the success_url to redirect to a page named 'tasks', which we haven't built yet.
Today, we're going to build that page. This lesson directly addresses the learning outcome: Build the 'Read' functionality to list all of a user's tasks using ListView. We'll bring the "R" (Read) from CRUD into our application, creating the main dashboard where users can see all their tasks.
From Creation to Display: Introducing ListView
Just as CreateView is Django's shortcut for building creation forms, ListView is a generic Class-Based View (CBV) designed to display a list of objects from a model. It handles the boilerplate of querying the database and passing the list of objects to a template for rendering.
Conceptually, the process looks like this:
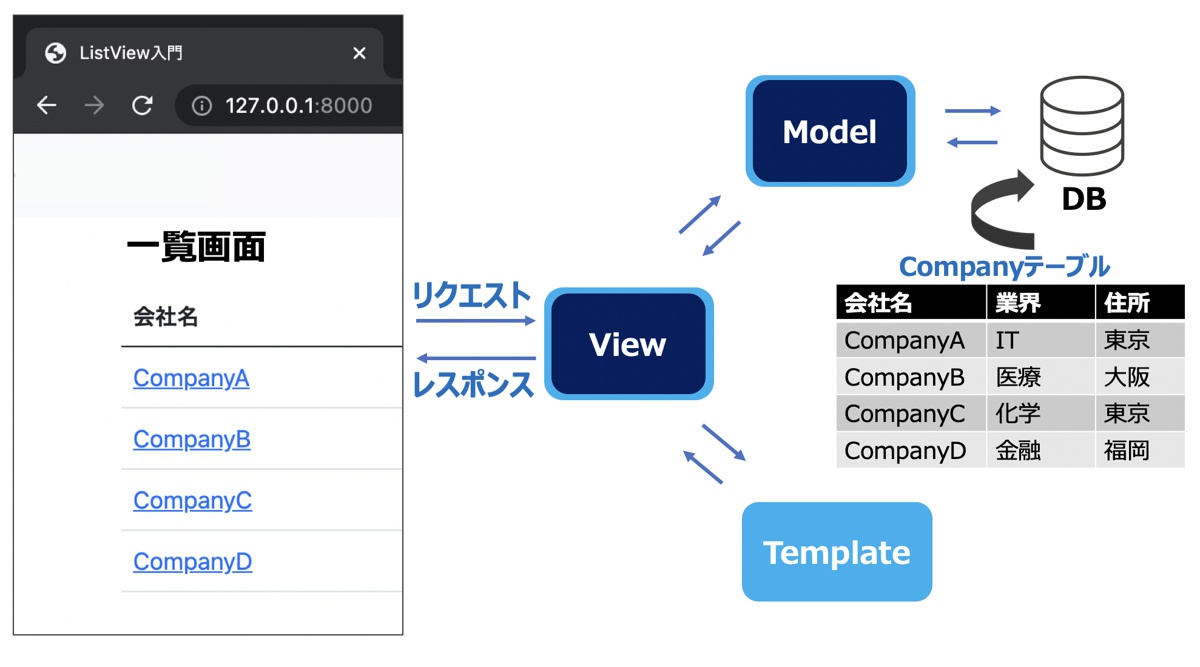
Using ListView saves you from writing repetitive code to fetch and display data, which is why it's a fundamental tool in Django development.
To get a better sense of how ListView works and what it's used for, let's start with a brief overview.
Learn Django Class Based Views - ListView - Theory and Examples
The video 'Learn Django Class Based Views - ListView' by Very Academy provides a clear explanation of what ListView is designed for and how it simplifies displaying lists of objects.
Watch from 00:00:33 to 00:02:08 to understand the core purpose of ListView, and then from 04:53 to 07:48 to see a practical demonstration of how little code is needed to get it working.
Step 1: Implementing the TaskList View
Let's start by creating the view. Open your app's views.py file. We will define a new class that inherits from ListView.
A naive implementation might look like this:
# In your_app/views.py
from django.views.generic.list import ListView
from .models import Task
# ... other imports and views ...

class TaskList(ListView):
    model = Task
However, this has a critical flaw: it would fetch all Task objects from the database and display them to any user. This is a major data privacy issue. We need to ensure that users can only see their own tasks.
To fix this, we'll do two things, just as we did with CreateView:
- Require login: Use
LoginRequiredMixinto ensure only authenticated users can access the page. - Filter data: Override a method in
ListViewto filter the tasks based on the current user.
The correct method to override for filtering the main list of objects is get_queryset(). This method is responsible for determining the list of objects that the view will display.
Manage Your To-Do Lists Using Python and Django
The article 'Manage Your To-Do Lists Using Python and Django' from Real Python provides an excellent example of overriding get_queryset() to filter a list. While their example filters based on a URL parameter, the principle is identical for filtering by the logged-in user.
Read the section 'Subclass ListView to Display a List of To-Do Items'. Pay close attention to the ItemListView class and its get_queryset method. This shows the pattern we will use to return a filtered list of objects.
Now, let's write the correct and secure view in views.py.
# your_app/views.py
from django.views.generic.list import ListView
from django.contrib.auth.mixins import LoginRequiredMixin

from .models import Task
# ... other views ...

class TaskList(LoginRequiredMixin, ListView):
    model = Task
    context_object_name = 'tasks' # Custom name for the list of objects in the template

    def get_queryset(self):
        """
        Return the list of items for this view.
        The list is filtered to only include tasks owned by the current user.
        """
        return Task.objects.filter(user=self.request.user)
Let's break this down:
LoginRequiredMixin: As before, this protects the view. If a non-logged-in user tries to access it, they'll be redirected to the login page.context_object_name = 'tasks': By default,ListViewpasses the list of objects to the template under the variable nameobject_list. This isn't very descriptive. By settingcontext_object_name, we can give it a more intuitive name,'tasks', which we will use in our template.def get_queryset(self): We override this method. Instead of letting the default implementation returnTask.objects.all(), we explicitly returnTask.objects.filter(user=self.request.user). This queries the database forTaskobjects where theuserfield matches the currently logged-in user (self.request.user).
Test your understanding!
What would happen if you forgot to include LoginRequiredMixin but kept the get_queryset method as it is? Would an anonymous (not logged in) user see anything?
Show answer
The page would likely load, but it would be empty. The get_queryset method would try to filter by self.request.user. For an anonymous user, self.request.user is an AnonymousUser object. The filter Task.objects.filter(user=self.request.user) would correctly return an empty QuerySet, as no tasks in the database are assigned to an AnonymousUser. While this prevents a data leak, it's better to use LoginRequiredMixin to redirect them to the login page, which provides a much better user experience.
Step 2: Creating the URL Pattern
Now we need to connect our TaskList view to a URL. This is the 'tasks' URL we've been waiting to create. We'll make it the root URL of our app, so visiting http://127.0.0.1:8000/ will show the task list.
Open your app's urls.py and add the new pattern:
# In your_app/urls.py
from django.urls import path
from .views import TaskList, TaskCreate # Import TaskList

urlpatterns = [
    path('', TaskList.as_view(), name='tasks'), # The root URL now points to our list view
    path('task-create/', TaskCreate.as_view(), name='task-create'),
    # ... any other URLs you might add ...
]
Make sure you import TaskList at the top of the file. By giving this path the name='tasks', the success_url from our TaskCreate view will now work correctly.
Step 3: Building the HTML Template
ListView automatically looks for a template named <model_name>_list.html (so, task_list.html in our case). Let's create this file in your app's templates directory (your_app/templates/your_app/).
This template will receive the context from our view, which includes the list of tasks under the name tasks. We can loop through this list to display each one.
<!-- your_app/templates/your_app/task_list.html -->

<h1>My Tasks</h1>

<a href="{% url 'task-create' %}">Add New Task</a>

<hr>

{% if tasks %}
    <ul>
    {% for task in tasks %}
        <li>
            <strong>{{ task.title }}</strong>
            <p>{{ task.description|truncatewords:20 }}</p>
        </li>
    {% endfor %}
    </ul>
{% else %}
    <p>You have no tasks yet. Get started by adding one!</p>
{% endif %}
Key Template Features:
<a href="{% url 'task-create' %}">: This provides a convenient link for the user to navigate to the creation page we built in the last lesson. The{% url %}tag looks up the URL by its name.{% if tasks %}...{% else %}...{% endif %}: This is a powerful feature of the Django Template Language. It checks if thetaskslist is empty. If it's not, it proceeds to the{% for %}loop. If it is empty, it displays the message in the{% else %}block.{% for task in tasks %}...{% endfor %}: This loop iterates over everytaskobject in ourtaskslist and renders the HTML inside the loop for each one.{{ task.title }}: We can access the attributes of eachtaskobject using dot notation.|truncatewords:20: This is a template filter. It truncates the description to the first 20 words, which is useful for keeping the list view clean.
The following article provides another great, fully-styled example of a task list template, which you may find useful for inspiration.
Get Done ✅ : A step-by-step guide in building a Django To ...
The 'Get Done ✅' guide shows a complete task_list.html template. It's a great reference for how to structure your list and include extra information.
Find the section '6.6 task_list.html' to see a more advanced template. Notice how it welcomes the user ({{ request.user.username }}) and provides links for editing and deleting tasks, which are features we will build soon.
Now, run your server (python manage.py runserver), log in, and navigate to http://127.0.0.1:8000/. You should see a list of all the tasks you created in the last lesson!
Conclusion
Excellent work today! You have successfully implemented the "Read" functionality for your task manager. Users can now see a list of their own tasks, and you've connected the create and read views into a cohesive user experience.
Key Takeaways:
ListViewis the generic CBV for displaying lists of objects.- It's critical to filter data for the current user to ensure privacy.
- Overriding the
get_queryset()method is the standard and recommended way to filter the objects displayed by aListView. - Using
LoginRequiredMixinprotects your views from unauthorized access. - You can customize the context variable name with
context_object_nameto make your templates more readable.
Preview of the Next Lesson:
Now that users can create and read tasks, the next logical step is to allow them to modify existing tasks. In the next lesson, you will build the 'Update' functionality to edit an existing task using UpdateView. This will bring us one step closer to a fully-featured CRUD application.