In our previous session, you successfully set up your professional development environment by installing and configuring Visual Studio Code. You created your first project folder and an empty index.html file, which is now ready to become a real web page.
This lesson marks your first step into writing actual HTML code. We will construct the fundamental skeleton that every single web page on the internet is built upon. By the end of this session, you will be able to create a minimal, valid HTML document using the four essential building blocks: the DOCTYPE declaration, and the <html>, <head>, and <body> elements.
The Anatomy of an HTML Document
Before we write any code, it's important to understand the structure. Think of an HTML document like a tree. It has a single root, from which other branches grow. All content on the page is organized within this nested structure.
The following diagram illustrates this core hierarchy.

Every HTML document you create will follow this exact pattern. Let's break down what each part does. The following article from The Odin Project provides a clear explanation of this fundamental "boilerplate."
The Odin Project HTML Boilerplate | The Odin Project
This article explains the purpose of the core components that make up a basic HTML page. It's a great introduction to the essential structure you'll be building.
Read the following sections to understand the role of each part: Start with The DOCTYPE, which explains the purpose of this initial declaration. Next, read the section on the HTML element to learn about the root container. Continue to the Head element section to understand where metadata goes. We will cover the specific elements that go inside the <head>, like <title>, in our next lesson. Finally, read about the Body element, which contains all the visible content.
To summarize the key ideas from that reading:
<!DOCTYPE html>: This is not an HTML tag, but a declaration. It must be the very first line of your file. It tells the web browser that the document should be interpreted using the modern HTML5 standard.<html>element: This is the root element of the page. All other elements are "nested" inside it.<head>element: This contains metadata—information about the webpage, such as its title or character encoding. Nothing inside the<head>is displayed on the actual page.<body>element: This contains all the content that you want to display to the user, including text, images, links, and more.
Hands-On: Building Your First HTML Skeleton
Now it's time to apply this knowledge. You will build this structure in the index.html file you created in the last lesson.
First, let's see how this is done by watching a developer type it out manually. This video segment is excellent for reinforcing the structure we just discussed.
Master HTML with Visual Studio Code | Beginner's Guide
This video from Framework Tech demonstrates how to create the basic HTML document structure from scratch in VS Code.
Watch the portion from this timestamp. Pay close attention to the nesting of the tags and the explanation of the head versus the body.
Now, it's your turn.
- Open the
vscode101folder in Visual Studio Code if it's not already open. - Click on the
index.htmlfile in the Explorer sidebar to open it in the editor. - Carefully type the following code into the file. Pay attention to the indentation, which helps visualize the nested structure.
<!DOCTYPE html>
<html>
  <head>
  </head>
  <body>
  </body>
</html>
- Save the file (File > Save, or
Ctrl+S/Cmd+S). Remember the "Format on Save" setting you enabled? VS Code should automatically ensure your code is perfectly indented.
You have just created your first valid HTML document! It doesn't display anything yet, because the <body> is empty, but the browser now recognizes it as a proper web page.
The Professional Shortcut: Emmet
Typing that boilerplate manually is good for learning, but in practice, developers use shortcuts. VS Code has a powerful built-in tool called Emmet that helps you write HTML much faster.
You can generate the entire HTML skeleton with just a few keystrokes. The next segment of the video you just watched demonstrates this powerful shortcut.
Master HTML with Visual Studio Code | Beginner's Guide
This part of the video shows you the standard, efficient way to create the HTML boilerplate using an Emmet shortcut in VS Code.
Now, watch the segment from this timestamp. The instructor demonstrates the html:5 shortcut.
Let's try this yourself.
- Delete all the code you just typed into your
index.htmlfile, so it is blank again. - Type
html:5and press theEnterorTabkey.
Instantly, VS Code generates the complete HTML boilerplate for you.
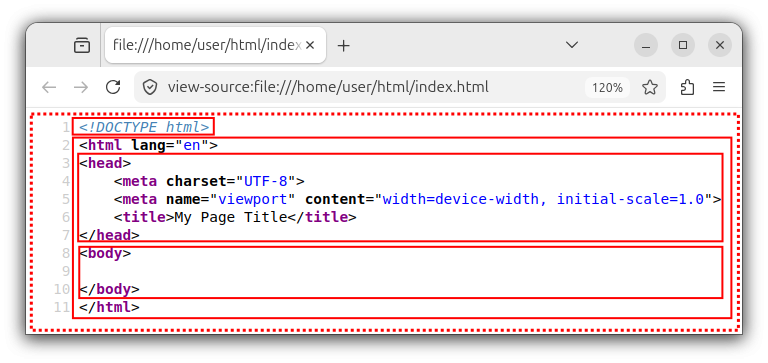
You'll notice that this shortcut adds a few more things than we typed manually. For now, don't worry about the lang="en" attribute or the <meta name="viewport"...> tag. We will focus only on the core structure. The generated code perfectly sets us up for our next lesson.
Conclusion
In this lesson, you moved from setting up your tools to writing the foundational code for any web page. You learned about the non-negotiable structure that provides order and meaning to an HTML document.
Key Takeaways:
- Every HTML document requires a specific skeleton:
<!DOCTYPE html>, followed by an<html>element that contains a<head>and a<body>. - The
<head>section is for metadata (data about the page) and is not visible to the user. - The
<body>section holds all the content that will be displayed in the browser. - Using the Emmet shortcut
html:5in VS Code is the standard, professional way to generate this boilerplate instantly.
In our next lesson, we will zoom in on the <head> section. You will learn how to add a title to your page—the text that appears in the browser tab—and how to include a crucial meta tag that ensures your text displays correctly across all browsers and languages.