Welcome back! In our last session, we created the fundamental skeleton of an HTML document using the html:5 shortcut in VS Code. This automatically generated the essential DOCTYPE, html, head, and body structure, and even pre-filled the <head> with some important tags.
Today, we will dive into that <head> section to understand and customize two of the most critical pieces of information for any webpage. You will learn how to set a proper page title and ensure your page can correctly display any character you might want to use. This is your first step in moving from a generic template to a webpage with its own identity.
The Purpose of the <head> Element
As a quick recap, the <head> element is a container for metadata: data about your HTML document. This information is not displayed on the main part of the page itself, but it's used by the browser, search engines, and other web services to understand and process your content correctly.
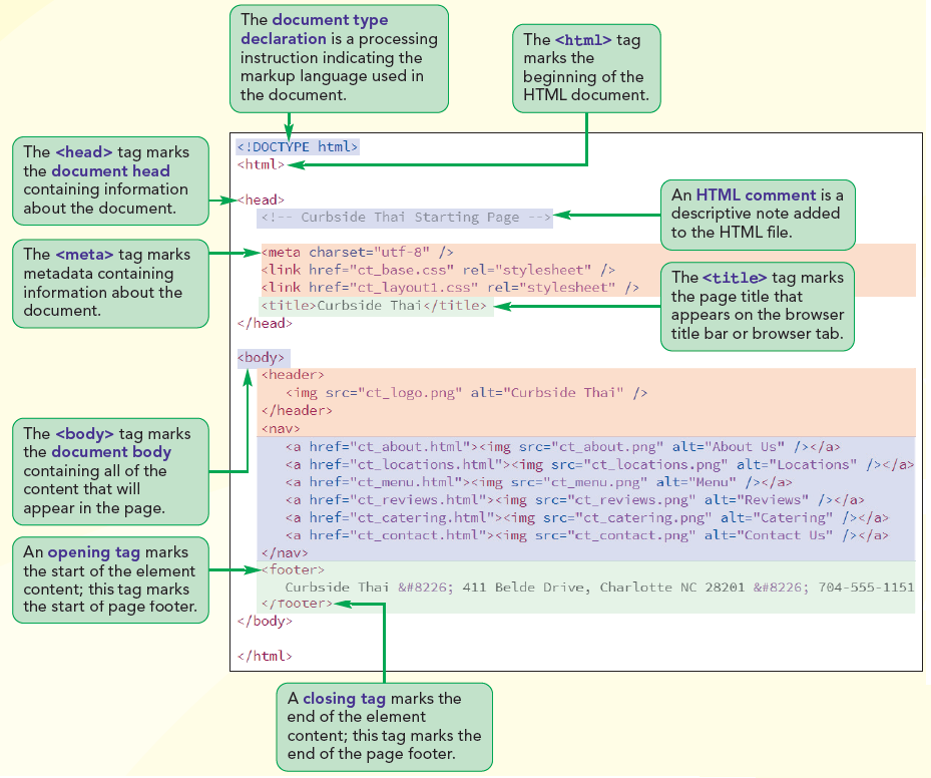
The two most fundamental pieces of metadata, which should be included in every HTML file you create, are the document's title and its character set.
Defining the Page Title
The first tag we'll examine is <title>. This element does exactly what its name suggests: it defines the title of your document. This title is not visible within the main browser window but appears in other crucial places:
- The browser's tab.
- A user's bookmarks or favorites.
- Search engine results pages (like Google).
A clear and descriptive title is vital for both user experience and search engine optimization (SEO).
The following short video provides a great explanation of the <title> tag's function and importance.
This clip from the "Every HTML Head Tag Explained" video by Train To Code clearly shows where the title appears and why it's a required part of your document.
Please watch the section from the beginning of the video. The speaker explains the purpose of the title tag and where it is displayed.
Hands-On: Changing Your Page Title
Let's apply this. When you used the html:5 shortcut, VS Code likely generated a default title, such as <title>Document</title>. Let's change it to something more meaningful.
- Open your
vscode101project folder in VS Code. - Open the
index.htmlfile. - Locate the
<title>element inside the<head>section. - Change the text between the opening
<title>and closing</title>tags to "My First Web Page". - Save the file (
Ctrl+SorCmd+S).
Your code should now look like this:
<!DOCTYPE html>
<html lang="en">
<head>
  <meta charset="UTF-8">
  <meta name="viewport" content="width=device-width, initial-scale=1.0">
  <title>My First Web Page</title>
</head>
<body>

</body>
</html>

Specifying the Character Set with <meta>
Next, let's look at the line that reads <meta charset="UTF-8">. This is another essential piece of metadata.
The <meta> tag is a general-purpose tag used to specify metadata that can't be expressed by other dedicated tags like <title>. In this case, we are using the charset attribute to define the character encoding for the document.
Think of character encoding as a dictionary that the browser uses to convert the bytes of your file into the readable characters you see on screen. For historical reasons, many different "dictionaries" exist. By specifying UTF-8, we are telling the browser to use the universal, modern standard. UTF-8 can represent almost every character and symbol from every language in the world, which is why it is the required standard for HTML5.
This next clip from the same video explains the purpose of the <meta charset> tag.
This segment explains what the <meta> tag is for and specifically details the function of the charset="UTF-8" attribute.
Now, watch the portion of the video covering the meta tag.
To solidify your understanding of these required head elements, the following reading provides a detailed reference.
This article from web.dev, a resource maintained by Google, explains the components that go inside the <head> of an HTML document.
In the article, find the section titled "Required components inside the <head>". Please read the two subsections within it: Start with Character encoding. Pay attention to why UTF-8 is the standard and why this tag should come first in the <head>. Then, read the section on the Document title to reinforce what you've just learned.
The key takeaway is that <meta charset="UTF-8"> should always be the very first element inside your <head>. This ensures the browser knows how to interpret all characters correctly, even those that might appear in the <title> itself, before it tries to render them. Fortunately, the html:5 shortcut you learned places it correctly for you.
Conclusion
In this lesson, you took control of your webpage's metadata. While these changes aren't visible in the main content area, they are fundamental to how your page is identified and understood by browsers and search engines.
Key Takeaways:
- The
<head>element contains metadata, which is information about the page. - The
<title>tag defines the text that appears in the browser tab, in bookmarks, and in search results. Every page must have a unique, descriptive title. - The
<meta charset="UTF-8">tag tells the browser to use the universal character encoding standard, allowing text and symbols from all languages to be displayed correctly. It should be the first element inside the<head>.
Now that you've given your page a title, the next logical step is to see it live. In our next lesson, we will cover how to open your local index.html file in a web browser to view your work and inspect its structure using developer tools.