Hello! Welcome back to your Linux+ preparation.
In the previous lesson, we established the "what" and "why" of Access Control Lists (ACLs). You learned that ACLs are a powerful extension to the standard Linux permission model, designed for situations where the user:group:other system isn't flexible enough.
Today, we transition from theory to practice. This lesson directly addresses the learning outcome: Use getfacl and setfacl to manage ACLs on files and directories. We will cover the commands for viewing, adding, modifying, and removing ACL entries, giving you the hands-on skills needed to implement the granular access control policies we discussed previously.
1. Prerequisites: Is Your System Ready for ACLs?
Before you can use ACLs, you need to ensure two things:
- The necessary command-line tools (
getfaclandsetfacl) are installed. - Your filesystem is mounted with ACL support enabled.
Most modern Linux distributions include the tools and enable ACL support by default on common filesystems like ext4 and xfs. However, it's a good practice to know how to verify this.
This video demonstrates how to check for the tools and confirm that ACLs are enabled on your filesystem.
Linux Crash Course | User Permissions - Access Control Lists (ACL)
The Technology Sandbox provides an excellent walkthrough of the initial setup steps for using ACLs.
Watch from the beginning to 05:53. Focus on these key actions: How to check if the filesystem supports ACLs (using tune2fs -l and looking for 'acl' in the 'Default mount options'). How to check if the acl package is installed and how to install it if it's missing (e.g., sudo apt install acl on Debian/Ubuntu systems or sudo dnf install acl on Red Hat/Fedora systems).
2. Viewing ACLs with getfacl
The getfacl command is your window into a file's access control list.
If a file has no ACLs, getfacl simply displays the standard permissions in a more detailed format.
$ touch testfile
$ chmod 640 testfile
$ getfacl testfile
# file: testfile
# owner: myuser
# group: mygroup
user::rw-
group::r--
other::---
Notice the structure:
user::rw-: The owner's permissions.group::r--: The owning group's permissions.other::---: The "other" permissions.
The real power of getfacl becomes apparent once you add custom ACLs.
3. Modifying ACLs with setfacl
The setfacl command is used to add, modify, or remove ACL entries. Its basic syntax is:
setfacl [options] [rules] <file/directory>
Let's break down the most common operations.
Modifying or Adding Entries (-m)
The -m (or --modify) option is used to add a new ACL entry or modify an existing one. The rule you provide follows a specific format: type:identity:permissions.
This is explained well in the "setfacl" section of the following article from Pearson IT Certification.
File and directory permissions
This article provides a clear, command-oriented explanation of setfacl syntax.
Read the first few paragraphs under the setfacl heading, down to where the ls -l output with the '+' sign is shown. Pay close attention to the format of the argument: what:who:permission and the definitions for user, group, etc.
Granting Permissions to a Specific User
Let's revisit the scenario from our last lesson: you need to give user bob read-write access to a file, but he isn't the owner or a member of the primary group.
# Set a read-write ACL for user 'bob' on 'project_plan.txt'
setfacl -m u:bob:rw- project_plan.txt
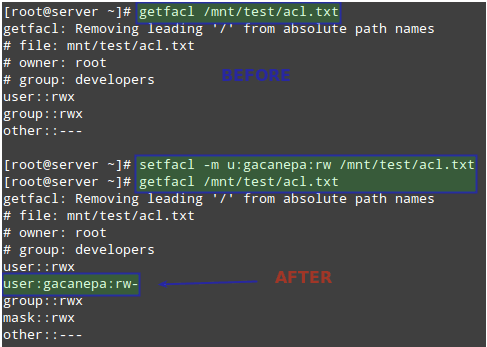
Now, let's look at the result with getfacl:
$ getfacl project_plan.txt
# file: project_plan.txt
# owner: alice
# group: managers
user::rw-
user:bob:rw-      #<-- Our new entry
group::r--
mask::rw-
other::---
And ls -l will now show the + sign: -rw-rw-r--+.
The mask entry is important: it defines the maximum effective permissions that can be granted to any additional user or group ACL entry. In this case, since the mask is rw-, bob gets his full rw- permissions. If the mask were only r--, bob's effective permissions would be limited to read-only, regardless of his ACL entry.
Granting Permissions to a Specific Group
The process is nearly identical for groups. You just use g instead of u.
# Grant the 'qa_team' group read-execute access to the 'builds' directory
setfacl -m g:qa_team:r-x builds/
Removing Entries (-x and -b)
To remove specific ACL entries, you use the -x (or --remove) option. You only need to specify the type and identity, not the permissions.
# Remove the ACL entry for user 'bob'
setfacl -x u:bob project_plan.txt

# Remove the ACL entry for the 'qa_team' group
setfacl -x g:qa_team builds/
To remove all extended ACLs from a file, returning it to just its standard permissions, use the -b (or --remove-all) option.
setfacl -b project_plan.txt
The following video demonstrates adding user and group permissions, and then removing them, in a realistic "contractor" scenario.
Linux Crash Course | User Permissions - Access Control Lists (ACL)
The Technology Sandbox channel walks through adding a user, then a group, to a directory's ACL, and shows how to clean up the entries afterwards.
Watch from 05:53 to 19:34. This is a longer clip, but it's a complete workflow. Observe: How setfacl -m u:contractor1:rx grants access to a single user (08:13 - 13:40). How setfacl -x u:contractor1 removes that user's access (14:58 - 15:45). How permissions are then granted to a group with setfacl -m g:contractors:rx (15:45 - 18:00). How the group entry is finally removed.
Test your understanding!
You have a file named financials.csv. It is owned by alice and the finance group. The permissions are 660 (-rw-rw----). You need to grant the user auditor read-only access without adding them to the finance group. After their work is done, you need to revoke this access. What two commands would you run?
Show answer
- To grant access:
setfacl -m u:auditor:r-- financials.csv - To revoke access:
setfacl -x u:auditor financials.csv
4. ACLs on Directories: Recursion and Inheritance
Managing ACLs on directories introduces two powerful concepts: recursion and inheritance (defaults).
Recursive Application (-R)
When you want to apply an ACL to a directory and all the files and subdirectories it currently contains, you use the -R (recursive) option.
# Grant the 'devs' group read-execute access to the 'src' directory and everything inside it
setfacl -R -m g:devs:r-x src/
Important: This only affects existing files. What about new files created later? For that, we need default ACLs.
Default ACLs for Inheritance (-d)
A default ACL is a special type of ACL set on a directory. It doesn't define permissions for the directory itself, but rather dictates the ACLs that will be automatically inherited by any new file or subdirectory created within it.
The syntax involves adding d: to the start of the rule.
# Set a default ACL on the '/srv/shared' directory
# Any new item created here will automatically get an ACL giving 'bob' read-write access
setfacl -m d:u:bob:rw- /srv/shared
Let's see what happens:
$ touch /srv/shared/new_doc.txt
$ getfacl /srv/shared/new_doc.txt
# file: /srv/shared/new_doc.txt
# owner: myuser
# group: mygroup
user::rw-
user:bob:rw-      #<-- Inherited from the parent directory!
group::r--
mask::rw-
other::r--
This is an incredibly powerful feature for managing collaborative folders, ensuring new content always has the correct baseline permissions.
You can find excellent examples of setting and verifying default ACLs in the Pearson IT Certification article you looked at earlier.
File and directory permissions
Let's return to the Pearson IT Certification article to see the syntax and effect of default ACLs.
Scroll down within the setfacl section to the part that begins "For regular permissions, the umask value is used...". Read from there to the end of the setfacl section. Focus on the examples that create a default ACL on a 'reports' directory and then show how a new file and directory inherit those ACLs.
Conclusion
You have now moved from understanding the "why" of ACLs to mastering the "how." You have the practical skills to view, set, and manage fine-grained permissions for specific users and groups, which is a critical skill for any Linux administrator and a key topic for the Linux+ exam.
Key Takeaways:
- View ACLs: Use
getfacl <file>to see the full permission list. - Modify/Add ACLs: Use
setfacl -m type:identity:perms <file>.ufor user,gfor group.
- Remove ACLs:
setfacl -x type:identity <file>to remove a specific entry.setfacl -b <file>to remove all extended ACLs.
- Directory ACLs:
-Rapplies changes recursively to existing contents.d:prefix in a rule creates a default ACL that new items will inherit.
In our next lesson, we will shift gears from file access control to the user's interactive environment. The topic will be: Explain and manage user environment variables for a shell session. You'll learn how to view, set, and persist variables that control how the shell and other programs behave for a user.