Hello! Welcome to your next lesson in the "Troubleshooting, Recovery, and Maintenance" module.
In our last session, we explored how to use rescue and emergency modes to perform system repairs. We learned that by interrupting the boot process, we can gain a root shell to fix critical issues like a broken /etc/fstab file.
Today, we will apply that exact skill to solve one of the most common and stressful problems an administrator can face: a forgotten root password. This lesson directly addresses the learning outcome: Recover from a forgotten root password. By the end, you will understand the principles behind password recovery and be able to apply different methods to regain access to both Debian-based (like Ubuntu) and Red Hat-based (like CentOS) systems.
The Principle of Password Recovery
Before we dive into the "how," let's start with the "why" this is possible. As you've seen, physical access to a machine allows you to interrupt the bootloader (GRUB). This gives you the power to change how the Linux kernel starts. Instead of loading the full operating system with its usual security and authentication checks, you can instruct the kernel to bypass them and drop you directly into a root-level command prompt.
Once you have a root shell, the system considers you the superuser, granting you full administrative privileges. From there, you can use the standard passwd command to reset the password for any user, including root.
This capability is a double-edged sword: it's an essential recovery tool, but it also underscores the importance of physical security. If an unauthorized person has physical access to your server, they can use these same techniques to take control. We'll touch on ways to mitigate this later in the course.
Method 1: Using Recovery Mode (The Debian/Ubuntu Way)
Many user-friendly distributions, particularly those in the Debian family like Ubuntu and Linux Mint, provide a simplified "recovery mode" directly in the GRUB menu. This is the most straightforward method when available.
To see this in action, we'll watch a short video that demonstrates the process on an Ubuntu system.
RESET your Forgotten Linux (Ubuntu) Password in 2 minutes
The video "RESET your Forgotten Linux (Ubuntu) Password in 2 minutes" by David Bombal provides a clear, step-by-step guide to using Ubuntu's built-in recovery mode.
Please watch from 00:20 to 02:40. Focus on these key steps: How to access the GRUB menu during boot. Navigating to "Advanced options" and selecting "recovery mode". Dropping to a root shell prompt from the recovery menu. Using the passwd command to reset a user's password.
To recap the process shown in the video:
- Reboot the machine. As it starts, repeatedly press the
Esckey (or holdShift) to display the GRUB boot menu. - Select "Advanced options for Ubuntu".
- Choose the entry that ends with "(recovery mode)".
- A new menu will appear. Use the arrow keys to select "root - Drop to root shell prompt" and press Enter.
- You will be presented with a command prompt at the bottom of the screen, with root privileges. The filesystem is typically mounted in read-write mode automatically.
- Type
passwd <username>to change the password for a specific user, or justpasswdto change the root password. Enter the new password twice when prompted. - Type
exitto return to the recovery menu. - Select "resume - Resume normal boot" to continue booting the system. You can now log in with the new password.
Method 2: Manually Editing GRUB Parameters (The Universal Method)
What if your distribution doesn't have a convenient "recovery mode" entry? Or what if that mode doesn't work? There is a more universal method that involves manually editing the boot parameters in GRUB. This technique works on a wide variety of systems, including Debian, Ubuntu, CentOS, Fedora, and Arch Linux.
The goal is to tell the kernel to run a shell (/bin/bash) as its initial process (init), completely bypassing systemd and all login procedures.
How to RESET the ROOT password in LINUX MINT 22 (when you can't run sudo commands)
The video "How to RESET the ROOT password in LINUX MINT 22" from TECHMIMIC demonstrates this manual editing process. Although it's on Linux Mint, the principles are broadly applicable.
Watch from 02:08 to 04:16. Pay close attention to: How the presenter edits the boot entry by pressing 'e'. The specific changes made to the line starting with linux: removing ro quiet splash and adding rw init=/bin/bash. The command used to remount the filesystem if it's read-only. Using passwd to set the new root password.
The general steps for this method are:
- Reboot the machine and get to the GRUB menu (using
EscorShift). - With the default boot entry selected, press the
ekey to edit it. - Use the arrow keys to find the line that starts with
linux. - At the end of this line, add the parameter
init=/bin/bash. - It's also a good idea to find the
ro(read-only) parameter on that line and change it torw(read-write). This saves you from having to remount the filesystem later. - Press
Ctrl+XorF10to boot with these modified parameters. - The system will boot directly to a root shell prompt (
#).
Once you have the root shell, you can change the password.
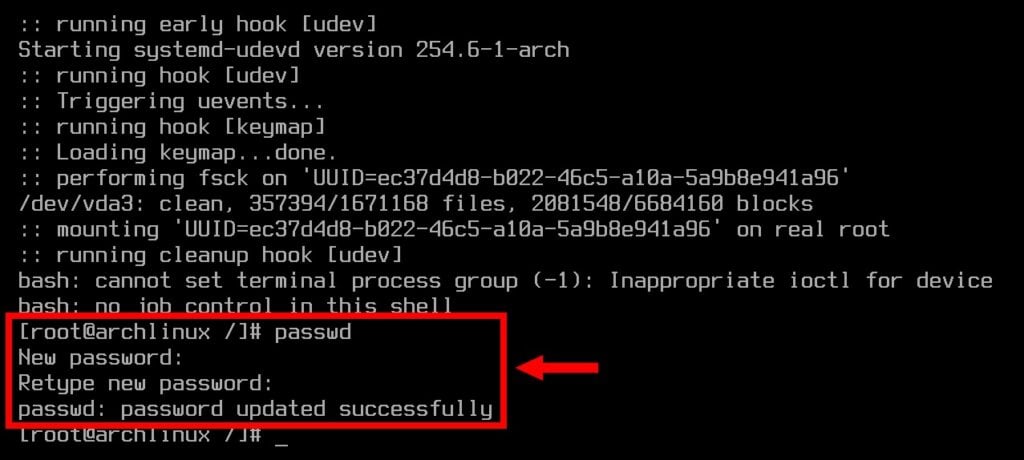
After you've successfully changed the password, you must reboot the machine. Because the normal init system isn't running, you may need to force a reboot. A common command to restart correctly from this state is exec /sbin/init, or you can force a reboot with reboot -f.
Variations for Red Hat, CentOS, and Fedora
The CompTIA Linux+ exam requires you to know about different Linux families. While the manual GRUB editing method is similar for Red Hat-based systems, there are a few crucial differences, primarily due to the initramfs environment and SELinux.
Resetting root password by booting into Single User Mode ...
The article "Resetting root password by booting into Single User Mode" provides detailed, distribution-specific instructions. We'll focus on the modern CentOS/RHEL method.
Please read the sections titled "CentOS 8" and "Alternative Method for CentOS 8 & 7". Focus on the use of rd.break, the chroot /sysroot command, and the touch /.autorelabel step.
As you read, the process for a modern Red Hat-based system (like CentOS 8, Rocky Linux, or RHEL 8/9) looks like this:
- Interrupt GRUB and press
eto edit, just like before. - Find the
linuxline and addrd.breakto the end. - Press
Ctrl+Xto boot. The system will boot into a temporary RAM-based environment (initramfs). - The real root filesystem is mounted read-only at
/sysroot. You must remount it as read-write:mount -o remount,rw /sysroot - Next, you must switch your environment so that
/sysrootis treated as the actual root (/) of the filesystem. This is done with thechrootcommand:
This step is critical; without it, thechroot /sysrootpasswdcommand won't be able to find the necessary files in/etc. - Now, you can run
passwdto reset the password. - SELinux Step: Because you've modified the
/etc/shadowfile from outside the normally running system, SELinux needs to relabel the file to restore its security context. To trigger this on the next boot, create an empty file named.autorelabelin the root directory:touch /.autorelabel - Type
exitto leave the chroot, and thenexitagain orrebootto restart the machine. The system will take longer to boot as it performs the SELinux relabeling.
Test your understanding!
You are resetting the root password on a CentOS 8 server using the rd.break method. After remounting /sysroot as read-write, you immediately run passwd, but it fails with an error like command not found or an authentication token error. What crucial step did you most likely miss?
Show answer
You likely missed the chroot /sysroot command. Without this step, your shell is still operating within the temporary initramfs environment. The passwd command and its required files (like /etc/shadow) are on the main system's filesystem, which is only accessible as / after you chroot into /sysroot.
Conclusion
You now possess a vital system recovery skill. By leveraging physical access to interrupt the boot process, you can gain a root shell and reset a forgotten password.
Key Takeaways:
- The Core Principle: Password recovery in Linux works by interrupting the normal boot sequence to gain a privileged root shell before authentication is required.
- Debian/Ubuntu Method: Use the "Advanced options" -> "recovery mode" entry in GRUB for a guided process.
- Universal Method: Edit the GRUB boot parameters to add
init=/bin/bash, which replaces the standard init system with a root shell. - Red Hat/CentOS Method: Use the
rd.breakboot parameter. This requires extra steps: remounting/sysrootas read-write, usingchroot /sysroot, and creating the/.autorelabelfile for SELinux. - The Final Command: In all cases, the
passwdcommand is the tool used to set the new password once you have a root shell.
Preview of the Next Lesson:
We've spent a lot of time on local system recovery. In our next lesson, we will shift gears and move into the realm of network security by exploring a fundamental concept: "Explain the role of SSL/TLS certificates in securing network communications."