Hello! Welcome to your next lesson in the "Troubleshooting, Recovery, and Maintenance" module.
In our last lesson, we focused on securing network communications by exploring the role of SSL/TLS certificates. You learned how encryption, authentication, and integrity are guaranteed through a system of certificates and trusted Certificate Authorities.
Today, we shift to a topic that has fundamentally changed how software is built, shipped, and run: containers. This lesson addresses the learning outcome: Explain container concepts and manage the container lifecycle using Docker or Podman. You will discover what containers are, why they are so powerful, and how to manage them using standard Linux command-line tools. For the CompTIA Linux+ exam, understanding containerization is crucial as it's a cornerstone of modern system administration and DevOps.
1. What is a Container? Solving "It Works on My Machine"
Have you ever tried to run an application that worked for someone else, but it failed on your system because of a missing library, a different software version, or a conflicting configuration? This is a classic problem that containers were designed to solve.
A container is a standard, lightweight, and portable unit of software that packages up an application's code along with all its dependencies (libraries, configuration files, etc.). This ensures the application runs quickly and reliably from one computing environment to another.
Containers vs. Virtual Machines (VMs)
You may have heard of Virtual Machines (VMs). While they also provide isolated environments, they work very differently. The core distinction lies in what they virtualize.
- Virtual Machines (VMs) virtualize the hardware. A hypervisor runs on the host machine and creates multiple virtual hardware systems, each with its own full-fledged guest operating system (OS). This is resource-intensive.
- Containers virtualize the operating system. All containers on a host share the host's OS kernel. They are just isolated processes. This makes them incredibly lightweight, fast to start, and efficient.
To get a clear visual and conceptual understanding of this crucial difference, let's watch a short video.
Containers vs VMs: What's the difference?
The video "Containers vs VMs: What's the difference?" from IBM Technology provides an excellent breakdown of these two virtualization technologies.
Watch from 00:56 to 04:22. Focus on how VMs achieve 'hardware virtualization' with a hypervisor, while containers use 'operating system-level virtualization' by sharing the host OS kernel. Pay attention to the distinction between 'machine isolation' (VMs) and 'process isolation' (containers).
As the video explained, containers achieve this process isolation by using features built into the Linux kernel itself, primarily:
- Namespaces: These provide each container with its own view of the system—its own process tree, network interfaces, user IDs, and filesystem mounts. To the application inside the container, it looks like it's the only thing running on the machine.
- Control Groups (cgroups): These limit and monitor the resources (CPU, memory, disk I/O) that a container can use, preventing a single container from consuming all of the host's resources.
2. The Tools: Docker and Podman
The two most common tools for working with containers on Linux are Docker and Podman. While they achieve the same goal, their underlying architecture is different, which has important security implications.
Docker: The Client-Server Model
Docker uses a client-server architecture. You interact with the docker command-line interface (the client), which sends instructions to a long-running background service called the Docker daemon (dockerd). This daemon, which typically runs with root privileges, is responsible for all the heavy lifting: building images, running containers, and managing resources.
Podman: The Daemonless Alternative
Podman was developed as a daemonless alternative to Docker. When you run a podman command, it executes directly as a process under your user account. There is no central daemon. This has a significant security advantage: rootless containers. By default, Podman runs containers as a regular user, so even if an application inside a container is compromised, the attacker won't have root access to the host machine.
This architectural difference is a key concept to understand.
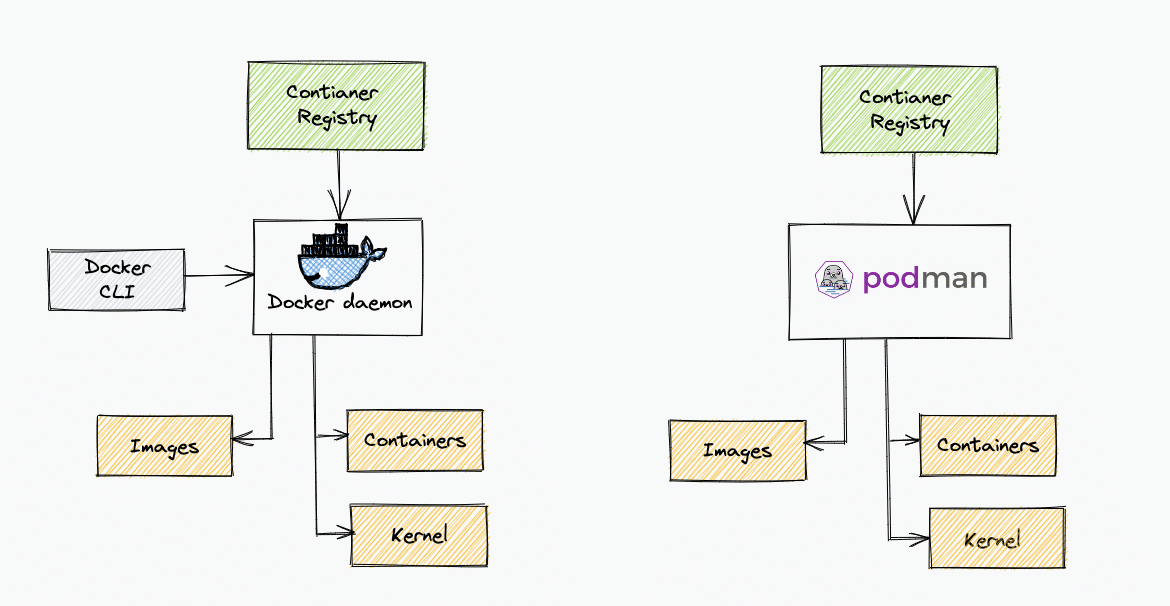
To dive deeper into this, let's watch a video that focuses on Podman and its distinctions from Docker.
What is Podman? How is it Different Than Docker?
The video "What is Podman? How is it Different Than Docker?" from IBM Technology clearly explains Podman's unique architecture and the benefits it offers.
Watch from 01:30 to 04:44. This section explains the daemon-less 'fork-exec' model of Podman and contrasts it with Docker's client-server architecture. Pay close attention to the explanation of 'rootless' containers and why this is a major security benefit.
Despite their differences, both tools adhere to the Open Container Initiative (OCI) standard. This means they can run the same container images and use similar commands. In fact, many users create a shell alias like alias docker=podman to use their existing Docker-based scripts with Podman seamlessly. For the rest of this lesson, we will use podman in our examples, but the commands are generally interchangeable with docker.
3. The Container Lifecycle: From Image to Running Process
Managing containers involves a few core concepts and a predictable lifecycle. The following article from the Linux Professional Institute provides an excellent, in-depth reference for these practical steps.
702.1 Lesson 1 - Linux Professional Institute – Learning
We will now work through the practical steps of managing containers. The article "702.1 Lesson 1" from the LPI Learning Materials is a comprehensive guide we'll use for the rest of this lesson.
Please open this article and keep it handy. We will refer to specific sections as we go. Start by reading the introduction and the "Foundations of Containerization" section to solidify the concepts we've just discussed. Then, read the section "Docker and Podman Architecture" for a detailed comparison.
The lifecycle begins with an Image, which is a read-only template. You then create a running, writable instance of that image, called a Container. These images are stored in a Registry, like Docker Hub or Quay.io.
This diagram shows the main states and the commands that move a container between them.

Let's walk through these commands.
Step 1: Pulling an Image
First, you need to get a container image from a registry. The podman pull command downloads an image to your local machine. Let's get an image for the Nginx web server.
# Pull the 'nginx' image with the 'latest' tag from the default registry
podman pull nginx:latest
You can see all the images on your system with podman images.
Step 2: Running a Container
The podman run command creates a new container from an image and starts it.
# Run a container from the nginx image
# -d: Run in detached (background) mode
# -p 8080:80: Map port 8080 on the host to port 80 in the container
# --name my-web-server: Give the container a human-readable name
podman run -d -p 8080:80 --name my-web-server nginx
Your Nginx container is now running! You can access it by opening a web browser and navigating to http://localhost:8080.
Step 3: Managing the Container
Now that the container is running, you can manage it.
- List running containers: The
podman pscommand shows active containers. Usepodman ps -ato see all containers, including stopped ones.podman ps - Stop a container: This gracefully stops the container.
podman stop my-web-server - Start a stopped container:
podman start my-web-server - Remove a container: You can only remove a stopped container. Use the
-f(force) flag to stop and remove a running container in one step.podman rm my-web-server
For more details on these commands, refer to the "Operating and Accessing Containers" section of the LPI article you opened earlier.
4. Interacting with and Monitoring Containers
Simply running a container isn't enough; you often need to look inside it to see what's happening.
Viewing Logs
The podman logs command fetches the standard output of a container, which is essential for debugging.
# View the logs of our web server
podman logs my-web-server

# Follow the logs in real-time (like tail -f)
podman logs -f my-web-server
Executing a Command in a Running Container
What if you need to run a command inside an already running container? The podman exec command lets you do this. It's incredibly useful for troubleshooting. Let's get an interactive shell inside our Nginx container.
# Start an interactive bash shell inside the 'my-web-server' container
# -it: Allocate an interactive pseudo-TTY
podman exec -it my-web-server /bin/bash
You are now "inside" the container. You can run commands like ls -l /etc/nginx/ to inspect its configuration. Type exit to leave the container's shell.
Inspecting a Container
To get detailed, low-level information about a container (like its IP address, mount points, and configuration), use podman inspect. The output is in JSON format.
# Get all metadata for the container
podman inspect my-web-server

# Use the --format option to extract a specific piece of information
podman inspect --format '{{.NetworkSettings.IPAddress}}' my-web-server
Refer to the LPI article sections "Viewing Detailed Container Information With inspect" and "Viewing Container Output With logs" for more examples.
Test your understanding!
You've started a web application in a container using podman run -d --name my-app my-image. The application seems to have failed to start correctly.
- What command would you first run to see if the container exited unexpectedly?
- What command would you then use to view the application's error messages?
Show answer
- You would first run
podman ps -a. The-ais crucial because it shows all containers, including those that have stopped or exited. You would look for the status of themy-appcontainer. - To see the error messages, you would run
podman logs my-app. This command fetches the standard output and standard error from the container, which is where most applications write their startup logs and error messages.
Conclusion
Congratulations! You've covered the fundamentals of containerization, a technology that is central to modern Linux administration. You now know what containers are, how they differ from VMs, and the architectural differences between Docker and Podman. Most importantly, you have learned the essential commands to manage the container lifecycle.
Key Takeaways:
- Containers solve application dependency and portability issues by packaging an application with its entire runtime environment.
- They are lightweight because they share the host OS kernel, using Linux namespaces for isolation and cgroups for resource limits.
- Docker uses a client-server model with a root daemon, while Podman is daemonless and supports rootless containers for enhanced security.
- The container lifecycle is managed with a standard set of commands:
pull: Get an image from a registry.run: Create and start a container from an image.ps: List containers.stop/start/restart: Control the container's state.rm: Remove a container.
- You can interact with running containers using
logsto view output andexecto run commands inside them.
Preview of the Next Lesson:
In our next lesson, we will explore another essential command-line utility: "Create and restore file archives using the tar utility." While tar is a classic tool, it remains incredibly relevant for tasks like creating backups, distributing source code, and moving files around—tasks you might even perform on files you want to use with your containers.