Hello! Welcome to your final lesson in the "Troubleshooting, Recovery, and Maintenance" module.
In our last session, we dove into the modern world of software deployment by explaining container concepts and how to manage them with tools like Podman. This gave you insight into how applications are packaged and run in isolated, portable environments.
Today, we'll shift our focus to a classic but indispensable Linux utility that is fundamental to system maintenance: tar. This lesson addresses the learning outcome: Create and restore file archives using the tar utility. You'll learn how to bundle multiple files and directories into a single file (an archive) for backups, storage, or transfer, and how to use compression to save space. Mastering tar is an essential skill for any Linux administrator and a key topic for the CompTIA Linux+ exam.
1. Archiving vs. Compression: A Core Distinction
Before we jump into the commands, it's crucial to understand the difference between archiving and compression, as tar can be involved in both.
- Archiving: This is the process of combining multiple files and directories into a single file, often called a "tarball." The original file structure, permissions, and ownership are preserved within the archive. The size of the archive is roughly the sum of the sizes of all the files it contains.
- Compression: This is the process of reducing the size of a file by using an algorithm to remove redundancy. Tools like
gzip,bzip2, andxzperform compression.
Historically, tar (which stands for tape archive) was used to write data to magnetic tape backups. Today, it writes to files, but its primary job remains archiving. Modern versions of tar can, however, call compression utilities directly, allowing you to archive and compress in a single step.
To solidify this concept, let's watch a short video.
Archiving & Compressing (Linux+ Objective 1.2.4)
The video "Archiving & Compressing" from Shawn Powers clearly explains the conceptual difference between putting files into a single archive and squeezing that archive down with compression.
Watch from 01:19 to 02:25. Focus on the visual analogy of lining files up end-to-end (archiving) versus squeezing the resulting file (compression).
2. Creating and Managing Archives with tar
Let's get hands-on. We'll start by creating an uncompressed archive, viewing its contents, and then restoring the files from it.
The basic structure of a tar command involves specifying an operation and some options. The most common options are:
-c: create a new archive.-x: extract files from an archive.-t: list the table of contents of an archive.-f: specify the file name of the archive. This option must be followed immediately by the archive name.-v: verbose mode. Shows the files being processed.
The video below provides a great walkthrough of these fundamental operations. It also demonstrates a best practice: creating a temporary copy of a system directory to practice on safely.
How to Archive Folders in Linux (tar and gzip tutorial) - Linux Crash Course Series
The video "How to Archive Folders in Linux (tar and gzip tutorial)" from Learn Linux TV will guide us through the core functions of tar.
Follow along with the presenter from 02:26 to 15:42. You don't have to use the /etc directory; you can create your own test directory and files. Pay close attention to the commands used for: Creating an archive with tar -cvf. Listing its contents with tar -tvf. Extracting (restoring) the files with tar -xvf.
Step-by-Step Guide (Text Version)
If you prefer a text-based guide or want to reinforce the video's content, the following article walks through the same process. It includes instructions for creating a safe practice directory.
Tutorial: How to use tar to back up and restore files in Linux
The article "How to use tar to back up and restore files in Linux" from TechTarget provides a clear, command-by-command guide to these same operations.
Read the sections titled "Create files," "Back up and archive your files with tar," "Simulate a data loss," and "Restore your files with tar." This will solidify your understanding of the create, list, and extract operations.
As you saw, the process is logical: you create an archive, which serves as your backup. If the original files are lost, you can extract them from the archive to restore them.
Test your understanding!
You have downloaded a file named project_files.tar and you want to see what files are inside it before you extract them to your current directory. What command would you use?
Show answer
You would use the -t (list) option:tar -tvf project_files.tar
The -v (verbose) flag provides more detail, like permissions and timestamps, similar to ls -l.
3. Adding Compression for Efficiency
Uncompressed archives are great for preserving file structure, but for large backups or for transferring files over a network, you'll want to compress them to save space. tar makes this easy by integrating with popular compression tools via single-letter options.
-z: Use gzip compression. This is the most common and fastest option. The standard file extension is.tar.gzor.tgz.-j: Use bzip2 compression. This offers better compression than gzip but is slower. The extension is.tar.bz2.-J: Use xz compression (note the capital J). This usually provides the best compression ratio but is the slowest to create. The extension is.tar.xz.
When you use these flags, tar handles both the archiving and compression (or decompression) in one command.
This screenshot shows the full sequence: listing files, creating a compressed archive (.tar.gz), and then listing the contents of that new archive.
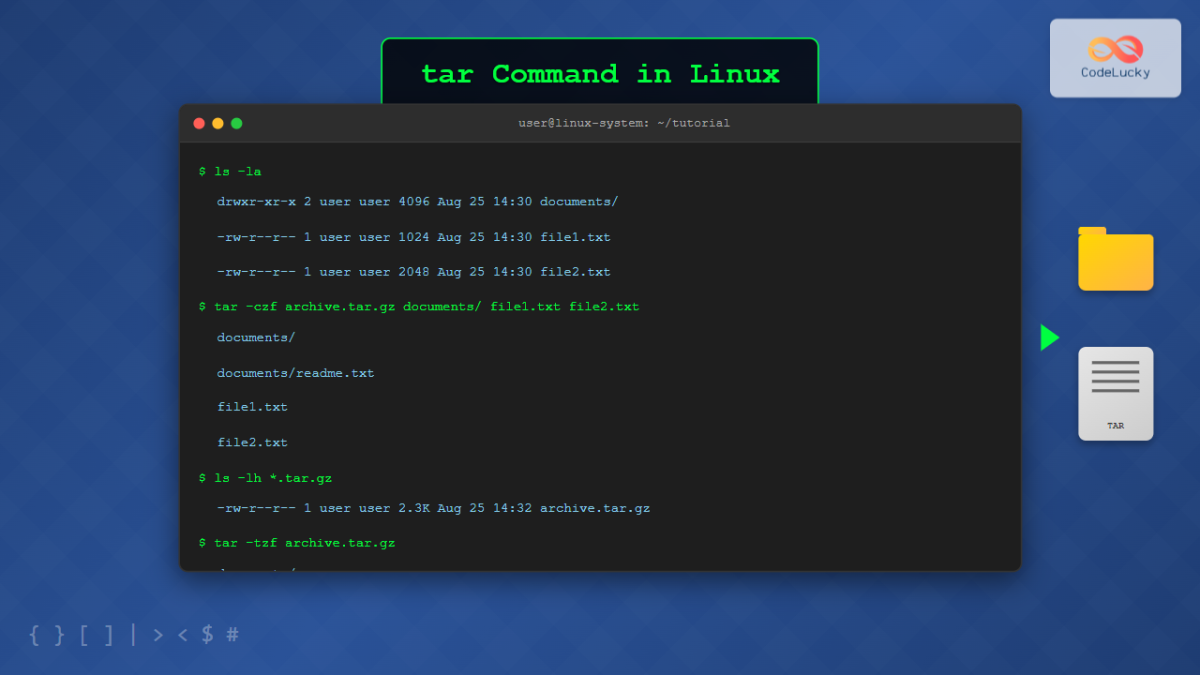
Let's see how this works in practice and how the compression ratios compare.
Archiving & Compressing (Linux+ Objective 1.2.4)
Let's return to the "Archiving & Compressing" video, which demonstrates how to use the compression flags directly with tar.
Watch from 12:50 to 21:53. The first part (until 18:41) shows compressing an existing tarball, which helps you see the size differences clearly. The second part (from 18:41 onwards) shows the more common, single-step method of using flags like -z, -j, and -J during creation.
The key takeaway is that for most operations, you'll simply add the compression flag to your create and extract commands.
- Create a gzipped archive:
tar -czvf archive.tar.gz /path/to/directory - Extract a gzipped archive:
tar -xzvf archive.tar.gz
Note: Modern versions of tar are often smart enough to detect the compression type during extraction without you needing to specify the flag (e.g., tar -xf archive.tar.gz might work just fine). However, it's good practice to be explicit, and you should know the flags for the exam.
4. tar Command Summary
You've now covered the most critical tar operations. This image provides a handy visual summary of the options we've discussed.

Test your understanding!
You are tasked with creating a backup of your entire home directory located at /home/jdoe. The backup should be compressed using gzip and named jdoe_backup.tar.gz in the /tmp directory. What single command would accomplish this?
Show answer
The command would be:tar -czvf /tmp/jdoe_backup.tar.gz /home/jdoe
-c: Create a new archive.-z: Use gzip compression.-v: Verbose output (shows files as they are added).-f: Specify the output file name (/tmp/jdoe_backup.tar.gz)./home/jdoe: The source directory to be archived.
Conclusion
Congratulations on completing the final lesson of the course! You have now mastered tar, a cornerstone utility for any Linux user or administrator. It's a powerful tool for creating backups, packaging software source code, and managing large collections of files.
Key Takeaways:
- Archiving combines files, while compression reduces file size.
- The
tarcommand's main operations are create (-c), extract (-x), and list (-t). - The
-foption is used to specify the archive filename. - Compression can be handled directly by
tarusing flags:-zfor gzip,-jfor bzip2, and-Jfor xz. - Creating and restoring from compressed archives follows the same logic, simply adding the appropriate compression flag to the command.
This lesson concludes the new material for the "Prepare for the CompTIA Linux+" course. You have built a strong foundation, from understanding the Linux architecture and command line to managing software, security, and system maintenance. Your next step is to review the topics we've covered and practice your skills to prepare for the exam. Good luck