Hello! Welcome back to your Linux+ preparation course.
In the last two lessons, we built a solid foundation for Linux access control. You learned to interpret and modify permissions with chmod and umask, and how to manage ownership with chown and chgrp. You now understand the standard rwx permissions for the user, group, and other categories.
Today, we're going beyond the standard model to explore special permissions. These are flags that modify the default behavior of executables and directories, enabling critical system functions and secure collaboration. This lesson directly addresses the learning outcome: Apply special permissions (setuid, setgid, sticky bit) to files and directories.
Understanding these special permissions is crucial for both system administration and for the CompTIA Linux+ exam, as they explain how certain privileged operations can be safely performed by regular users.
1. The Three Special Permissions
On top of the read, write, and execute permissions, Linux provides three special permissions that grant additional capabilities:
- SUID (Set User ID): For executable files.
- SGID (Set Group ID): For executable files and directories.
- Sticky Bit: For directories.
Let's dive into a comprehensive reading that explains what these are, why they're used, and how to set them.
Linux permissions: SUID, SGID, and sticky bit
Let's start with a foundational article from the Red Hat blog. It provides a clear, concise explanation of each special permission, complete with practical examples that are standard across Linux systems.
Please read the article from the beginning down to (and including) the section "Setting special permissions". As you read, focus on understanding the specific function of each of the three permissions and the classic examples given for each: passwd for SUID, collaborative directories for SGID, and /tmp for the sticky bit.
2. Deconstructing Special Permissions
Now that you've read the overview, let's break down each concept with some added context.
The SUID (Set User ID) Bit
As the article explains, when the SUID bit is set on an executable file, any user who runs that file temporarily assumes the permissions of the file's owner.
The most famous example is the /usr/bin/passwd command. Let's look at its permissions:
$ ls -l /usr/bin/passwd
-rwsr-xr-x. 1 root root 33544 Dec 13  2019 /usr/bin/passwd
Notice the s in the user's permission block (rws) where the x would normally be. This is the SUID bit. The file is owned by root. When a regular user (like you) runs passwd to change their own password, the process runs with root privileges. This is necessary because it needs to modify the /etc/shadow file, which stores encrypted passwords and is only writable by root.
The SUID bit provides a very controlled way to elevate privileges for a single, specific task, which is a critical security concept.
The SGID (Set Group ID) Bit
The SGID bit has two distinct functions, depending on whether it's applied to a file or a directory.
- On an Executable File: Similar to SUID, it causes the process to run with the privileges of the file's group. This is less common than SUID but can be used for programs that need to access group-restricted resources.
- On a Directory: This is the most common use. When the SGID bit is set on a directory, any new file or subdirectory created inside it will automatically inherit the group ownership of the parent directory, not the primary group of the user who created it.
This is extremely useful for collaborative projects. Imagine a directory /data/projectx owned by the developers group. By setting the SGID bit on this directory, any file any team member creates inside it will automatically belong to the developers group, ensuring all other team members can access it based on the group permissions.
The Sticky Bit
The sticky bit applies only to directories. When it's set on a directory, it modifies the rules for file deletion. Even if a user has write permissions to the directory, they can only delete or rename files that they personally own.
The classic example is the /tmp directory:
$ ls -ld /tmp
drwxrwxrwt. 15 root root 4096 Sep 22 15:28 /tmp/
The t at the very end of the permission string rwxrwxrwt indicates the sticky bit. Since /tmp is a world-writable directory used by all users and services for temporary files, the sticky bit is essential. It prevents one user from maliciously or accidentally deleting another user's temporary files.
This is what the effect looks like in practice:

3. Setting and Identifying Special Permissions
As you read in the Red Hat article, you use the chmod command to set special permissions, either with symbolic or numeric (octal) notation.
Numeric (Octal) Method
This method uses a four-digit number. The first digit represents the special permissions, and the last three are the standard rwx permissions you already know.
- 4: SUID
- 2: SGID
- 1: Sticky Bit
These values are added together just like standard permissions.
| Command | Numeric | Meaning |
|---|---|---|
chmod 4755 |
4... | SUID bit + rwxr-xr-x |
chmod 2775 |
2... | SGID bit + rwxrwxr-x |
chmod 1777 |
1... | Sticky bit + rwxrwxrwx |
chmod 6754 |
6... | SUID (4) + SGID (2) bits + rwxr-xr-- |
Symbolic Method
This method is often more readable.
u+s: Adds the SUID bit.g+s: Adds the SGID bit.+t: Adds the sticky bit (applies to the 'other' category).
Understanding s vs. S and t vs. T
This is a critical detail. The case of the letter tells you about the underlying execute permission.
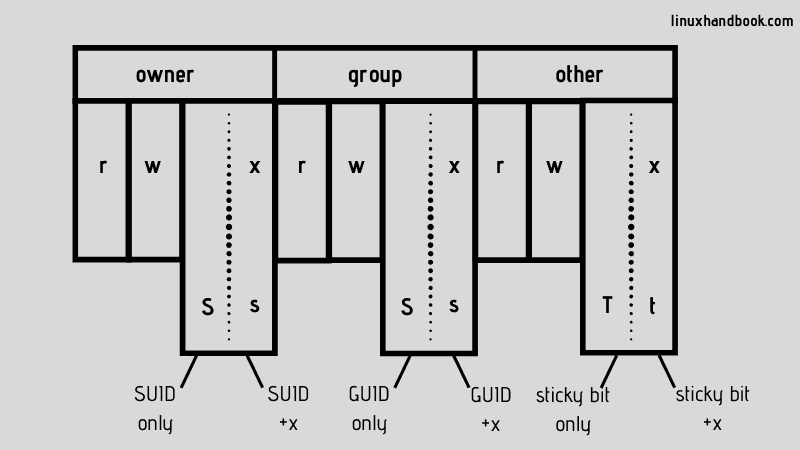
sort(lowercase): The special bit AND the execute (x) bit are set. This is the normal, functional state for executables and directories.SorT(uppercase): The special bit is set, but the execute (x) bit is NOT. This usually indicates a configuration error, as a SUID file that isn't executable is useless.
Test your understanding!
You are tasked with setting up a shared project directory called /srv/collaboration. The directory needs the following permissions:
- The owner (root) should have full control (
rwx). - Members of the
projectgroup should have full control (rwx). - All new files created in the directory should automatically belong to the
projectgroup. - Others should have no access.
Which chmod command would you use to apply the correct permissions?
Show answer
The correct command is chmod 2770 /srv/collaboration.
- 2: This sets the SGID bit, which ensures new files inherit the directory's group.
- 7:
rwxfor the owner (root). - 7:
rwxfor theprojectgroup. - 0: No permissions for others.
4. Practical Exercise
Time to apply this knowledge in your virtual machine.
-
Examine SUID/SGID files: Instead of creating dangerous SUID files, let's find existing ones. Run this command to find all files in
/usr/binwith either the SUID or SGID bit set:find /usr/bin -perm /6000 -lsYou will see
passwd,su,mount, and others. Note that they are typically owned byroot. -
Set up a collaborative SGID directory:
- Create a new group and add your user to it.
sudo groupadd projectx sudo usermod -aG projectx $(whoami) # You need to log out and log back in for the new group to take effect! # Or you can start a new shell session for that group: newgrp projectx - After logging back in, create and configure the directory.
sudo mkdir /srv/projectx sudo chown root:projectx /srv/projectx sudo chmod 2770 /srv/projectx - Verify the permissions. The group permissions should show an
s.ls -ld /srv/projectx - Now, create a file inside it.
Notice thattouch /srv/projectx/testfile.txt ls -l /srv/projectx/testfile.txttestfile.txtbelongs to theprojectxgroup, even though your primary group is likely different. The inheritance worked!
- Create a new group and add your user to it.
-
Set up a Sticky Bit directory:
- Create a directory anyone can write to.
sudo mkdir /var/public sudo chmod 777 /var/public - Now, add the sticky bit.
sudo chmod +t /var/public ls -ld /var/public - You will see the permissions are now
drwxrwxrwt. While you can't test the deletion restriction without logging in as another user, you have successfully configured a directory just like/tmp.
- Create a directory anyone can write to.
Conclusion
You have now mastered the final layer of the traditional Linux permission system. These special permissions are powerful tools that enable security and collaboration.
Key Takeaways:
- SUID (Set User ID) grants a process the permissions of the file's owner, used for controlled privilege escalation (e.g.,
passwd). - SGID (Set Group ID) on a directory makes new files inherit the directory's group, which is ideal for shared folders.
- The Sticky Bit on a directory prevents users from deleting files they don't own, essential for public directories like
/tmp. - You can set these using
chmodwith a four-digit octal number (4=SUID, 2=SGID, 1=Sticky) or symbolic notation (u+s,g+s,+t). - The case of the permission letter (
s/S,t/T) indicates whether the underlying execute permission is also set.
This lesson concludes our module on User, Group, and Permission Management. We started with creating users and have now covered the full spectrum of access control, from basic rwx to these advanced special bits.
In our next lesson, we will begin a new module, "Advanced Access Control and Privilege Escalation." We'll start by taking a closer look at the very command we used as our primary SUID example: passwd. You'll learn how to use it and other tools to manage user passwords and password aging policies, building directly on the concepts you learned today.