Hello! Welcome to the next lesson in your Linux+ preparation course.
In our last session, you learned how to modify file permissions with chmod and set default permissions for new files and directories using umask. We established that every file has permissions for its owner, its group, and for others.
Today, we'll answer the natural next question: How do you change who the owner and group are? This lesson directly addresses the learning outcome: Change file ownership and group assignment using chown and chgrp. Mastering these commands is essential for managing a multi-user Linux system, a core skill tested in the CompTIA Linux+ exam.
1. Understanding File Ownership
Before we change ownership, let's quickly review how to see it. As you know from using the ls -l command, the third and fourth columns in the output show the user owner and the group owner of a file.
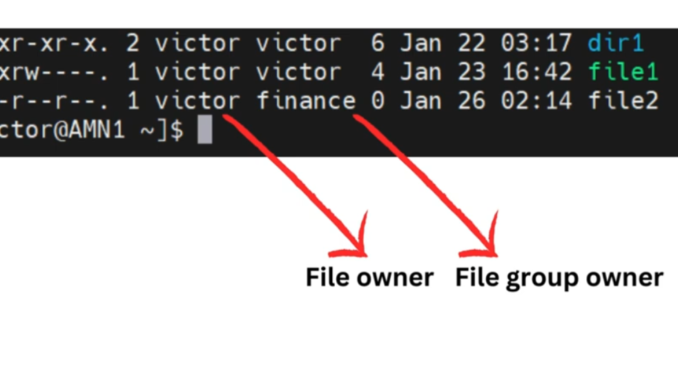
Every file and directory in Linux is assigned to a specific user and a specific group. This ownership is the foundation upon which the permission settings (rwx) are applied.
For a comprehensive review of the concept and syntax we'll be covering, the following article is an excellent reference.
Chown Command in Linux (File Ownership)
Let's start with a foundational reading from Linuxize. This article provides a clear and detailed explanation of the chown command, which will be our primary tool today.
Please read the introduction, the section "What Is File Ownership in Linux?", and the "chown Command Syntax" section. This will give you a solid overview of the command's purpose, its syntax variations, and its main options.
2. Changing Ownership: chown and chgrp
There are two primary commands for managing ownership:
chown(change owner): A versatile command that can change the user, the group, or both.chgrp(change group): A more specific command that only changes the group owner.
A Critical Security Rule
Before we proceed, it's vital to understand a core security principle of Linux:
Only the root user (or a user with
sudoprivileges) can change the user owner of a file.
A regular user cannot give away their files to another user. This prevents users from creating files and then assigning them to system users or other users to bypass security restrictions.
A regular user can, however, change the group of a file they own, but typically only to a group of which they are a member.
Method 1: Changing the Group with chgrp
The chgrp command is straightforward. Its sole purpose is to change the group ownership of a file or directory.
Syntax: chgrp [new_group] [file_or_directory]
Example:
Imagine you have a file report.txt that belongs to your user student and the group student. You want to change its group to editors so your colleagues can collaborate.
# Initial state
$ ls -l report.txt
-rw-r--r-- 1 student student 1024 Oct 26 10:30 report.txt

# Change the group
$ chgrp editors report.txt

# Final state
$ ls -l report.txt
-rw-r--r-- 1 student editors 1024 Oct 26 10:30 report.txt
Method 2: The All-in-One Tool, chown
While chgrp is useful, the chown command is more common in practice because of its flexibility. It can handle all ownership changes in one go.
The key is the use of a colon (:) to separate the user and group.
File and directory permissions
This reference from Pearson IT Certification provides an excellent, concise table summarizing the different ways to use chown. It's a perfect cheat sheet for the command's syntax.
Read the sections titled "chown" and "chgrp". Pay close attention to the table under the chown heading, as it clearly demonstrates how to change the user, the group, or both simultaneously.
Here’s a summary of the chown syntax patterns from the reading:
| Command Syntax | Action |
|---|---|
chown new_user file.txt |
Changes only the user owner of file.txt. |
chown :new_group file.txt |
Changes only the group owner of file.txt. |
chown new_user:new_group file.txt |
Changes both the user and group owner. |
Notice how chown :new_group is a direct equivalent to chgrp new_group. Because chown can do both jobs, many system administrators prefer it for consistency.
Test your understanding!
You have a file named project_plan.md owned by alice:projecta. You need to transfer ownership to the user bob and assign it to the projectb group. Which single command would you use?
Show answer
The correct command is sudo chown bob:projectb project_plan.md.
sudois needed because you are changing the user owner.bob:projectbspecifies the new user and group, separated by a colon.
3. Ownership in Action: Practical Examples
Let's watch a short video that demonstrates these commands in a real terminal session.
Linux Terminal Basics: chown, chgrp - File Ownership
This video from quidsup provides a quick, clear demonstration of changing user and group ownership and shows the practical consequence of not owning a file.
Watch the following segments: Changing user ownership with chown (00:40 - 01:00). The effect of ownership on permissions (01:47 - 02:32). Notice how the user cannot write to a file owned by root. Changing group ownership with chgrp (02:32 - 03:07). This will help you see the commands and their impact in practice.
Recursive Ownership Changes
One of the most important options for both chown and chgrp is the -R (or --recursive) flag. When you install software or manage a project directory with many subdirectories and files, you often need to change the ownership of everything inside that directory. The -R option does this efficiently.
Syntax: chown -R <user>:<group> <directory>
This command will "walk" through the entire directory tree, applying the new ownership to the main directory and every file and subdirectory within it. This is a fundamental task for system administration, such as setting the correct ownership for a web server's files.
The following video demonstrates this recursive concept in a real-world scenario.
Linux File Permissions ( chmod, chown, chgrp )
Now, let's see a practical demonstration of recursive ownership changes. This is a very common task for system administrators.
Watch from 13:11 to 14:10 to see how to change both user and group at the same time. Then, watch from 17:28 to 18:10. This part specifically demonstrates the chown -R command to change ownership of an entire directory and its contents recursively.
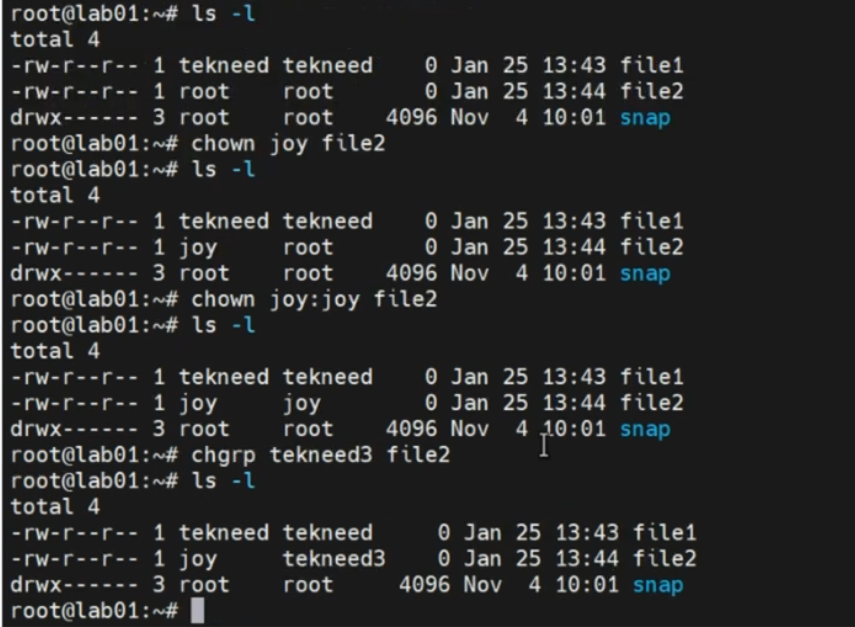
To bring all these concepts together, the following image provides a step-by-step visual of the commands we've discussed and their effect on the ls -l output.
Practical Exercise
Now it's your turn to practice in your Linux virtual machine.
- Open a terminal.
- Create a new user and group for testing. (You'll need
sudofor this).sudo useradd testuser sudo groupadd testgroup - Create a test file and a test directory.
touch my_file.txt mkdir my_project/ touch my_project/project_data.csv - View the current ownership. Your user should own them.
ls -l my_file.txt my_project/ - Change the user owner of
my_file.txttotestuser.sudo chown testuser my_file.txt ls -l my_file.txt - Change the group owner of
my_file.txttotestgroup.sudo chgrp testgroup my_file.txt ls -l my_file.txt - Now, change both the user and group of the
my_projectdirectory and all its contents recursively.sudo chown -R testuser:testgroup my_project/ - Verify the recursive change.
ls -l # Check the my_project directory itself ls -l my_project/ # Check the file inside - When you're done, you can remove the test user, group, and files.
sudo userdel testuser
sudo groupdel testgroup
rm my_file.txt
rm -r my_project/
Conclusion
Congratulations! You can now fully manage the standard Linux access control model. You know how to read permissions (ls -l), change permissions (chmod), and now, change who those permissions apply to (chown and chgrp).
Key Takeaways:
chownis the primary command to change file and directory ownership. It can change the user, the group, or both.chgrpis a simpler command that only changes the group.- The
user:groupsyntax (e.g.,chown user:group file) is the most efficient way to set both. - Changing the user owner requires root privileges (
sudo). - The
-Rflag is crucial for applying ownership changes recursively to entire directories.
In our next lesson, we will move beyond the standard rwx permissions and explore special permissions: setuid, setgid, and the sticky bit. These are special flags that grant temporary elevated privileges or modify default behavior in shared directories, adding another layer of powerful control to your administrative toolkit.