Hello and welcome back!
In our last lesson, we explored special permissions, and you saw how the passwd command uses the SUID bit to allow a regular user to perform a privileged action: modifying the secure /etc/shadow file. This provided a perfect example of controlled privilege escalation.
Today, we're diving into the passwd command itself. This lesson directly addresses the learning outcome: Set and change user passwords using the passwd command. You will learn the fundamental operations of changing your own password, managing passwords for other users as an administrator, and using several important options to manage account status. This is a core skill for any Linux user and a critical topic for the CompTIA Linux+ exam.
Let's get started.
1. Basic Usage: Changing Your Own Password
The most common use of the passwd command is for a user to change their own password. Since you have experience with the command line, you might already be familiar with this, but let's formalize the process.
When you run passwd without any arguments, the system assumes you want to change the password for the account you are currently logged into. It will then prompt you for three things:
- Your current password (to verify your identity).
- Your new password.
- Your new password again (for confirmation).
For security, the characters you type for the passwords will not be displayed on the screen.
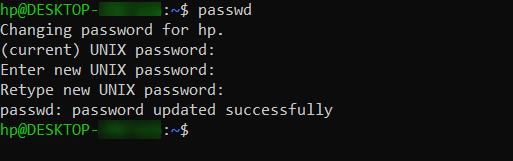
To see this in action, the following short video segment provides a clear demonstration.
Linux Crash Course Series - Using the passwd Command
Watch this clip from Learn Linux TV's "Linux Crash Course Series" to see the standard passwd command in use.
Watch the segment from 02:03 to 03:21. The presenter demonstrates how to change the password for the currently logged-in user and explains the interactive prompts.
2. Administrative Usage: Managing Other Users' Passwords
As a system administrator, you are responsible for managing all user accounts. This includes setting initial passwords for new users and resetting passwords for users who have forgotten them. To do this, you need to run the passwd command with root privileges (using sudo) and specify the username.
The command format is: sudo passwd <username>
A crucial difference when running passwd as root is that it will not ask for the user's current password. The system assumes that as the root user, you have the authority to make the change without needing prior verification. It will only ask you to enter and confirm the new password.
Let's watch another short clip that illustrates this process.
Linux Crash Course Series - Using the passwd Command
This segment demonstrates how an administrator can set or change a password for another user account using sudo.
Watch from 07:18 to 10:05. The video shows the creation of a new user and then using sudo passwd <username> to set their initial password, highlighting that the current password is not required.
3. Behind the Scenes: The /etc/shadow File
So, what exactly happens when you run passwd? As we discussed in the previous lesson, the command modifies the /etc/shadow file. This file stores the encrypted (or "hashed") passwords for all users. Because it contains sensitive information, it is only readable by the root user.
The passwd command acts as a safe and controlled interface to this file. This is why the passwd executable needs the SUID bit: so a regular user's command can run with root's permission to write to /etc/shadow.
Let's take a look at the structure of this important file.
Linux Crash Course - Managing Users
This clip from another Learn Linux TV video breaks down the /etc/shadow file. Understanding this file provides the foundational theory behind password management.
Watch from 28:05 to 30:15. Focus on the explanation of the first two fields: the username and the long, encrypted password hash. The other fields relate to password aging, which we will cover in our next lesson.
As the video explains, the x in a user's entry in the /etc/passwd file is a placeholder indicating that the actual password hash is stored securely in /etc/shadow. When you set a password, the passwd command generates a new hash and places it in the second field of the user's line in /etc/shadow.
Test your understanding!
A new junior administrator tells you they need to reset a forgotten password for the user bwayne. They tried running passwd bwayne but it failed. Why did it fail, and what is the correct command they should use?
Show answer
It failed because a regular user does not have permission to change another user's password. They need to use sudo to gain root privileges for this administrative task. The correct command is sudo passwd bwayne.
4. More Powerful Options for Password Management
The passwd command can do more than just change passwords. It includes several options, or "flags," that are essential for system administration. Let's look at the most important ones.
Managing Linux users with the passwd command
This article from Red Hat's blog, "Managing Linux users with the passwd command", provides a great reference for several powerful options. We will focus on a few key ones.
Please review the section titled "Options". Specifically, focus on the descriptions and examples for the -S (status), -l (lock), -u (unlock), -d (delete), and -e (expire) options. You don't need to memorize the aging-related options (-n, -x, -w, -i) for now, as we'll cover those separately.
Let's summarize and reinforce the most critical options from that reading.
Locking and Unlocking Accounts (-l and -u)
It is often necessary to temporarily disable an account without deleting the user's files. This is called "locking" the account. You can do this with the -l option:
sudo passwd -l <username>
This action prepends an exclamation mark (!) to the password hash in /etc/shadow, making it impossible for the system to match any password the user enters. To re-enable the account, you use the -u (unlock) option:
sudo passwd -u <username>
This simply removes the ! from the hash, restoring login capability. The following reading provides a step-by-step walkthrough of this exact process.
Manage Linux User Accounts with useradd, usermod, and ...
This tutorial from labex.io provides a hands-on walkthrough of locking and unlocking an account, showing you exactly how the /etc/shadow file changes.
Read the section "Lock and Unlock User Accounts with passwd -l and passwd -u". Pay close attention to the grep commands that show the /etc/shadow entry before and after locking.
Checking Password Status (-S)
The -S (status) option provides a concise summary of a user's password information. It's a quick way to see if an account is locked, has a password set, and to view its aging policies.
passwd -S <username>

Deleting and Expiring Passwords (-d and -e)
sudo passwd -d <username>: This deletes the user's password, allowing them to log in without one. This should be used with extreme caution and is typically reserved for service accounts that should not have direct password-based logins.sudo passwd -e <username>: This expires a user's password. The next time the user tries to log in, they will be immediately forced to choose a new password before they can proceed. This is useful for forcing a password change after a security incident or when setting up a new account with a temporary password.
Conclusion
You now have a solid, practical understanding of how to manage user passwords with the passwd command, a fundamental skill for the Linux+ exam and for real-world administration.
Key Takeaways:
passwdby itself allows a user to change their own password.sudo passwd <username>allows an administrator to set or reset a password for any user.- The command works by safely updating the encrypted password hash in the
/etc/shadowfile. - Key administrative options include:
-lto lock an account's password.-uto unlock it.-Sto view the account's password status.-eto force a password change on the next login.
In our next lesson, we will build directly on this foundation. You saw the password aging fields in the output of passwd -S and in the /etc/shadow file. We will explore those in-depth and learn how to configure password expiration policies using the chage command.