Hello! Welcome to our lesson on DNS configuration.
Introduction
In our last session, we mastered configuring network interfaces for both static and dynamic IP addressing using nmcli. We noted that a complete IP configuration includes the addresses of DNS servers. Today, we'll focus entirely on that piece of the puzzle.
This lesson directly addresses the learning outcome: to configure DNS client settings and test hostname resolution.
Following your preference, we'll first build a solid theoretical foundation of what the Domain Name System (DNS) is and how Linux handles name resolution. Then, we will move into the practical steps of configuring your system's DNS settings using nmcli and, finally, learn how to test that everything is working correctly using standard command-line tools. Understanding DNS is not just crucial for the CompTIA Linux+ exam; it's a fundamental skill for troubleshooting almost any network issue.
1. What is DNS? The Theory of Name Resolution
At its core, networking runs on IP addresses, but humans find it much easier to remember names like google.com or my-internal-server. DNS is the bridge between these two worlds.
To start, let's get a high-level overview of what DNS is and why it's so fundamental to networking from a source you'll appreciate: the CompTIA blog itself.
This article, 'What is DNS?', provides an excellent introduction to the core concepts.
Read the introduction and the 'How does DNS work?' section. Focus on understanding that DNS translates human-readable names to computer-readable IP addresses and the concept of a DNS server providing this service. Pay attention to the mention of resource records, especially 'A' records.
Now that you have the general concept, let's look at how a Linux system specifically handles the process of name resolution. It's not just about DNS; there's an order of operations.
This next video breaks down the key files involved and the sequence in which Linux consults them.
DNS in Linux for the Absolute Beginners!
This video from KodeKloud, 'DNS in Linux for the Absolute Beginners!', clearly explains the roles of the three main files that govern name resolution on a Linux client.
Please watch from 00:30 to 06:39. Pay close attention to the roles of three different files: /etc/hosts: For local, static name-to-IP mappings. /etc/resolv.conf: To specify the DNS servers (nameservers) your system should query. /etc/nsswitch.conf: To define the order of resolution (e.g., check local files first, then DNS).
Key Configuration Files Summary
Based on the video, let's solidify our understanding of these three critical files:
-
/etc/hosts: This is a simple text file that acts as a local, static "phonebook." You can add entries here to map an IP address to a hostname. By default, the system checks this file before asking a DNS server. It's useful for overriding public DNS for testing or for defining names for local devices without a DNS server.# Example /etc/hosts file 127.0.0.1 localhost 192.168.1.100 fileserver.local fileserver -
/etc/resolv.conf: This is the primary DNS client configuration file. It tells your system which DNS servers to contact. The most important line in this file isnameserver, followed by the IP address of a DNS server. You can have multiplenameserverlines for primary, secondary, and tertiary servers.# Example /etc/resolv.conf file nameserver 8.8.8.8 nameserver 1.1.1.1 -
/etc/nsswitch.conf: The Name Service Switch (NSS) configuration file is the master controller. It tells the system in what order to use different sources for various types of information. For our purposes, thehosts:line is key. A typical entry looks like this:hosts: files dns
This means: "When trying to resolve a hostname, first look in localfiles(like/etc/hosts), and if you don't find it there, then askdns."
2. Configuring DNS Client Settings with NetworkManager
A common mistake for beginners is to directly edit /etc/resolv.conf. On modern Linux systems that use NetworkManager (which we've been using with nmcli), this file is often dynamically generated. Any manual changes you make will be overwritten the next time the network service restarts or a connection is re-established.
The correct, persistent way to configure DNS is to modify the connection profile using nmcli. This ensures your settings survive reboots.
The following video segment shows the exact commands for this process.
030 - How To Configure Network In Linux Using NetworkManager (nmcli & nmtui) | RHEL 8
Since manually editing /etc/resolv.conf isn't persistent on modern systems, we'll use our trusted tool, nmcli. This segment from the CommandLine channel shows the precise commands for modifying a connection to add DNS servers.
Watch the segment from 05:53 to 07:40. Focus on the nmcli connection modify <connection_name> ipv4.dns ... command to set a primary DNS server, and the +ipv4.dns syntax to add a secondary one.
Let's walk through a complete example. Suppose we have a connection named enp0s3 and we want to set its DNS servers to Google's (8.8.8.8) and Cloudflare's (1.1.1.1).
-
View your current DNS settings:
nmcli dev show enp0s3 | grep DNSThis will likely show DNS servers provided by your DHCP server.
-
Modify the connection:
We will set the DNS servers and, crucially, tell NetworkManager to ignore any DNS servers provided automatically by DHCP.sudo nmcli con mod enp0s3 ipv4.dns "8.8.8.8 1.1.1.1" sudo nmcli con mod enp0s3 ipv4.ignore-auto-dns yes -
Re-activate the connection to apply the changes:
sudo nmcli con up enp0s3 -
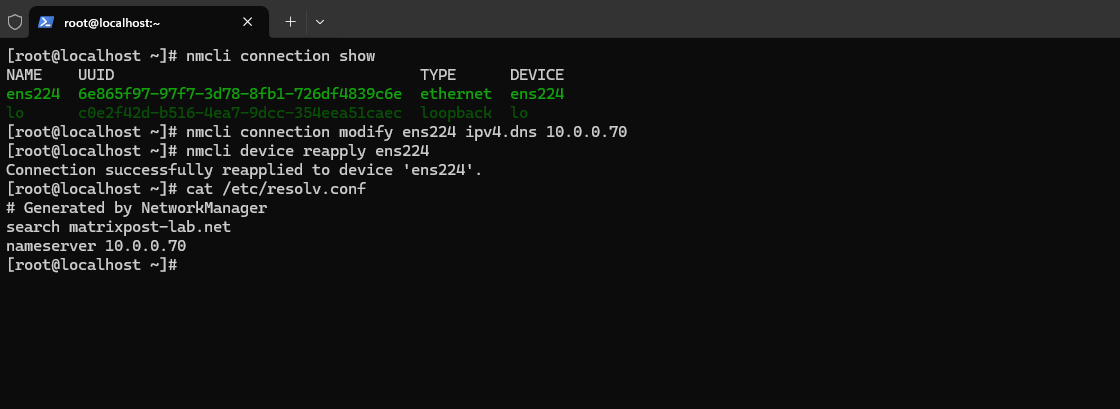
Verify the result:
Now, if you check the/etc/resolv.conffile, you should see your new settings reflected.cat /etc/resolv.confThe output should now show
nameserver 8.8.8.8andnameserver 1.1.1.1.
3. Testing Hostname Resolution
Once your DNS settings are configured, you need to test them. While ping <hostname> is a good first step, it doesn't give you much detail. For proper DNS troubleshooting, Linux provides several powerful utilities.
DNS in Linux for the Absolute Beginners!
Now that we've configured our DNS settings, how do we test them? This final clip from the KodeKloud video introduces nslookup and dig, two essential testing tools.
Watch from 13:10 to 14:10. The video briefly demonstrates nslookup and dig for querying a DNS server directly.
Here are the main tools you should know for the Linux+ exam:
| Tool | Description | Example Usage |
|---|---|---|
dig |
(Domain Information Groper) The most powerful and preferred tool. Provides detailed, structured output perfect for scripting and deep analysis. | dig comptia.org |
nslookup |
An older but still widely available tool. Can be used in a simple one-off query or in an interactive mode for multiple queries. | nslookup comptia.org |
host |
Provides a simple, clean output that is very easy to read. Excellent for quick, straightforward lookups. | host comptia.org |
The dig command is particularly important. Its output is broken into sections that give you a complete picture of the DNS query.

Test your understanding!
You run ping webserver.local and it fails with "name or service not known". However, you run ping 192.168.1.50 (the server's correct IP) and it succeeds. What is the most likely category of problem, and which file would you check first to see which DNS servers your system is configured to use?
Show answer
This is a name resolution (DNS) problem. Since the IP address is reachable, the underlying network connection is working, but the translation from the name webserver.local to the IP 192.168.1.50 is failing.
You should first check /etc/resolv.conf to see which nameservers your system is currently using to try and resolve the name. This will tell you if your system is pointing to the wrong DNS server or if it has no DNS server configured at all.
Conclusion
Excellent work today! You've successfully navigated the essentials of DNS client configuration and testing on a Linux system.
Key Takeaways:
- DNS is the service that translates human-friendly hostnames into machine-usable IP addresses.
- Linux uses a sequence of sources for resolution, configured in
/etc/nsswitch.conf(typically checking local/etc/hostsfirst, then DNS). - The
/etc/resolv.conffile shows the current nameservers but should not be edited directly on modern systems managed by NetworkManager. - The correct, persistent method for setting DNS client information is with
nmcli connection modify <name> ipv4.dns "..."andipv4.ignore-auto-dns yes. - The
dig,nslookup, andhostcommands are the standard tools for testing and troubleshooting DNS resolution.
Preview of the Next Lesson:
Now that we can configure an interface with an IP address and resolve hostnames, the next piece of the networking puzzle is understanding how your system decides which path to take to reach other networks. In our next lesson, we will manage the system's routing table, giving you a complete picture of how IP traffic gets from your machine to its destination.