Hello! Welcome to our next lesson.
Introduction
In our last session, we got hands-on with the ip and nmcli commands, learning how to view our network configuration and make both temporary and persistent changes to interfaces. We established nmcli as the modern tool for managing permanent network settings in Linux.
Today, we will apply that knowledge to a crucial, everyday task for any system administrator: configuring how a system gets its IP address. This lesson directly addresses the learning outcome: to configure static and dynamic (DHCP) IP addressing for a network interface.
We'll start by exploring the "why"—understanding the difference between static and dynamic addressing and when to use each. Then, following your preference for a mix of theory and practice, we will dive into the practical nmcli commands needed to implement both methods. Mastering this skill is essential for setting up any Linux machine, from a desktop client to a critical server, and is a core competency for the CompTIA Linux+ exam.
1. Static vs. Dynamic Addressing: The Theory
Before we type any commands, it's vital to understand the two main philosophies for assigning IP addresses. A computer can either be told its address manually (static) or it can ask for one automatically (dynamic). The Dynamic Host Configuration Protocol (DHCP) is the system that handles the automatic process.
To get a clear overview of these concepts, let's watch a short, animated video.
DHCP Explained - Dynamic Host Configuration Protocol
This video, 'DHCP Explained' from PowerCert Animated Videos, does an excellent job of breaking down the fundamental differences between static and dynamic IP addressing and introducing how DHCP works.
Please watch the following two segments: Introduction to Static vs. Dynamic (00:00 - 02:15): Focus on the definitions of static and dynamic IPs and the administrative overhead associated with static assignment in large networks. DHCP Scopes and Leases (03:44 - 07:56): Pay close attention to the concepts of a 'scope' (a pool of available addresses) and a 'lease' (the temporary assignment of an address).
Let's summarize the key points from the video:
-
Static IP Addressing:
- The IP address, subnet mask, gateway, and DNS servers are manually and permanently set on the device.
- Use Case: Essential for devices that need a predictable, unchanging address, such as servers (web, file, database), network printers, and routers. Clients on the network need to know where to find these services consistently.
- Downside: Managing static IPs for many devices is time-consuming and prone to errors like typos or address conflicts.
-
Dynamic IP Addressing (DHCP):
- The device is configured to automatically request an IP configuration when it joins the network.
- A DHCP Server (often a service running on a router or a dedicated server) responds to this request.
- The server assigns an IP address from a pre-defined pool called a scope.
- This assignment is temporary and called a lease. The device must periodically renew its lease to keep the IP address. This ensures that unused IP addresses are returned to the pool for others to use.
- Use Case: Ideal for client devices like desktops, laptops, and mobile phones, where the exact IP address isn't important for other devices to know. It simplifies network administration immensely.
Now that we understand the "why," let's move on to the "how."
2. Configuring a Dynamic (DHCP) Client
Most Linux distributions are configured to use DHCP by default for network connections. However, you need to know how to explicitly set a connection to use DHCP, especially if you're reverting from a static configuration. With NetworkManager, you simply set the connection's IPv4 method to auto.
There are two common scenarios: adding a new connection that will use DHCP, and modifying an existing one.
Adding a New DHCP Connection
If you are setting up a new connection profile from scratch and want it to use DHCP, you can use the nmcli connection add command. This creates a new profile that is automatically set to use DHCP.
The following reading provides a clear example of this.
3.3. Configuring IP Networking with nmcli
The official Red Hat documentation, 'Configuring IP Networking with nmcli', provides authoritative and precise examples. We'll look at the section on adding a dynamic connection.
Please read the subsection titled 'Adding a Dynamic Ethernet Connection'. Focus on the command syntax: nmcli connection add type ethernet con-name ... ifname ... and the example provided.
As the documentation shows, the command is straightforward. For example, to create a new DHCP-enabled connection profile named office-network for the interface eth0, you would run:
sudo nmcli connection add type ethernet con-name "office-network" ifname eth0
NetworkManager defaults to the auto method, so no further configuration is needed for DHCP.
Modifying an Existing Connection to Use DHCP
More commonly, you might need to change an existing connection (e.g., one that was previously static) back to using DHCP. For this, you use the nmcli connection modify command.
This is a simple change to the ipv4.method property.
sudo nmcli connection modify <connection_name> ipv4.method auto
For instance, to switch a connection named static-server-ip back to DHCP:
sudo nmcli connection modify "static-server-ip" ipv4.method auto
After making this change, you must reactivate the connection for it to take effect:
sudo nmcli connection up "static-server-ip"
The device will then perform a DHCP request to get a new IP address automatically.
3. Configuring a Static IP Address
Configuring a static IP is more involved because you must provide all the necessary details yourself: the IP address, the subnet prefix (CIDR), and the default gateway.
Let's look at how to do this using nmcli.
Creating a New Static Connection
To create a new, persistent static IP configuration from scratch, we use nmcli connection add with additional arguments to specify the IP details.
Linux: Display and Manage IP Address Settings
Let's turn to the article 'Linux: Display and Manage IP Address Settings' from The New Stack for a practical example of setting a persistent static IP.
Read the section detailing how to set a persistent static IP. Start from the paragraph 'You’ll probably find that the NetworkManager component...' and focus on the nmcli con add command example that sets the IP address, subnet mask, and gateway.
Based on the reading, the command structure is as follows:
sudo nmcli con add con-name <name> ifname <interface> type ethernet ip4 <address/prefix> gw4 <gateway_address>
For example, to configure the interface eth0 with the static IP 192.168.1.100, a 24-bit subnet mask, and a gateway at 192.168.1.1, you would run:
sudo nmcli con add con-name "server-static" ifname eth0 type ethernet ip4 192.168.1.100/24 gw4 192.168.1.1
This creates a new profile named server-static with all the required settings.
Modifying an Existing Connection to Use a Static IP
Alternatively, you can modify an existing connection (like a default DHCP one) to use a static IP. This involves changing the method to manual and providing the address details.
The following video segment demonstrates this exact process.
Moving from network scripts to Network Manager (nmcli) | Into the Terminal 118
In our previous lesson, we watched a video from Red Hat on nmcli. Let's revisit a key segment that shows exactly how to modify a connection from automatic to manual.
Please watch the segment from 10:13 to 14:17. The presenter demonstrates a single, powerful nmcli connection modify command to switch a connection to manual and set the IP, netmask (via prefix), and gateway all at once.
As the video shows, the command combines several modifications:
sudo nmcli connection modify <connection_name> ipv4.method manual ipv4.addresses <address/prefix> ipv4.gateway <gateway_address>
After creating or modifying the connection, remember to apply the changes by bringing the connection up. This deactivates any old configuration and applies the new static one.
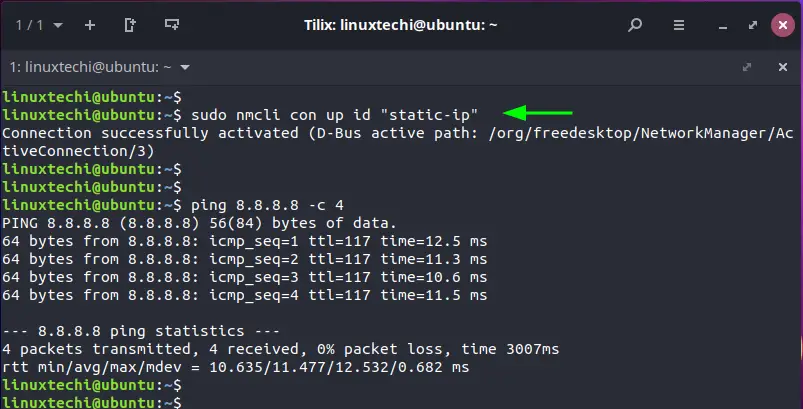
sudo nmcli connection up <connection_name>
You can then verify your settings.

Finally, you should always test connectivity with a tool like ping.
Test your understanding!
Your manager asks you to reconfigure a server. The existing network connection profile is named Wired-DHCP and it's assigned to the interface ens18. You need to change it to use the static IP 10.42.0.5 with a subnet mask of 255.255.255.0 and a gateway of 10.42.0.1. What single nmcli command would you use to make this persistent change? (Note: 255.255.255.0 is equivalent to a /24 prefix).
Show answer
sudo nmcli connection modify "Wired-DHCP" ipv4.method manual ipv4.addresses "10.42.0.5/24" ipv4.gateway "10.42.0.1"
This command targets the existing connection, changes its method from auto to manual, and sets both the IP address (with the correct CIDR prefix) and the gateway in one go. You would then run sudo nmcli con up "Wired-DHCP" to apply the changes.
4. A Note on Configuration Files
It's useful to know that nmcli is a user-friendly tool that works by managing configuration files on the system. While you should almost always use nmcli, the CompTIA Linux+ exam may expect you to recognize the underlying files.
- Red Hat Family (RHEL, CentOS, Fedora): NetworkManager traditionally uses
ifcfg-*files located in/etc/sysconfig/network-scripts/. For example, a connection foreth0might be defined in/etc/sysconfig/network-scripts/ifcfg-eth0. This method is considered legacy but is still very common. - Debian Family (Debian, Ubuntu): Modern versions use Netplan, which configures networking through
.yamlfiles in the/etc/netplan/directory. Netplan is a higher-level tool that can then configure NetworkManager on your behalf.
You don't need to memorize the syntax of these files right now. The key takeaway is that nmcli is the standard, distribution-agnostic way to manage these settings safely.
Conclusion
Great work! You've now covered the theory and practice of configuring the two primary types of IP addressing on a modern Linux system. This is a fundamental skill that moves you from being a user to an administrator.
Key Takeaways:
- Static IPs are manually set and unchanging, ideal for servers and network infrastructure.
- Dynamic IPs are automatically assigned via DHCP, perfect for client machines.
- To configure a connection for DHCP, use
nmcli con modify <name> ipv4.method auto. - To configure a static IP, set
ipv4.method manualand provide theipv4.addressesandipv4.gateway. - You can either
adda new connection with the desired settings ormodifyan existing one. - Changes are made persistent by
nmclibut only take effect after the connection is broughtup.
Preview of the Next Lesson:
We've mentioned DNS servers as part of the configuration provided by DHCP or set manually with a static IP. But what exactly is DNS and how do you manage it? In our next lesson, we will dive deep into that topic. We will configure DNS client settings and test hostname resolution, completing the foundational set of networking skills you need.