Hello! Let's continue our journey into advanced storage with LVM.
Introduction
In our previous lesson, you learned how to construct the fundamental LVM architecture: creating Physical Volumes (PVs) from disks, pooling them into Volume Groups (VGs), and carving out usable Logical Volumes (LVs). We built the foundation, but the real power of LVM lies in its flexibility, which we'll unlock today.
This lesson directly addresses the primary benefit of LVM: the ability to change the size of your storage on the fly. You will learn how to resize LVM logical volumes and their underlying filesystems. We'll cover the two essential steps in this process and tackle the two most common scenarios:
- Growing a logical volume when your volume group has free space.
- Expanding the volume group itself by adding a new disk when it's full.
By the end of this lesson, you'll be able to confidently manage and adapt your Linux storage to meet changing demands—a critical skill for any system administrator and a key topic for your CompTIA Linux+ exam.
1. The Core Concept: Resizing the Volume and the Filesystem
A key concept to grasp is that resizing an LVM volume is a two-part operation.
- Resizing the Logical Volume (the container): You first tell LVM to allocate more (or less) space to the LV. This changes the size of the block device (e.g.,
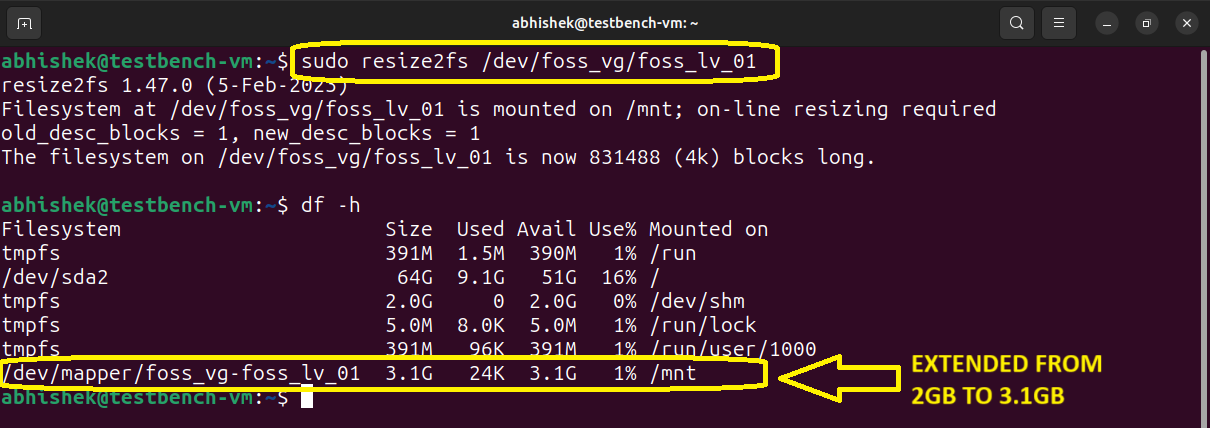
/dev/my_vg/my_lv). - Resizing the Filesystem (the contents): After the LV container is bigger, you must command the filesystem (like ext4) living inside it to expand and use that new space.
If you only do step 1, the new space will be allocated but unusable. The operating system won't see the extra capacity until the filesystem is also resized.
The order is critical:
- To Grow: First, grow the logical volume, then grow the filesystem.
- To Shrink: First, shrink the filesystem, then shrink the logical volume. Shrinking is riskier because if you make the LV smaller than the filesystem, you will cause data corruption. We will focus on growing, which is the far more common and safer operation.
2. The Modern Approach: lvresize with the -r Flag
Fortunately, modern LVM tools provide a convenient way to perform both steps of the growing process with a single command. The lvresize or lvextend commands have a -r (or --resizefs) flag that automatically resizes the filesystem after successfully resizing the logical volume. This is the recommended method.
Let's see exactly how this works.
Configure RAID and LVM Storage in Linux
The following guide from LabEx provides a concise, hands-on demonstration of the lvresize command with the crucial -r flag.
Please read the section titled 'Resize an LVM Logical Volume with lvresize'. Pay close attention to the syntax used, the function of the -r flag, and how the df -h command is used to verify the change.
As the guide demonstrates, the workflow is straightforward:
- Check the current size with
df -h. - Run
sudo lvresize -r -L +<size> /path/to/logical_volume. - Verify the new, larger size with
df -h.
The + sign is important; it tells the command to add space. For example, -L +5G adds 5 gigabytes to the LV's current size.
Another powerful option is to use percentages of the available free space in the volume group. The command lvresize -r -l +100%FREE ... will extend the logical volume to use all remaining free space in its parent volume group. Note the lowercase -l, which works with "extents" (the basic blocks of LVM storage) rather than absolute sizes.
Test your understanding!
You have a logical volume at /dev/vg_apps/lv_web that is currently 20GB. Your volume group, vg_apps, has 50GB of free space. What single command would you use to increase the size of lv_web by exactly 10GB and automatically resize its filesystem?
Show answer
sudo lvresize -r -L +10G /dev/vg_apps/lv_web
Alternatively, you could use lvextend:sudo lvextend -r -L +10G /dev/vg_apps/lv_web
Both commands achieve the same result for growing a volume.
3. The Full Workflow: Expanding a Volume Group
The simple resize works perfectly if your Volume Group has free space. But what happens when the VG itself is full? You can't add space to an LV if the pool it belongs to is empty.
This is where the true power of LVM shines. You can add an entirely new physical disk to the system, add it to the volume group, and then grow your logical volume—all without any downtime.
The process is:
- Add a new physical storage device to your server.
- Initialize it as an LVM Physical Volume (
pvcreate). - Extend the target Volume Group to include this new PV (
vgextend). - Now that the VG has free space, resize the Logical Volume as we did before (
lvresize -r).
Linux Logical Volume Manager (LVM) Deep Dive Tutorial
This video from Learn Linux TV provides an excellent, step-by-step demonstration of this entire workflow. The presenter adds a new virtual disk to a running server and uses it to expand the root filesystem online.
Watch from 28:06 to 34:57. Follow along as the presenter: Adds a new hard disk. Uses pvcreate to prepare it. Uses vgextend to add the new PV to the volume group. Uses lvextend to grow the logical volume. Initially forgets to resize the filesystem, demonstrating why the next step (resize2fs) or the -r flag is so important. He then shows the combined command with the -r option.
Let's recap the key commands from the video:
sudo pvcreate /dev/sdb: Initializes the new disk/dev/sdbas a physical volume.sudo vgextend vg_ubuntu /dev/sdb: Extends thevg_ubuntuvolume group, adding all the space from/dev/sdbto its pool.sudo lvextend -r -l +100%FREE /dev/mapper/vg_ubuntu-lv_root: Resizes the logical volumelv_rootto use all the new free space and automatically resizes the filesystem on it.
This ability to seamlessly absorb new physical storage into your existing logical volumes is a fundamental LVM skill.
4. A Note on Shrinking Volumes
While growing volumes is common and safe, shrinking is less common and carries more risk. The order of operations is reversed and must be followed precisely to avoid data loss.
- Unmount the filesystem (usually required).
- Run a filesystem check (
e2fsck -f) to ensure it's healthy. - Shrink the filesystem first (
resize2fs) to a size smaller than your target logical volume size. - Shrink the logical volume (
lvreduceorlvresize) to its new, smaller size.
Because of this complexity and risk, shrinking is rarely done unless absolutely necessary. For the exam and most practical purposes, mastering how to grow volumes is the priority.
Conclusion
You have now mastered the most celebrated feature of LVM: dynamic volume resizing. This capability frees you from the rigid constraints of static partitions and allows you to manage storage in a fluid, adaptable way.
Key Takeaways:
- Growing a logical volume is a two-step process: grow the LV, then grow the filesystem.
- The
lvresize -rorlvextend -rcommand is the best practice, as it performs both steps safely in one operation. - If a Volume Group is full, you can expand it by adding a new Physical Volume with the
vgextendcommand. - The full workflow for expansion is:
pvcreate(on the new disk) →vgextend(to add the new disk to the pool) →lvresize -r(to grow the logical volume). - Shrinking a volume is possible but riskier and requires shrinking the filesystem before shrinking the logical volume.
Preview of the Next Lesson:
With this lesson, we conclude our deep dive into LVM. You now have the skills to create, manage, and resize flexible storage solutions. In the next lesson, we will shift gears from storage to the second major topic of this module: networking. You will learn to explain fundamental networking concepts like IP addresses, subnets, gateways, and DNS, laying the groundwork for configuring and troubleshooting network connectivity on a Linux system.