Hello! Welcome to the first lesson in our module on "Advanced Storage and Networking."
Introduction
In the previous module, we covered the fundamentals of disk management, from partitioning and creating filesystems with fdisk and mkfs to ensuring data integrity with fsck. You learned how to manage static storage structures. Now, we're going to explore a more dynamic and powerful approach to storage: Logical Volume Management (LVM).
While traditional partitions are rigid, LVM introduces a layer of abstraction that allows you to create flexible, resizable storage pools that can span multiple physical disks. This is a cornerstone of modern Linux server administration and a key topic for the CompTIA Linux+ exam.
In this lesson, you will learn to create and manage the fundamental components of LVM: physical volumes (PVs), volume groups (VGs), and logical volumes (LVs). We will cover:
- The limitations of traditional partitioning that LVM solves.
- The three-tiered architecture of LVM.
- The commands to initialize disks for LVM (
pvcreate), create storage pools (vgcreate), and carve out usable volumes (lvcreate).
Mastering these concepts is the essential first step before we learn how to resize and modify these volumes in the next lesson.
1. Why Use LVM? The Problem with Static Partitions
Imagine you've set up a server with a 100GB partition for web content and a 50GB partition for logs. What happens when the web content partition fills up, but the log partition is nearly empty? With traditional partitions, you're stuck. Reallocating that space is a complex, risky, and often offline process.
LVM was designed to solve this exact problem. It provides the flexibility to manage your disk space as a single, fluid pool.
Linux Logical Volume Manager (LVM) Deep Dive Tutorial
To see a dramatic, real-world demonstration of this problem, watch the first part of the 'Linux Logical Volume Manager (LVM) Deep Dive Tutorial' from Learn Linux TV. The presenter intentionally fills up a disk on a system without LVM and then shows how LVM would have easily saved the day.
Watch from the beginning until 10:49. Pay close attention to the scenario he creates and how the non-LVM system grinds to a halt when it runs out of space, while the LVM system can be expanded online.
This demonstration highlights LVM's primary benefit: flexibility. You can adapt to changing storage needs without repartitioning disks or taking systems offline for extended periods.
2. The LVM Architecture: A Three-Layer Model
Your preference for starting with theory will be well-served here, as understanding the LVM architecture is key to using it effectively. LVM organizes storage into three hierarchical layers.
An Introduction to LVM Concepts, Terminology, and ...
The article 'An Introduction to LVM Concepts' from DigitalOcean provides an excellent breakdown of LVM's architecture. It clearly defines the core components.
Read the section 'LVM Storage Management Structures' and 'Understanding Extents'. This will introduce you to Physical Volumes, Volume Groups, and Logical Volumes, and explain the concept of 'extents'—the basic building blocks LVM uses to allocate space.
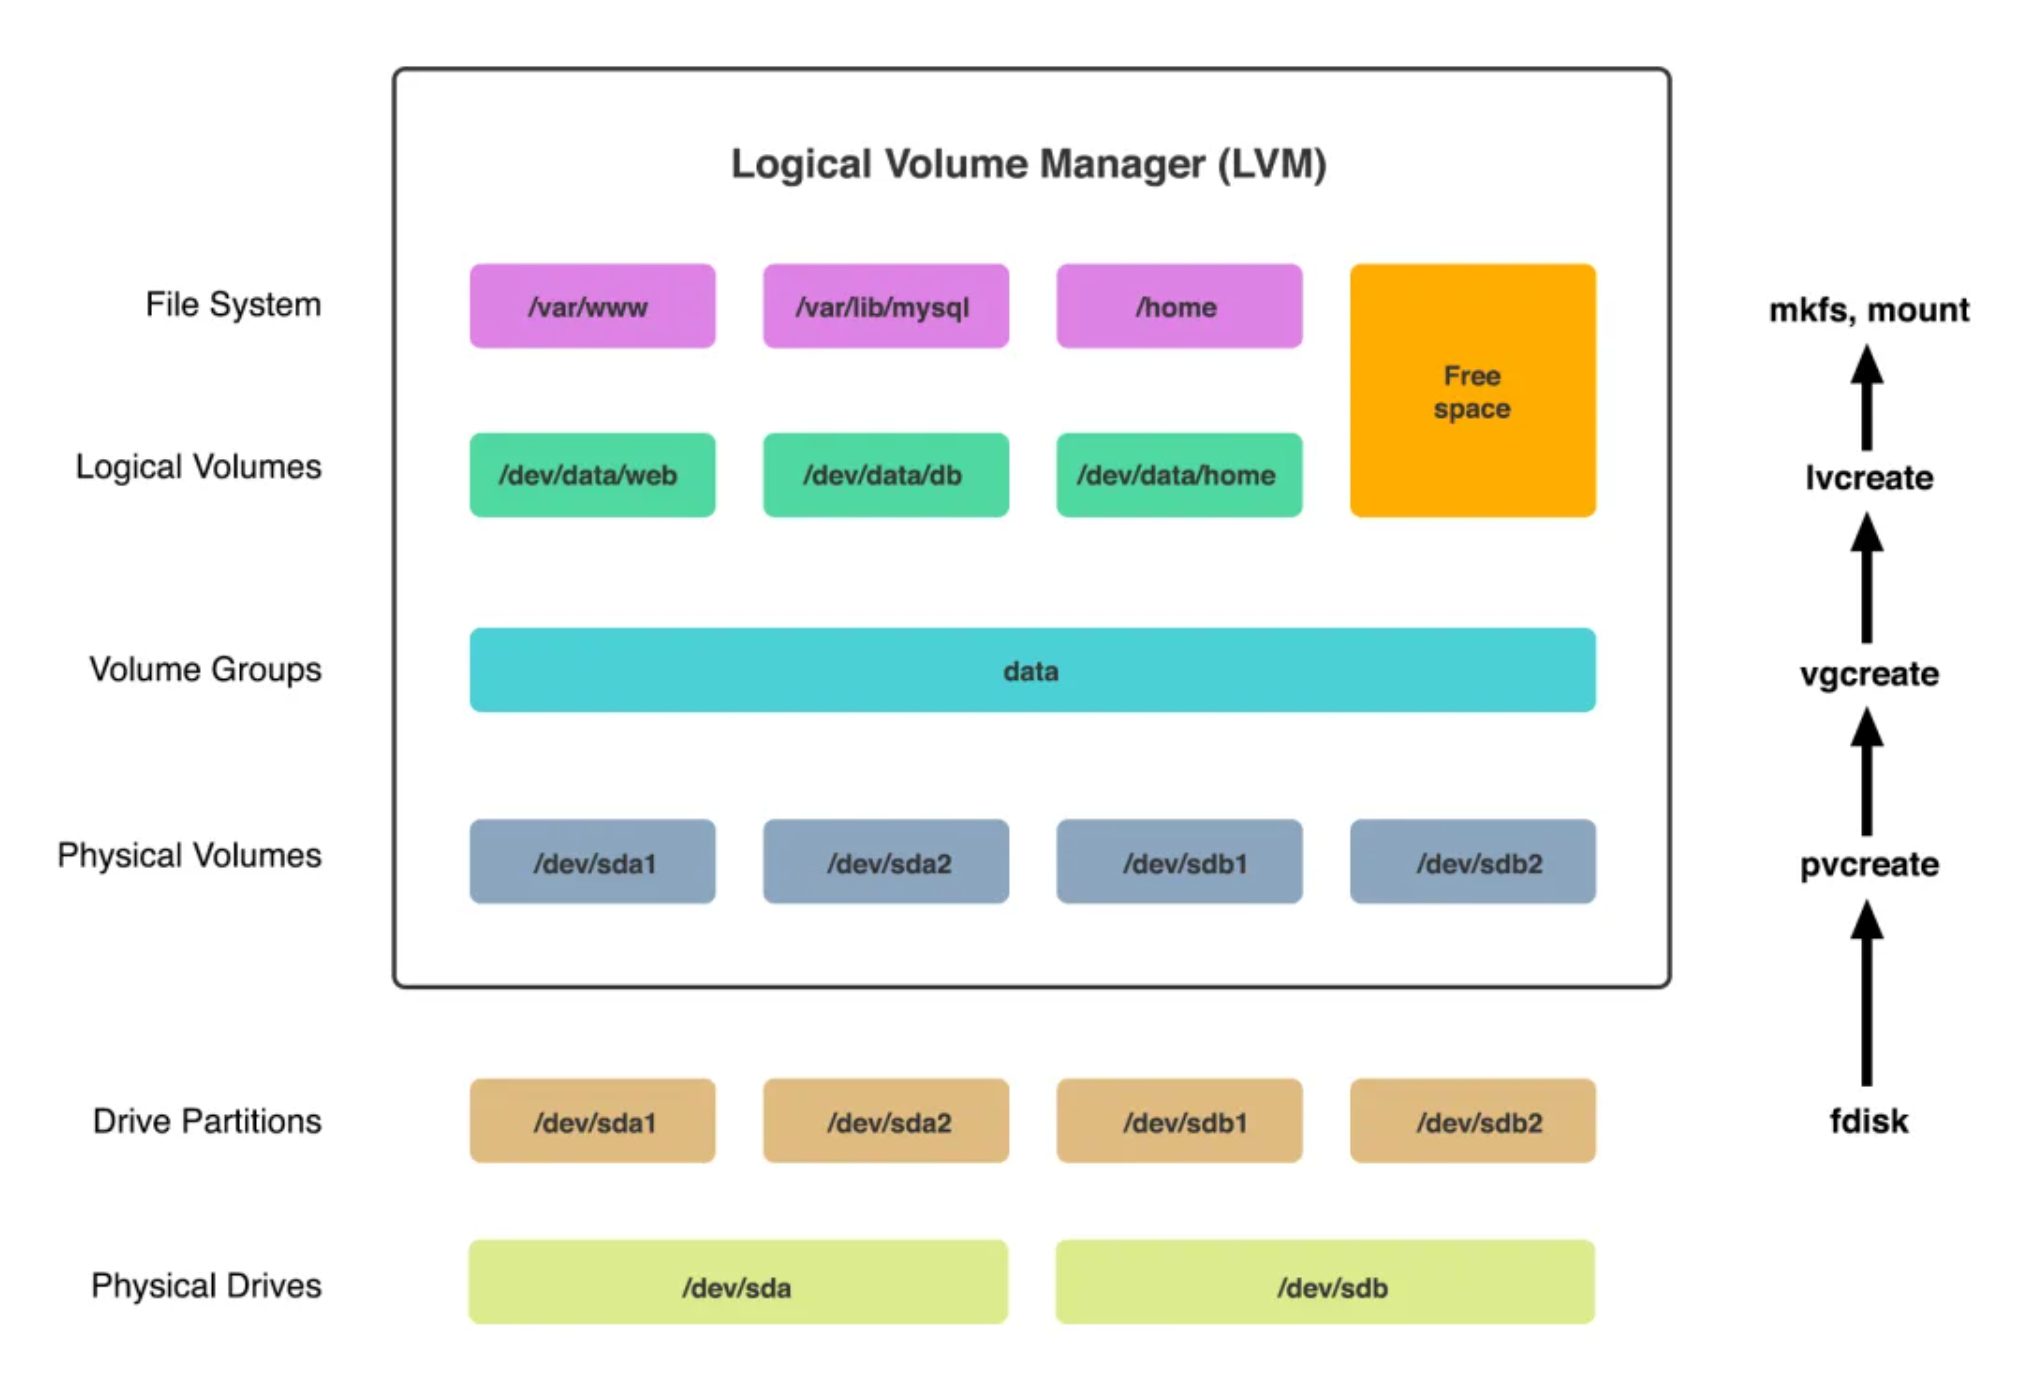
To summarize the architecture:
-
Physical Volumes (PVs): These are the raw building blocks. A PV can be an entire physical disk (e.g.,
/dev/sdb) or a disk partition (e.g.,/dev/sdb1). You use thepvcreatecommand to "donate" a physical device to LVM's control. -
Volume Groups (VGs): This is the storage pool. A VG is created by combining one or more PVs. For example, you can combine two 500GB disks into a single 1TB Volume Group. From the system's perspective, this VG is one giant, continuous pool of space.
-
Logical Volumes (LVs): These are the "virtual partitions" that you carve out from a Volume Group. An LV is what the operating system ultimately uses. You can create an LV of any size (up to the total size of the VG), format it with a filesystem like ext4, and mount it just like a regular partition.
The following diagram illustrates this layered relationship perfectly.
3. Practical Guide: Creating an LVM Setup
Now, let's put the theory into practice. We will walk through the process of taking new, un-partitioned disks and creating a usable LVM logical volume. For these examples, assume we've added two new disks to our system: /dev/sdb and /dev/sdc.
A quick note on command prefixes: The LVM command suite is very consistent.
- Commands for Physical Volumes start with
pv(e.g.,pvcreate,pvs,pvdisplay). - Commands for Volume Groups start with
vg(e.g.,vgcreate,vgs,vgdisplay). - Commands for Logical Volumes start with
lv(e.g.,lvcreate,lvs,lvdisplay).
Step 1: Initialize Physical Volumes (PVs)
First, we need to tell LVM that our new disks are available for its use.
Warning: The pvcreate command is destructive. It writes a metadata header to the disk, which will overwrite any existing data. Always double-check that you are using the correct device names.
# Initialize /dev/sdb and /dev/sdc as Physical Volumes
sudo pvcreate /dev/sdb /dev/sdc
After running the command, you can verify that LVM sees them using pvs (a summary view) or pvdisplay (a detailed view).
sudo pvs
# Expected Output:
# PV         VG   Fmt  Attr PSize   PFree
# /dev/sdb        lvm2 ---  <size>  <size>
# /dev/sdc        lvm2 ---  <size>  <size>
Notice the VG column is empty, as they haven't been assigned to a Volume Group yet.
An Introduction to LVM Concepts, Terminology, and ...
The DigitalOcean article provides clear, step-by-step instructions for this process. We'll follow its structure.
Read the section 'Marking the Physical Devices as Physical Volumes' for a detailed walkthrough of the pvcreate and pvs commands.
Step 2: Create the Volume Group (VG)
Now that we have our building blocks (PVs), we can combine them into a single storage pool (VG). Let's call our new Volume Group vg_data.
# Create a Volume Group named vg_data using our two PVs
sudo vgcreate vg_data /dev/sdb /dev/sdc
You can now use vgs or vgdisplay to see your new pool of storage.
sudo vgs
# Expected Output:
# VG        #PV #LV #SN Attr   VSize   VFree
# vg_data     2   0   0 wz--n- <total_size> <total_size>
The output shows that vg_data contains 2 PVs, has 0 LVs, and its entire size is free.
An Introduction to LVM Concepts, Terminology, and ...
Let's continue with the DigitalOcean guide for creating the Volume Group.
Read 'Adding the Physical Volumes to a Volume Group' to see the vgcreate command in action.
Step 3: Create the Logical Volume (LV)
With our storage pool ready, we can finally carve out a usable "virtual partition"—our Logical Volume. We'll use the lvcreate command. The most important options are:
-L: Specifies the size (e.g.,10Gfor 10 gigabytes).-n: Specifies the name of the LV.
Let's create a 15GB logical volume named lv_projects from our vg_data pool.
# Create a 15GB Logical Volume named lv_projects inside vg_data
sudo lvcreate -L 15G -n lv_projects vg_data
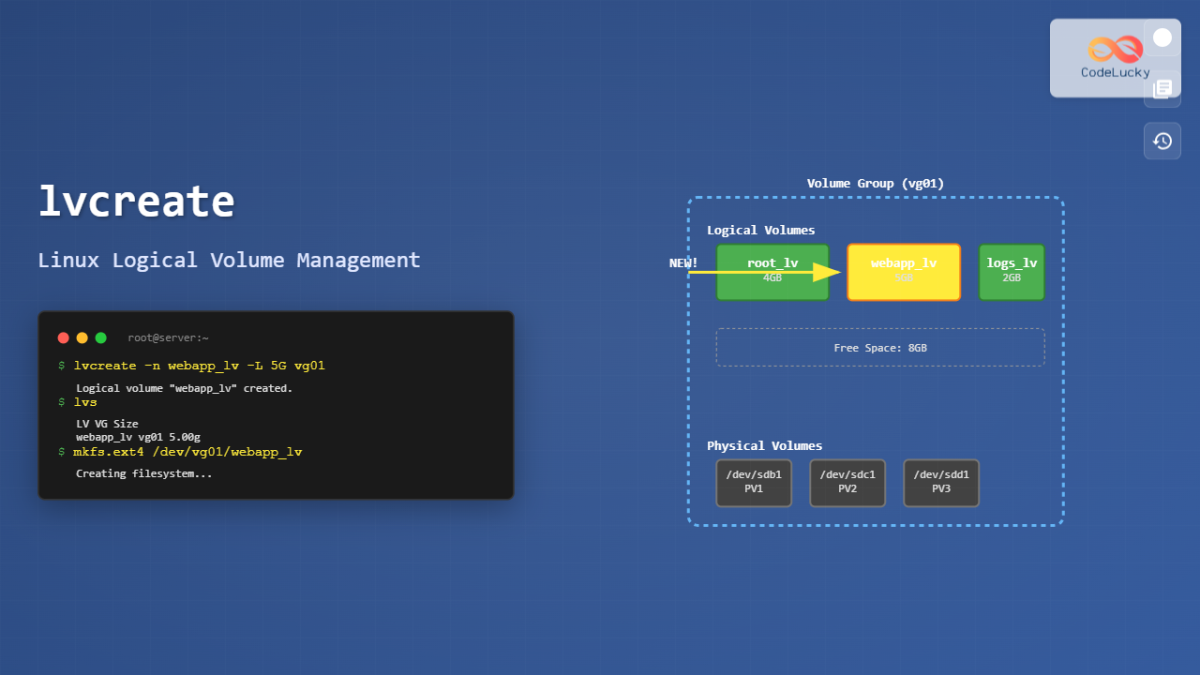
You can check the result with lvs or lvdisplay.
sudo lvs
# Expected Output:
# LV          VG      Attr       LSize  Pool Origin Data%  Meta%  Move Log Cpy%Sync Convert
# lv_projects vg_data -wi-a----- 15.00g
You can also run vgs again to see that the VFree space has decreased.
An Introduction to LVM Concepts, Terminology, and ...
To complete the creation process, let's look at the guide for lvcreate.
Read 'Creating Logical Volumes from the Volume Group Pool'. This covers the lvcreate command and also introduces a very useful option: -l 100%FREE, which allocates all remaining space in the VG to an LV.
Step 4: Format and Mount the Logical Volume
The lv_projects volume now exists as a block device at /dev/vg_data/lv_projects (or /dev/mapper/vg_data-lv_projects). To use it, you must treat it like any other disk partition: format it with a filesystem and mount it.
# 1. Format the new LV with the ext4 filesystem
sudo mkfs.ext4 /dev/vg_data/lv_projects

# 2. Create a mount point
sudo mkdir /mnt/projects

# 3. Mount the LV at the mount point
sudo mount /dev/vg_data/lv_projects /mnt/projects
To make this mount permanent across reboots, you would add an entry to your /etc/fstab file, just as you learned in the previous module.
Test your understanding!
You have a new 1TB disk, /dev/sdd. What sequence of three main commands would you use to create a 200GB logical volume named lv_backups inside a volume group named vg_archive?
Show answer
-
Create the Physical Volume:
sudo pvcreate /dev/sdd -
Create the Volume Group:
sudo vgcreate vg_archive /dev/sdd -
Create the Logical Volume:
sudo lvcreate -L 200G -n lv_backups vg_archive
Conclusion
In this lesson, you took the first and most crucial step into Logical Volume Management. You've moved beyond the rigidity of physical partitions and learned how to create a flexible storage foundation.
Key Takeaways:
- LVM solves the problem of inflexible, static partitions by creating an abstraction layer over physical disks.
- The architecture consists of three tiers: Physical Volumes (PVs) are the physical disks/partitions, Volume Groups (VGs) are pools of storage made from PVs, and Logical Volumes (LVs) are the usable "virtual partitions" carved from VGs.
- The core commands for creation are
pvcreate,vgcreate, andlvcreate. - Once created, an LV is a standard block device that must be formatted with a filesystem (
mkfs) and mounted (mount) to be used.
Preview of the Next Lesson:
We started this lesson with a scenario where a partition ran out of space. While we've now built the LVM structure, we haven't yet used its main feature. In the next lesson, "Resize LVM logical volumes and their underlying filesystems," you will learn how to dynamically grow (or shrink) the logical volumes you've created, finally closing the loop on why LVM is so powerful.