Hello! Welcome to the final lesson of our "Storage and Filesystem Management" module.
In our previous lesson, we explored how to build robust and performant storage solutions by combining multiple disks into a RAID array using mdadm. You learned to create, monitor, and even recover an array from a simulated disk failure. Now, we'll address a different kind of problem: what happens when the data structure on a storage device—the filesystem itself—becomes corrupted?
This lesson will teach you how to check and repair file systems using fsck. This is a critical skill for any Linux administrator, as filesystem errors can prevent a system from booting or cause data loss. We will cover:
- What filesystem corruption is and why it happens.
- The role of the
fsckcommand as a universal tool for filesystem maintenance. - The crucial rule of unmounting filesystems before checking them.
- How to use
fsckwith its most common options for checking and repairing. - How to handle specific filesystem types like XFS and ext4.
- The special procedure for checking the root filesystem, which can't be unmounted on a running system.
Mastering fsck is essential for system recovery and is a key topic for the CompTIA Linux+ certification.
1. Understanding Filesystem Corruption and the Role of fsck
A filesystem is a complex set of data structures (like inodes, superblocks, and directory entries) that organizes how data is stored and retrieved from a disk. If these structures become inconsistent, the filesystem is considered "corrupted." This can happen for several reasons:
- Improper Shutdown: A sudden power loss or system crash can interrupt writes to the disk, leaving the filesystem in an inconsistent state.
- Hardware Failure: A failing disk drive or controller can write bad data or fail to write data correctly.
- Software Bugs: Errors in the kernel or other low-level software could potentially damage filesystem structures.
When this happens, you might encounter strange behavior: files that disappear, I/O errors when trying to access data, or—most critically—the system failing to boot.
A real-world example of a boot failure. The system has detected filesystem inconsistencies and is instructing the administrator to run fsck manually to fix the problem.
The primary tool for diagnosing and fixing these issues is fsck (File System Consistency Check). It's important to understand what fsck does and, just as importantly, what it doesn't do.
Chapter 15. Checking and repairing a file system
Let's start with a formal definition from the Red Hat documentation, 'Chapter 15. Checking and repairing a file system'. This short section clarifies the purpose of fsck.
Please read the introduction and the section titled '15.1. Scenarios that require a file system check'. Focus on the distinction it makes: fsck tools guarantee metadata consistency, but they are not data recovery tools. They fix the structure of the filesystem, not necessarily the data within the files.
In short, fsck is like a repair service for the filesystem's "address book" (its metadata). It ensures all the pointers and records are correct, but if a page of the book was already scribbled on (corrupted file data), fsck can't restore the original text.
2. How fsck Works: A Wrapper for Specific Tools
One of the most important concepts to grasp is that fsck itself is not one single program. It's a front-end or wrapper that automatically calls the correct tool based on the filesystem type you're trying to check.
- For ext2, ext3, and ext4 filesystems, it calls
e2fsck. - For XFS, it calls
xfs_repair(or, more accurately, a small helper that tells you to usexfs_repair). - For FAT/VFAT, it calls
fsck.fat.
This design makes your life easier—you can usually just use the fsck command without needing to memorize the name of every specific checker. However, it's crucial to know that different backend tools have different capabilities and options.
LPIC 1 - 042 - 104.2 (2/2) - Filesystem integrity; checking and fixing fs with fsck and xfs tools
The video 'Filesystem integrity; checking and fixing fs with fsck and xfs tools' by Jadi provides an excellent explanation of this wrapper concept.
Watch the first two minutes (00:00 - 02:01) to understand how fsck works as a front-end. Then, watch the segment from 04:43 to 05:35, which specifically discusses how fsck handles the XFS filesystem by directing you to use xfs_repair.
3. The Golden Rule: Unmount Before You Check
This is the most critical rule of using fsck: Never run fsck on a mounted filesystem.
When a filesystem is mounted, the kernel is actively reading from and writing to it. Running fsck at the same time would be like trying to repair a car's engine while it's running. The changes fsck makes could conflict with the kernel's operations, leading to further corruption and catastrophic data loss.
Therefore, the standard workflow is:
- Identify the device you want to check (e.g., using
lsblkordf -h). - Unmount it using the
umountcommand. - Run
fsck. - Mount it again using the
mountcommand.
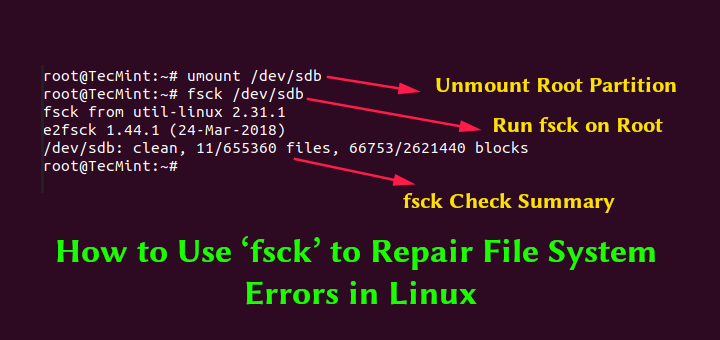
This annotated terminal output clearly shows the correct procedure: first unmount the partition, then run fsck on it.
The only exception to this rule is checking the root filesystem (/), which we will cover in a later section.
4. Practical fsck Usage and Common Options
Now let's look at how to use the command. The basic syntax is:
sudo fsck [options] /dev/device
The article below provides a great walkthrough of the most important options. We'll summarize them here, but use the article as a reference.
How to Use fsck Command to Check and Repair Filesystem
The article 'How to Use fsck Command to Check and Repair Filesystem' from phoenixNAP is a comprehensive guide to the practical use of fsck.
First, read the sections 'View Mounted Disks and Partitions', 'Unmount the Disk', and 'Run fsck to Check for Errors' to solidify the standard workflow. Then, quickly review the sections on 'Fix Detected Errors Automatically' (-y), 'Do a Dry Run' (the article uses -N, but -n is more common), and 'Force fsck to Do a Filesystem Check' (-f). Finally, look at the summary table at the end for a quick reference of all the options.
Key fsck Options to Know:
- Interactive Repair (Default):
sudo fsck /dev/sdb1
Iffsckfinds an error, it will stop and ask you what to do. This gives you maximum control but can be tedious if there are many errors.
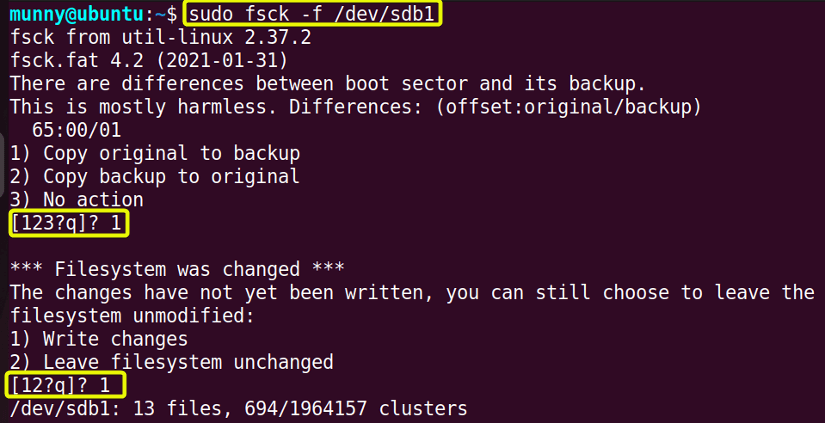
*An interactive `fsck` session. The tool has found an inconsistency and is prompting the user to choose a course of action.*
-
Automatic Repair (
-y):sudo fsck -y /dev/sdb1
This option automatically answers "yes" to every prompt to fix an error. It's fast and convenient but use it with caution, as it will make changes without asking for confirmation. -
Dry Run / Report-Only (
-n):sudo fsck -n /dev/sdb1
This performs a check but does not make any changes. It will only report the errors it finds. This is the safest option and is excellent for assessing the extent of the damage before deciding how to proceed. -
Force Check (
-f):sudo fsck -f /dev/sdb1
By default,fsckwill skip checking a filesystem that is marked as "clean" in its superblock. The-foption forcesfsckto run a full check even if the filesystem appears to be healthy. This is useful for periodic maintenance checks.
Test your understanding!
You suspect a non-boot partition /dev/sdc1 has errors, but you want to see what's wrong before you commit to any changes. What two commands, in order, should you run?
Show answer
First, you must unmount the partition to ensure it can be safely checked:sudo umount /dev/sdc1
Second, you should run fsck in "dry run" mode to see the errors without fixing them:sudo fsck -n /dev/sdc1
5. Filesystem-Specific Procedures: XFS and ext4
As we learned, fsck is a wrapper. For the two most common Linux filesystems, XFS and ext4, it's good to know the underlying tools and their specific procedures.
Checking XFS Filesystems
You cannot use fsck to repair an XFS filesystem. You must use the dedicated xfs_repair utility.
The standard procedure for checking an XFS filesystem is slightly different because of its robust journaling.
- Unmount the filesystem.
- Run
xfs_repair -n /dev/deviceto perform a read-only check. This will report any corruption it finds. - If errors are found, run
sudo xfs_repair /dev/deviceto perform the actual repair. - In emergencies only: If the journal itself is corrupt and the filesystem won't mount, you may need
sudo xfs_repair -L /dev/device. The-Loption zeroes the log, which will recover the filesystem but may result in significant data loss from the last few transactions. Use it as a last resort.
The Red Hat documentation (LINK) sections "15.4. Checking an XFS file system with xfs_repair" and "15.5. Repairing an XFS file system with xfs_repair" provide the official, detailed steps.
Checking ext2/3/4 Filesystems
For ext-family filesystems, fsck calls e2fsck. The options we discussed (-y, -n, -f) work as expected. A particularly useful option for e2fsck is -p.
sudo e2fsck -p /dev/device: The-poption stands for "preen" and performs an automatic, safe repair. It will fix any common, non-destructive issues without prompting but will stop if it encounters a problem that requires administrator intervention.fsck -ais often an alias fore2fsck -p.
6. The Big Challenge: Checking the Root Filesystem
So, if you can't run fsck on a mounted filesystem, how do you check the root filesystem (/), which is always mounted when the system is running? There are two primary methods.
Method 1: Automatic Check on Boot
Linux can be configured to automatically check the root filesystem during the boot process. In the /etc/fstab file, the last column for each entry is a number (pass number) that tells the boot process whether to check the filesystem.
0: Do not check.1: Check first (used for the root filesystem).2: Check after the root filesystem (used for all other filesystems).
If the system detects that the root filesystem was not unmounted cleanly, it will automatically run fsck before mounting it read-write.
Method 2: Manual Check via Recovery Mode
If you need to force a manual check of the root filesystem, you cannot do it from your normal running system. You must boot into a special maintenance environment where the root filesystem is mounted read-only or not at all.
How to Use fsck Command to Check and Repair Filesystem
The phoenixNAP article we looked at earlier has an excellent, clear guide on how to do this on an Ubuntu-based system.
Please read the section 'Run fsck on Linux Root Partition'. This walks you through rebooting, entering the GRUB menu, selecting 'recovery mode', and using the fsck utility from the recovery menu. This is a critical procedure for system administrators.
This recovery mode approach is the definitive way to safely and manually run fsck on your root partition to fix boot-preventing errors.
Conclusion
You have now reached the end of the "Storage and Filesystem Management" module. You've learned how to partition disks, create filesystems, manage mount points, configure swap, build RAID arrays, and now, how to maintain the health of your filesystems with fsck.
Key Takeaways:
fsckis the primary Linux utility for checking and repairing filesystem metadata inconsistencies.- It acts as a wrapper, calling filesystem-specific tools like
e2fsck(for ext4) andxfs_repair(for XFS). - The most important rule is to always unmount a filesystem before checking it.
- Common options include
-y(auto-fix),-n(report-only dry run), and-f(force check). - The root filesystem (
/) cannot be unmounted live. It must be checked either automatically at boot or manually by booting into recovery mode.
Preview of the Next Lesson:
In our next module, "Advanced Storage and Networking," we will begin by exploring another powerful storage management technology: Logical Volume Management (LVM). You will learn how to use LVM to create flexible, resizable storage volumes that can span multiple disks, offering a different approach to storage virtualization than the RAID arrays we covered previously.