Hello! Welcome to your next lesson in the "Software and Package Management" module.
In our previous lessons, we've focused on the convenience and security of package managers like apt and dnf. You learned how they manage software and how to verify packages using checksums and GPG signatures. But what happens when the software you need isn't in a repository, or you require a version that isn't offered?
This is where you, as a system administrator, need to know how to build software from the ground up. This lesson introduces the traditional and powerful method of compiling software from its source code. Our goal is to describe the workflow for compiling software from source, focusing on the standard e.g., ./configure, make, make install process. Understanding this is a cornerstone of advanced Linux administration and a key topic for your CompTIA Linux+ exam.
1. From Human-Readable Code to Machine Executable
Before diving into the commands, let's establish why and what we are doing.
Why Compile from Source?
While package managers are the preferred method for 99% of software installations, compiling from source is essential in several scenarios:
- The Latest Version: Package repositories often lag behind the latest "bleeding-edge" software releases for stability reasons. If you need the newest features, you may need to compile it yourself.
- Customization: Compiling gives you the power to enable or disable specific features of a program, tailoring it to your exact needs.
- Availability: Sometimes, a particular piece of software, especially niche or academic tools, is only distributed as source code.
Basic Linux -- How to Compile Software Yourself (on Ubuntu)
The video 'Basic Linux -- How to Compile Software Yourself' by tutoriaLinux starts with a great summary of these motivations. It sets the stage for why this skill is so important.
Watch the first minute of the video (0:20 to 1:07) to hear the key reasons for compiling your own software.
What Are We Building?
When you compile, you start with source code: human-readable text files written in a programming language like C or C++. These files are the blueprints for the application. The goal is to transform these blueprints into a binary executable, a file containing machine code that the computer's CPU can understand and run directly.
This transformation is a multi-stage process, as illustrated in the flowchart below.
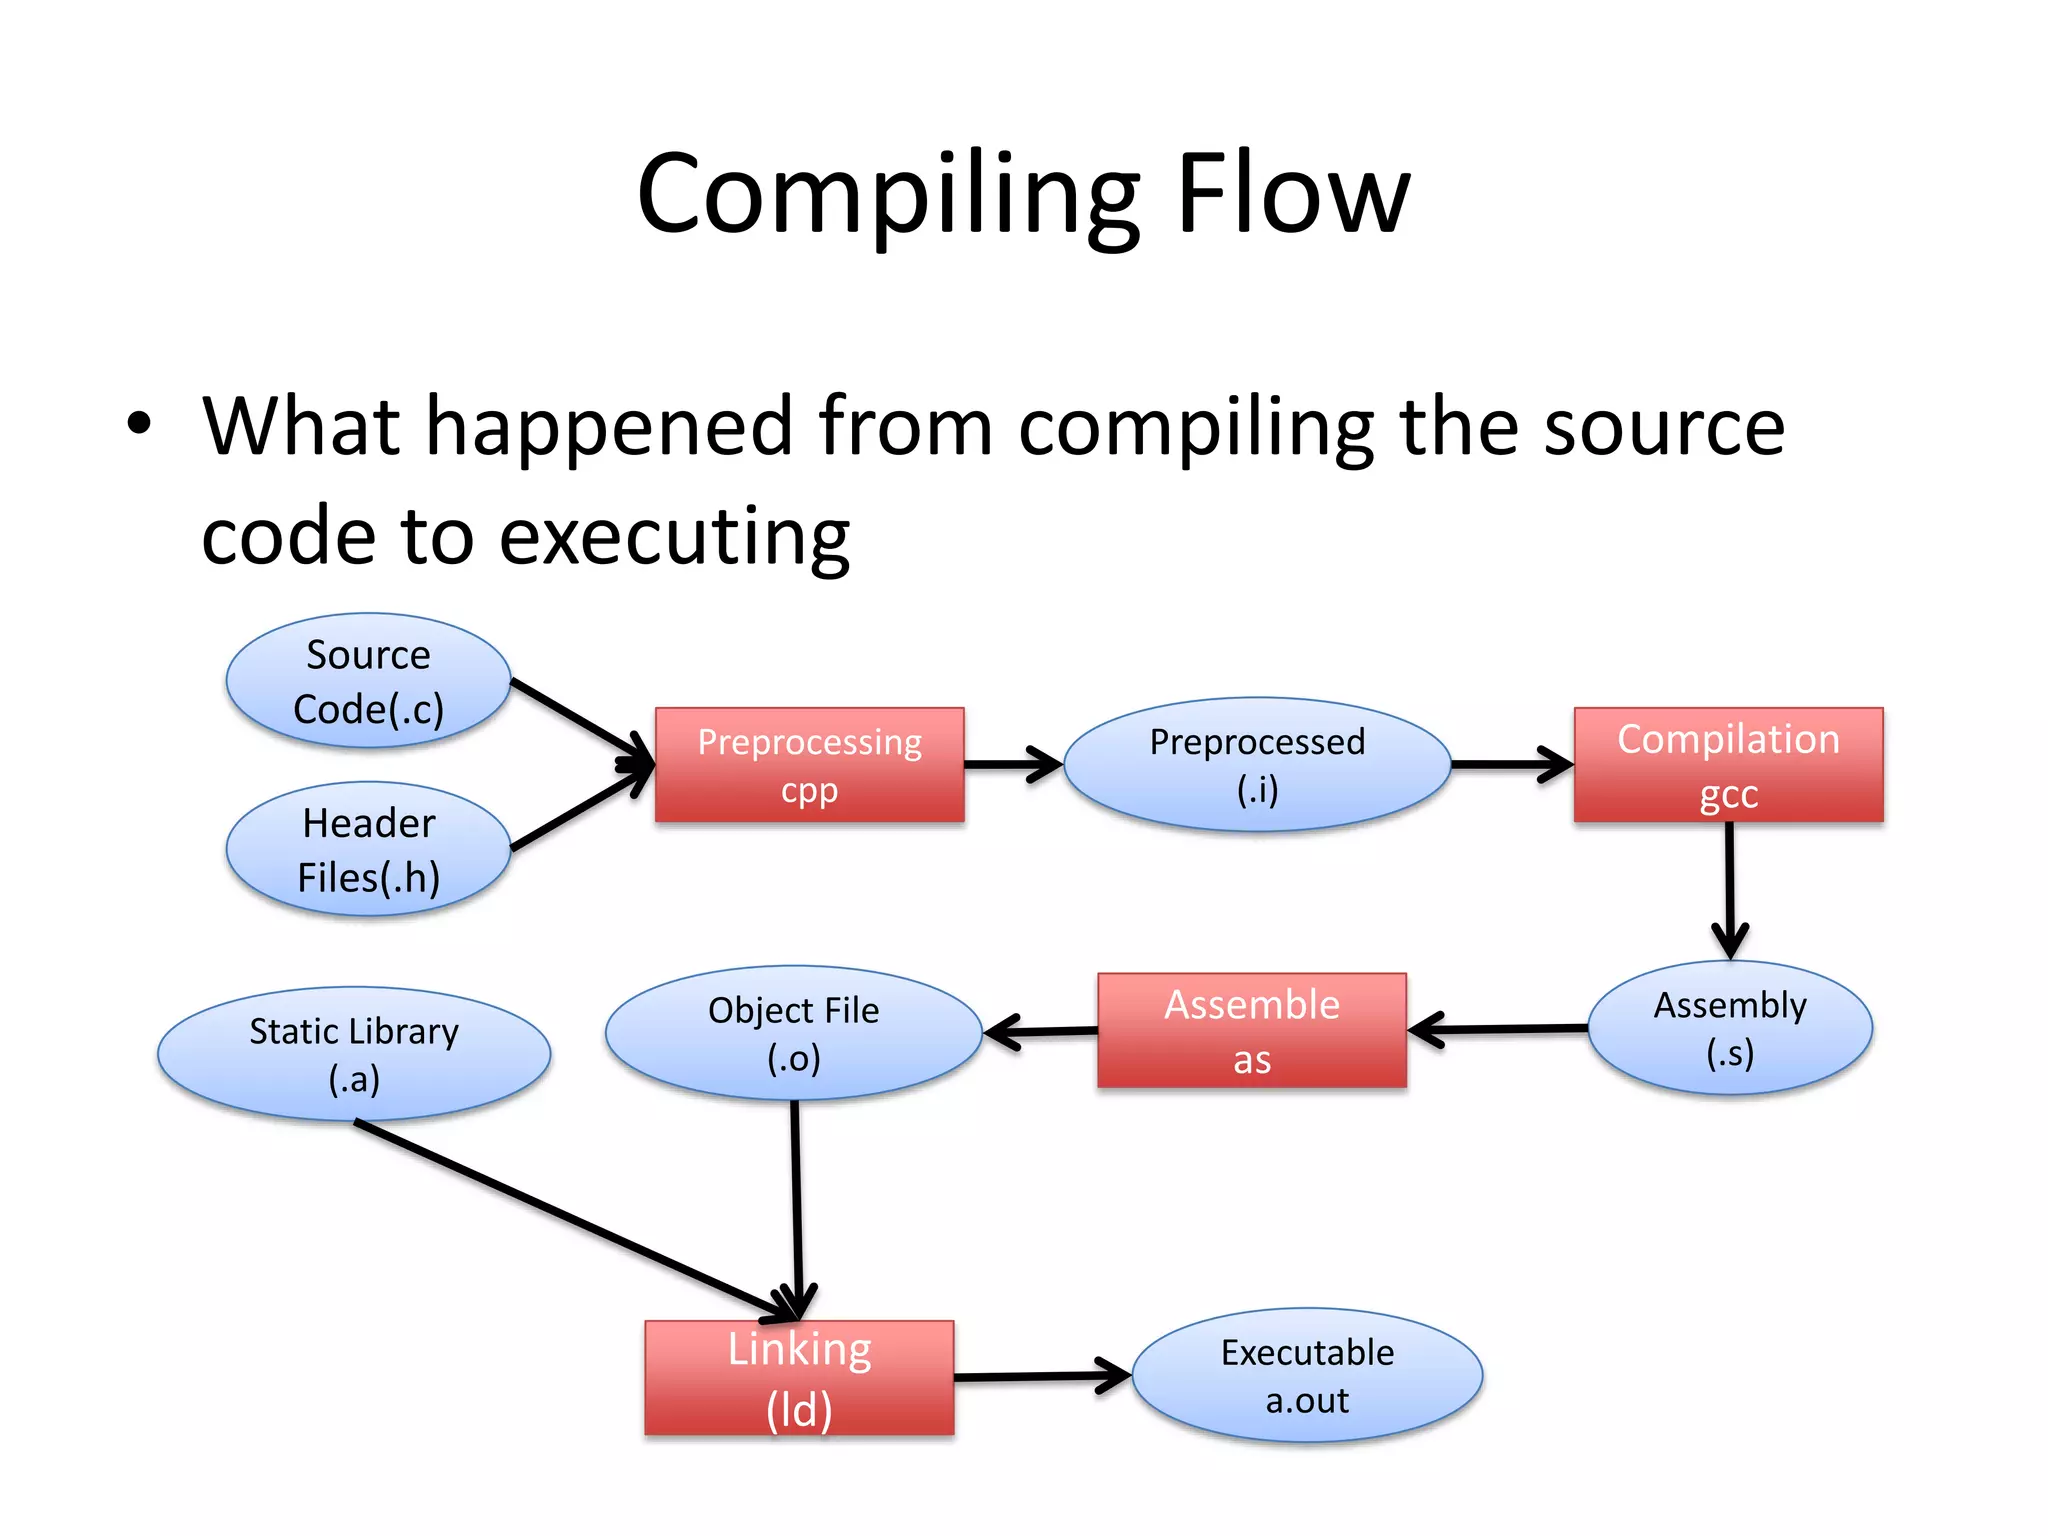
This process is complex, involving many steps and dependencies. Thankfully, developers provide tools to automate it for us.
2. The Standard Build Workflow: ./configure, make, make install
For decades, the open-source community has relied on a standardized three-step process for building software, often called the GNU Build System. Once you download and extract the source code, you navigate into its directory and run a sequence of three commands.

Let's walk through this process conceptually.
The Basics of Installing Software from Source in Linux
The video 'The Basics of Installing Software from Source in Linux' provides a clear, step-by-step demonstration of this entire workflow. It's an excellent visual guide to the concepts we're about to discuss.
Watch this video from 6:31 to 16:21. As you watch, pay close attention to how the presenter executes each of the three main commands and explains what's happening. I will break down each step below, referencing what you see in the video.
Step 0: Get the Source and Read the Instructions
As shown in the video (07:53), source code is typically downloaded as a compressed archive, often called a tarball (e.g., program.tar.gz or program.tar.bz2). You first need to extract it using the tar command.
Once extracted, the single most important first step is to look for files named README or INSTALL. As the presenter demonstrates (09:59), these files contain project-specific instructions, dependencies, and other critical information. Always read them first!
Step 1: ./configure — The Pre-Flight Check
The configure script is a shell script generated by developers to inspect your system. When you run ./configure, it acts like a detective, checking for:
- Required Tools: Do you have a C compiler (
gcc) installed? - Required Libraries: Does the program need a library for handling graphics or networking, and is it installed on your system?
- System Information: What is your operating system type and architecture (e.g., 64-bit Linux)?
Its main job is to take all this information and generate a file called a Makefile. This file is a custom-tailored recipe that the make command will use to build the software specifically for your system. As you saw in the video (11:50), the script runs many checks before successfully creating the Makefile.
Step 2: make — Building the Program
This is where the actual compilation happens. The make command reads the Makefile and executes the series of commands needed to turn all the source code files into executable binary files.
You'll see a lot of compiler commands scroll by on the screen, as shown in the video (12:48). This step can take anywhere from a few seconds to many hours, depending on the size of the program and the speed of your computer. If this step completes without any Error messages, you have successfully built the program.
Step 3: sudo make install — Placing the Files
The make command built the program, but all the files are still inside the source code directory. The final step is to copy these files to a standard location on the system so you can run them easily.
Running make install does this copying. It will place the main executable in a directory like /usr/local/bin, its manual pages in /usr/local/share/man, and any other necessary files into their respective locations.
Because it writes to system directories (like /usr/local/), this command almost always requires elevated privileges, which is why we run it with sudo, as demonstrated in the video (13:38).
3. Practicalities and Common Problems
The ./configure, make, make install workflow seems simple, but in the real world, you will encounter issues. Being able to solve them is a key skill.
Missing Build Tools
You can't build a house without a hammer. Similarly, you can't compile code without a compiler and the make utility. Minimal Linux installations often don't include these. If configure or make fails with a "command not found" error, you need to install the development toolchain.
- On Debian/Ubuntu:
sudo apt install build-essential - On Red Hat/CentOS/Fedora:
sudo dnf groupinstall "Development Tools"
These meta-packages install gcc, make, and other essential utilities for compiling software.
Missing Dependencies
The most common failure occurs at the ./configure step. The script will stop and report that a required library is missing.
Basic Linux -- How to Compile Software Yourself (on Ubuntu)
The tutoriaLinux video you saw earlier offers a fantastic, realistic look at what happens when configure fails due to a missing dependency. Watch how the presenter diagnoses and solves the problem.
Please watch from 7:17 to 13:36 and then from 15:14 to 16:44. Notice how the error message points to a missing library (libncurses) and the steps the presenter takes—searching online, installing different packages—to resolve it. This is a perfect example of real-world troubleshooting.
The key takeaway is that when configure fails, you must read the error message carefully. It will usually tell you what you're missing. Often, you need to install the "-dev" or "-devel" version of the package (e.g., libncurses-dev), which contains the header files needed for compilation.
Controlling the Installation Directory with --prefix
By default, make install places files in /usr/local. This mixes files from all the software you compile, making uninstallation difficult. A much cleaner approach is to tell configure exactly where to install the program using the --prefix option.
For example:./configure --prefix=/opt/my-custom-app
This command would configure the Makefile to install the software into its own directory, /opt/my-custom-app. This keeps your system tidy and makes uninstallation as simple as deleting that one directory (sudo rm -rf /opt/my-custom-app).
Install Software from Source Code in Linux [Beginner's ...
The article 'Install Software from Source Code in Linux' from It's FOSS explains the --prefix option very well, connecting it to the Filesystem Hierarchy Standard (FHS) that we've discussed previously.
Read 'Step 2: Understanding the Build System...' and 'Step 3: The FHS'. Focus on the explanation of the --prefix option and the rationale for choosing an installation directory like /usr/local versus /opt.
Test your understanding!
You are trying to compile a new command-line tool. You run ./configure and it exits with the error: configure: error: zlib library not found. What is the most likely cause of this error, and what is your immediate next step?
Show answer
The most likely cause is that the zlib compression library, or more specifically its development files, are not installed on your system. The configure script needs these files to check for zlib's features and link against it during compilation.
Your immediate next step is to use your system's package manager to search for and install the zlib development package. On a Debian-based system, this would likely be sudo apt install zlib1g-dev. On a Red Hat-based system, it would be sudo dnf install zlib-devel. After installing it, you would run ./configure again.
Conclusion
You now have a solid theoretical understanding of the classic Linux software compilation workflow. While package managers have made this process less common for day-to-day tasks, knowing how to compile from source is an indispensable skill for any serious Linux administrator.
Key Takeaways:
- Compiling from source gives you access to the latest software and allows for deep customization.
- The standard GNU build workflow follows three main steps:
./configure: Checks the system and creates aMakefile. Use--prefixto control the installation path.make: Reads theMakefileand compiles the source code into executable binaries.sudo make install: Copies the compiled files to the final destination on the system.
- The most common problems are missing build tools (install
build-essentialorDevelopment Tools) and missing libraries (install the required-devor-develpackages). - Always read the
READMEandINSTALLfiles before you begin!
Preview of the Next Lesson:
You've learned the theory and seen the workflow demonstrated. In the next lesson, you will put this knowledge into practice. You will be guided through performing a complete software installation from a source tarball on your own virtual machine, from downloading the code to running the final program.