Hello! Welcome to your next lesson.
In our previous session, we laid the theoretical foundation for disk management. You learned how to identify block devices (like /dev/sda or /dev/nvme0n1) and understood the critical differences between the MBR and GPT partitioning schemes.
Today, we move from theory to practice. This lesson directly addresses the learning outcome: Partition disks using fdisk or parted. We will take an "empty" virtual disk and use these two essential command-line tools to create the logical divisions (partitions) needed to store data. This is a core hands-on skill for any Linux system administrator and is frequently tested on the CompTIA Linux+ exam.
1. A Quick Review: Identifying the Target Disk
Before making any changes, the most important step is to correctly identify the disk you want to partition. Modifying the wrong disk can lead to catastrophic data loss. As a quick refresher from our last lesson, you can list the block devices on your system using several commands.
Let's watch a brief video that demonstrates the most common commands for this task.
How to Partition and Format a Disk in Linux
This clip from the video 'How to Partition and Format a Disk in Linux' by Gary Explains quickly runs through using lsblk, fdisk -l, and parted -l to find the correct device name.
Watch from 00:30 to 03:09. Notice how each command provides a list of disks and their partitions, helping you confirm which device you need to work on. For all the exercises in this lesson, we will assume we are working with a new, empty disk named /dev/sdb.
Remember, all partitioning commands must be run with administrative privileges, typically using sudo.
2. Partitioning with fdisk
fdisk is the traditional, dialog-driven tool for managing partition tables. While historically associated with MBR, modern versions of fdisk can also manage GPT disks. Its interactive nature makes it a good tool for learning because changes are not saved until you explicitly command it to do so.
We will walk through the process of using fdisk to create a new MBR partition table and two partitions on our hypothetical /dev/sdb disk.
For a comprehensive text reference on fdisk, please consult this lesson from the Linux Professional Institute (LPI). It covers the commands we'll be using in detail.
Read the section titled 'Managing MBR Partitions with FDISK'. Focus on understanding the interactive commands like p (print), n (new), d (delete), and the crucial difference between w (write) and q (quit).
Now, let's see these commands in action. The following video provides a clear, step-by-step walkthrough.
Creating Partitions In Linux Using fdisk (and other tools)
The video 'Creating Partitions In Linux Using fdisk' by DistroTube demonstrates the full workflow. We will use it to guide our practical example.
Watch from 02:34 to 07:32. Follow along as the presenter performs these steps: Starts fdisk and uses m for help. Creates a new MBR (DOS) partition table with the o command. Creates two new primary partitions with the n command, specifying sizes like +1G. Changes a partition's type using the t command. Toggles the 'bootable' flag with the a command. Finally, writes the changes to the disk with the w command.
fdisk Workflow Summary
Based on the resources, the interactive fdisk workflow for a new MBR disk is:
- Start
fdisk:sudo fdisk /dev/sdb - Create Partition Table:
o(This creates a new empty DOS partition table, wiping any existing partitions). - Create Partitions: Use
nfor each new partition. You'll be prompted for:- Partition type (primary
por extendede). - Partition number.
- First sector (usually accept the default).
- Last sector (you can specify a size like
+500Mor+2G).
- Partition type (primary
- Change Partition Type (if needed):
t(e.g., to set a partition asLinux swap). - Review Changes:
p(Print the partition table to verify your work). - Save and Exit:
w(Write the changes to the disk and exit).
Important: If you make a mistake, you can always use q to quit without saving any changes.
Test your understanding!
You are in the fdisk interactive prompt. You've created three partitions but realize you made a mistake on the second one. You want to start over completely without affecting the actual disk. Which single-letter command should you use?
Show answer
The command is q. This quits the fdisk utility without writing any of the changes you've made in memory to the disk's partition table.
3. Partitioning with parted
parted is another powerful command-line utility for managing partitions. It can handle both MBR and GPT disks and is particularly useful for scripting. There is one extremely important difference between fdisk and parted.
Warning: Unlike
fdisk, which holds changes in memory until you write them,partedexecutes commands and writes changes to the disk immediately. There is no "save" command. Be very careful when usingparted.
We will use parted to create a GPT partition table and a partition on our disk.
To understand the parted workflow, start with this guide from the LPI. It clearly explains the commands and highlights the immediate-write nature of the tool.
Read the section 'Managing Partitions with GNU Parted'. Pay close attention to the syntax for mklabel and mkpart.
parted Workflow Summary
The interactive parted workflow is more direct:
- Start
parted:sudo parted /dev/sdb - Create Partition Table:
mklabel gpt(We'll use GPT, the modern standard). - Create Partition:
mkpart. The syntax ismkpart [part-type] [fs-type] [start] [end].- For a GPT disk,
part-typeis just a name you give the partition (e.g.,primaryordata). fs-type(e.g.,ext4) is only a label;parteddoes not create the filesystem.startandenddefine the space. You can use MB, GB, or percentages (e.g.,1MB 1025MBcreates a partition from 1MB to 1025MB, or1GB 100%creates a partition from 1GB to the end of the disk).
- For a GPT disk,
- Review Changes:
print(Shows the current partition table). - Exit:
quit
Let's see a practical example of creating a single partition that takes up the entire disk.
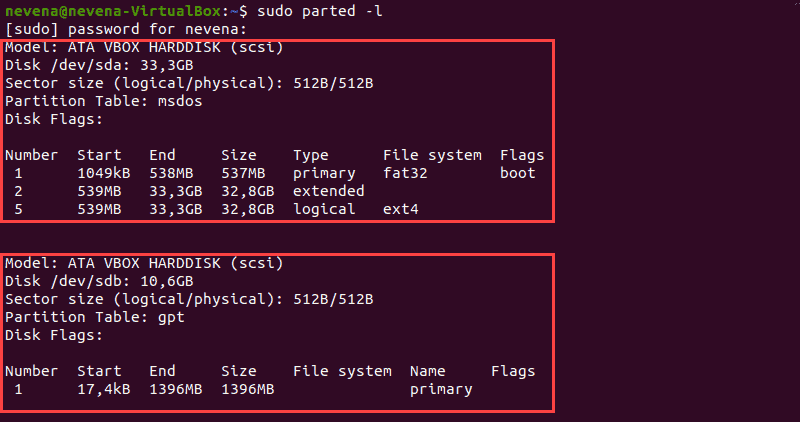
The following step-by-step guide provides a concise walkthrough of this process.
How to Create Partitions in Linux
This article from phoenixNAP gives a clear, step-by-step guide to using parted.
Read the section 'Partition Disk Using parted Command'. This will reinforce the steps: listing disks, selecting the disk, creating a partition table (mklabel), and creating the partition (mkpart).
Test your understanding!
What are the two main differences in the user experience and operation between fdisk and parted when creating partitions?
Show answer
- Saving Changes:
fdiskis not immediate. It requires awcommand to write changes to the disk.partedwrites changes immediately after each command is executed. - Command Style:
fdiskis more "conversational," using single-letter commands that often lead to further prompts.partedcommands are more explicit, requiring all arguments on a single line (e.g.,mkpart primary ext4 1GB 5GB).
4. A Note on Other Tools
While fdisk and parted are the two tools specified by the learning outcome and required for your exam, you should be aware of a few alternatives:
cfdisk: A curses-based (text user interface) version offdisk. It provides a more visual way to manage partitions in the terminal and is often considered more user-friendly.gdisk: Essentially the GPT-equivalent of the classicfdisk. Its interface and commands are nearly identical tofdiskbut it is designed specifically for GPT disks.- Graphical Tools: Most Linux desktop environments include graphical partitioning tools like GParted or KDE Partition Manager, which are front-ends to
parted. While convenient, you must know the command-line tools for server administration and the exam.
Conclusion
You have now practiced partitioning disks, a fundamental skill for a Linux administrator. You've taken an abstract disk and given it a logical structure, preparing it for the next stage.
Key Takeaways:
- Always verify the disk you are targeting with
lsblkorfdisk -lbefore you begin. fdiskis an interactive, menu-driven tool where changes are queued and saved with thewcommand. Useqto abort.partedis a powerful tool where changes are written to the disk immediately after each command.- The general workflow is: 1) Identify the device, 2) Start the tool, 3) Create a partition table (
mklabelinparted,oorginfdisk), 4) Create partitions (mkpartinparted,ninfdisk).
Preview of the Next Lesson:
Our disk now has partitions, but the operating system still doesn't know how to store files on them. In the next lesson, we will create and manage common Linux file systems (like ext4 and xfs) on these partitions using the mkfs command, making them ready for use.