Hello! Let's dive into your next lesson.
In our last session, you successfully partitioned a disk using fdisk and parted. You now have logical divisions on your storage device, like /dev/sdb1, but they are still just raw, unstructured space. An operating system can't store files on them yet.
Today, we'll make those partitions usable. This lesson directly addresses the learning outcome: Create and manage common Linux file systems (e.g., ext4, xfs). We will "format" our new partitions by creating a file system on them. This process creates the necessary structure—like an index in a book or a catalog in a library—that allows the kernel to track, store, and retrieve files.
We will focus on the two most common file systems you'll encounter in server environments and on the CompTIA Linux+ exam: ext4 and XFS.
1. What is a File System?
Before we start creating file systems, it's important to understand what they do. Think of a raw partition as an empty warehouse with no shelves or labels. A file system is the entire organizational system you build inside: the shelves, aisles, and a detailed inventory list that tells you exactly where everything is.
To get a clear picture of the fundamental concepts like blocks, sectors, and inodes (the "inventory list" entries), let's start with a short conceptual overview.
LINUX FILE SYSTEM EXPLAINED: EXT4 , XFS, ZFS, BTRFS
The video 'LINUX FILE SYSTEM EXPLAINED' from XPSTECH provides an excellent introduction to what a file system is at a technical level. This will give you the foundational theory you prefer before we move to practical commands.
Please watch from 01:32 to 03:34. Focus on understanding the roles of sectors, blocks, and especially inodes, which store metadata (information about your files).
As the video explained, the file system organizes the disk into blocks and uses inodes to keep track of every file's metadata (permissions, owner, size, and location of its data blocks).
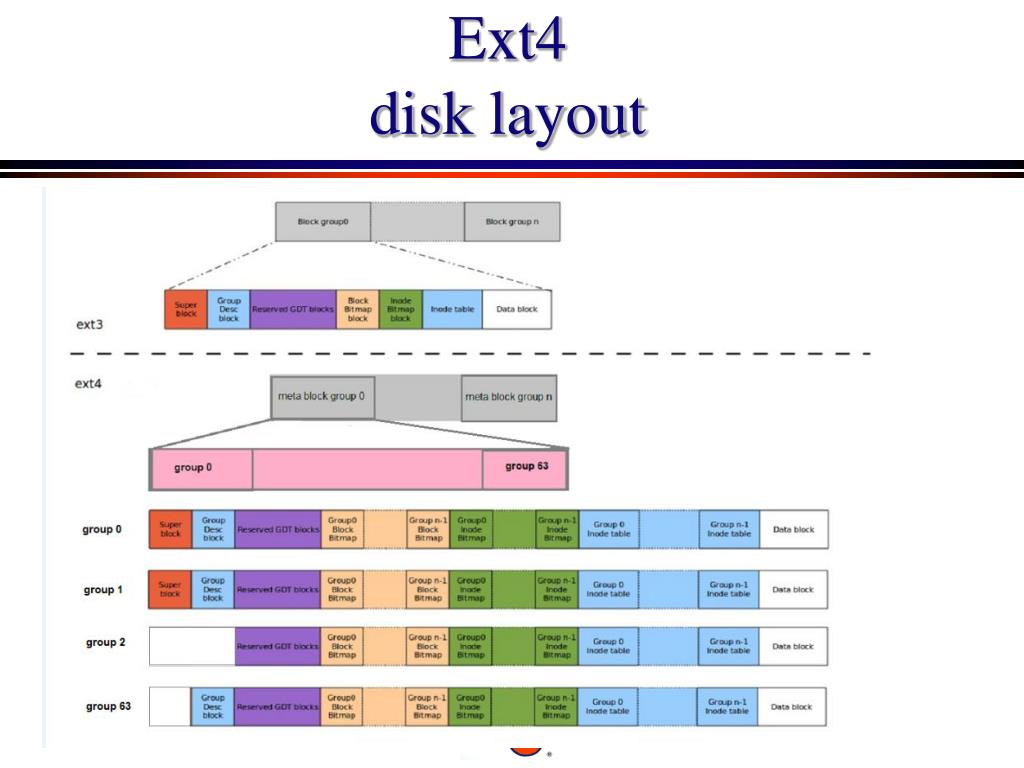
2. Comparing ext4 and XFS
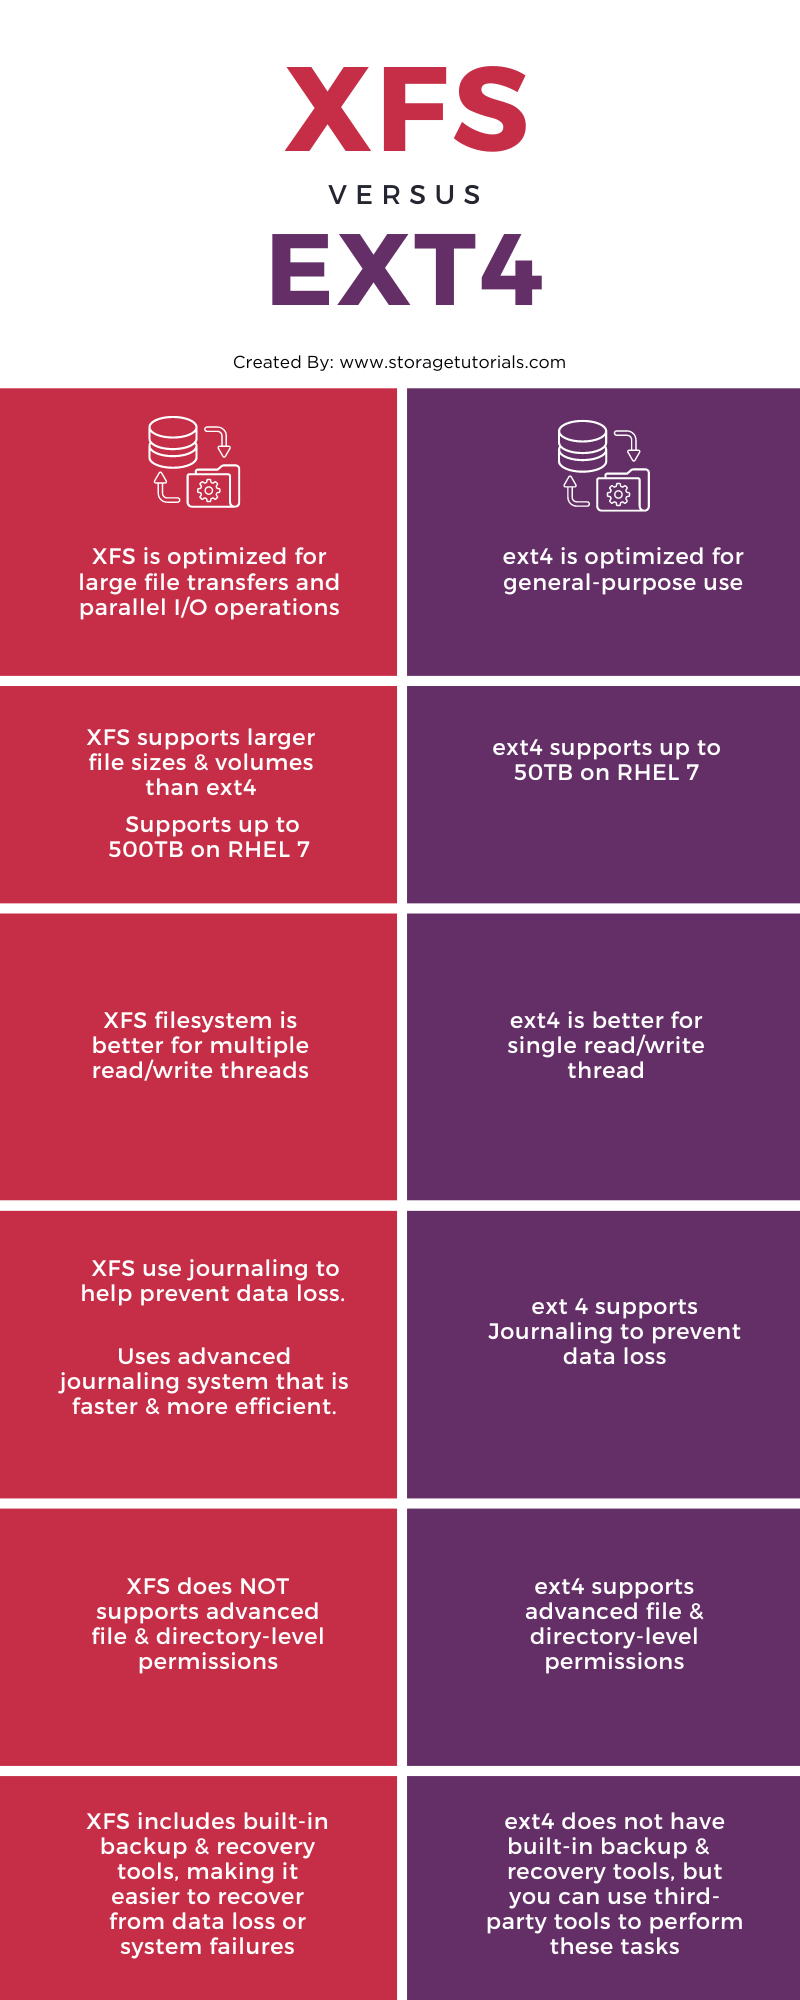
For most Linux server installations, you'll be choosing between ext4 and XFS. While they serve the same fundamental purpose, they are optimized for different workloads.
- ext4 (Fourth Extended Filesystem): The long-standing, reliable workhorse. It's the default file system for many popular distributions like Debian and Ubuntu. It offers a great balance of performance and stability for a wide variety of tasks.
- XFS (XFS File System): A high-performance file system originally developed for powerful graphics workstations. It excels at handling very large files and parallel I/O operations, making it the default for distributions like Red Hat Enterprise Linux (RHEL) and its derivatives.
Let's continue with the same video to understand the specific features of each.
LINUX FILE SYSTEM EXPLAINED: EXT4 , XFS, ZFS, BTRFS
Now, let's look at the specific characteristics of ext4 and XFS to understand when you might choose one over the other.
Watch the next two segments: ext4 (03:34 - 06:30): Pay attention to the concepts of journaling (for crash recovery) and extents (for efficient large file storage). XFS (06:30 - 09:12): Note its 64-bit architecture (allowing for massive files and volumes) and the idea of 'allocation groups' for parallel performance.
To reinforce these concepts and give you a useful reference, the article below provides a detailed breakdown of the advantages, disadvantages, and ideal use cases for both file systems.
Linux File Systems: ext4, XFS, Btrfs - Which to Choose?
The article 'Linux File Systems: ext4, XFS, Btrfs - Which to Choose?' from Cubepath offers a written summary of what we just learned, along with command-line examples we will use shortly.
Please read the sections on ext4 and XFS. Focus on the 'Advantages', 'Disadvantages', and especially the 'Best Use Cases' lists for each. This will help you answer exam questions about selecting the appropriate file system for a given scenario.
For a quick visual summary, this infographic is a great tool.
3. Creating and Managing File Systems in Practice
Now for the hands-on part. We'll use the mkfs (make file system) command and other related tools to manage our partitions. The command is actually a frontend that calls specific tools like mkfs.ext4 or mkfs.xfs.
The following video is a fantastic, practical walkthrough of the commands you'll need for the Linux+ exam. We will use it to guide our exploration.
Filesystem Tools! (Linux+ Objective 1.3.4)
The video 'Filesystem Tools!' by Shawn Powers is tailored for the Linux+ exam and demonstrates the essential commands for creating and managing both ext4 and XFS file systems.
We will refer to specific parts of this video as we cover each file system. For now, know that this will be our primary guide for the practical commands.
3.1. Working with ext4
Let's assume we have a partition /dev/sdb1 that we created in the last lesson.
1. Creating the File System
The command is straightforward:sudo mkfs.ext4 /dev/sdb1
This command formats the partition with a default ext4 file system.
Watch the video from 02:47 to 03:33 to see this in action.
2. Inspecting and Tuning with tune2fs
After creation, you can view and change a file system's parameters using tune2fs. This is a powerful tool.
- View settings:
sudo tune2fs -l /dev/sdb1 - Change settings: For example, you can set the maximum mount count before a check is forced. A value of
-1or0disables this.
sudo tune2fs -c 20 /dev/sdb1(Force a check after 20 mounts)
Watch the video from 06:39 to 08:35 to see how tune2fs is used to list properties and change the mount count.
3. Checking and Repairing with e2fsck
If you suspect file system corruption, e2fsck is the tool to use. The generic fsck command will automatically call e2fsck for an ext4 partition.
Crucial: The file system must be unmounted before you run a check.sudo umount /dev/sdb1sudo e2fsck -f /dev/sdb1
(The -f flag forces a check even if the file system seems clean).
Watch the video from 05:10 to 06:39 for a demonstration of e2fsck.
4. Resizing with resize2fsext4 file systems can be grown or shrunk. To grow a file system to fill its partition, the command is:sudo resize2fs /dev/sdb1
The video demonstrates both shrinking and growing from 10:24 to 12:28.
3.2. Working with XFS
Now, let's reformat our /dev/sdb1 partition with XFS and learn its specific tools.
1. Creating the File Systemsudo mkfs.xfs /dev/sdb1
If a file system already exists, you need to force the overwrite:sudo mkfs.xfs -f /dev/sdb1
The video covers this from 12:28 to 13:17.
2. Inspecting and Administering
- View settings:
sudo xfs_info /dev/sdb1 - Change settings: Use
xfs_admin. For example, to add a label:
sudo xfs_admin -L "my_data" /dev/sdb1
This is shown in the video from 14:24 to 15:07.
3. Checking and Repairing with xfs_repair
Like e2fsck, xfs_repair checks for and fixes inconsistencies. The file system must be unmounted.sudo umount /dev/sdb1sudo xfs_repair /dev/sdb1
See this command in action from 13:17 to 13:48 in the video.
4. Resizing with xfs_growfs
This is a critical point of difference and a common exam topic:
- XFS file systems can only be grown, they cannot be shrunk.
- The file system must be mounted to be grown.
sudo mount /dev/sdb1 /mnt/datasudo xfs_growfs /mnt/data (Note: you specify the mount point, not the device)
The video explains this key concept from 13:48 to 14:24.
Test your understanding!
You are tasked with setting up a large storage server for a video production company that primarily works with multi-gigabyte video files. Performance is the top priority.
- Which file system,
ext4orXFS, would be more suitable and why? - After creating the partition, you later realize the partition is larger than the file system. What command would you use to expand the file system to fill the entire partition for your chosen file system type?
Show answer
- XFS would be the more suitable choice. It is specifically designed for high performance with large files and parallel I/O, which is ideal for video editing and storage.
- Assuming the XFS partition is mounted at
/mnt/video, the command would besudo xfs_growfs /mnt/video. Remember, XFS must be mounted to be grown.
Conclusion
You have now learned how to take a raw partition and give it a functional file system, making it ready to store data. This bridges the gap between partitioning a disk and actually using it.
Key Takeaways:
- A file system provides the logical structure (inodes, blocks) needed to manage files.
mkfs.ext4creates a standard, reliableext4file system. It is managed with tools liketune2fs(tuning),e2fsck(repair), andresize2fs(grow/shrink).mkfs.xfscreates a high-performanceXFSfile system. It is managed with tools likexfs_info(info),xfs_admin(tuning),xfs_repair(repair), andxfs_growfs(grow only).- Always unmount a file system before running a repair tool (
e2fsckorxfs_repair).
Preview of the Next Lesson:
Our partition is now formatted and ready. But how do we access it? In the next lesson, we will cover mounting and unmounting file systems. You will learn how to use the mount command to attach your new file system to a directory in the main Linux hierarchy (e.g., /data or /home/user/videos) and how to make these mounts persistent across reboots by editing the /etc/fstab file.