Hello! Welcome to your next lesson on managing Linux storage.
In our previous session, you learned how to create and manage file systems like ext4 and XFS on your disk partitions. Now that you have usable storage, the next critical skill is monitoring how that space is being used. Running out of disk space can halt applications and even crash a system, so knowing how to check and analyze disk usage is a fundamental task for any Linux administrator.
This lesson is designed to meet the learning outcome: Monitor disk usage using df and du commands. We'll explore these two essential utilities that, while sounding similar, serve two very different but complementary purposes.
df(disk free): Gives you a high-level overview of space usage on your mounted file systems. Think of it as checking the fuel gauge for each tank in your vehicle.du(disk usage): Drills down to show you how much space individual files and directories are consuming. This is like using a dipstick to check the fluid level in a specific container.
By the end of this lesson, you'll be able to use these commands together to quickly identify and diagnose storage issues.
1. The High-Level View: df (disk free)
The df command is your first stop when you want a quick summary of your system's storage. It reports the size, used space, and available space for all currently mounted file systems.
To get a practical demonstration of df and its most important options, we'll watch a section of the following video.
Linux df and du Commands | How to Check Linux Disk Space Usage
The video 'Linux df and du Commands' by Akamai Developer provides a clear, practical walkthrough. We'll start with the part covering the df command.
Please watch from 00:44 to 06:44. As you watch, pay close attention to: The default output of df and why it's hard to read. The effect of the -h (human-readable) option. How to interpret each column in the output. The purpose of the -T (type) and -x (exclude) options for refining the output.
Deconstructing the df Output
As the video demonstrated, the most useful way to run df is with the -h and -T options:df -hT
This command produces a clear, table-based report. Let's break down the output.
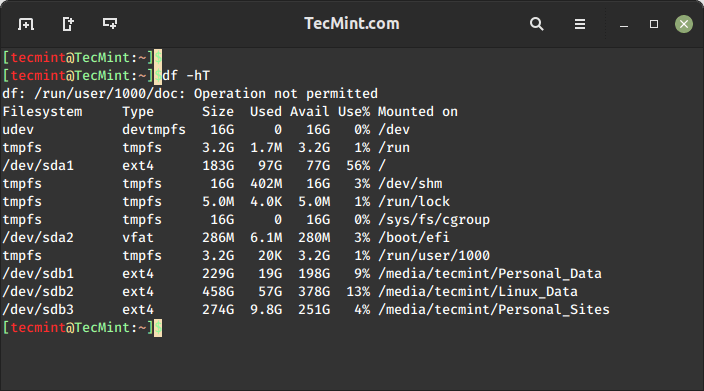
The key columns are:
- Filesystem: The device name of the partition (e.g.,
/dev/sda1). - Type: The file system type (e.g.,
ext4,xfs), which connects back to our last lesson. - Size: The total size of the file system.
- Used: The amount of space currently occupied by data.
- Avail: The amount of free space remaining.
- Use%: The percentage of the disk that is used. This is often the most important column to watch!
- Mounted on: The directory in the file system hierarchy where this partition is attached (e.g.,
/,/home). We'll cover this in detail in the next lesson.
You can also use df to check a specific file system by providing a path:df -h /home (This shows usage for the file system that contains the /home directory).
Test your understanding!
You run df -h and see the following line in the output:dev/sdb1 916G 870G 1.3G 100% /data
- What is the problem indicated by this output?
- What is the device name of the partition in question?
- Where is this partition mounted?
Show answer
- The file system is 100% full. There is no space left on the device, which could cause applications trying to write to
/datato fail. - The device name is
/dev/sdb1. - It is mounted at the
/datadirectory.
2. The Detailed View: du (disk usage)
The df command told us that the /data file system is full, but it didn't tell us what is taking up all that space. That's where du comes in. The du command calculates the space consumed by files and directories.
Let's continue with the video to see how du works.
Linux df and du Commands | How to Check Linux Disk Space Usage
Now we'll look at the second half of the Akamai Developer video, which focuses on the du command.
Please watch from 08:54 to 16:49. Focus on understanding: Why the default du output is often too verbose. The -h (human-readable) and -s (summarize) options for getting a directory's total size. How --max-depth helps you get a useful summary of subdirectories. The powerful combination of du with a wildcard (*) to list the size of all items in a directory.
Key du Command Patterns
The du command is most effective when you combine its options to get the exact information you need. Here are some of the most useful patterns, which are also excellent to know for your exam.
-
Get the total size of a single directory:
du -sh /var/log
(-sfor summarize,-hfor human-readable) -
See the size of each subdirectory, one level deep:
du -h --max-depth=1 /var
This is perfect for finding which subdirectory within/varis the largest. -
Find the largest files/directories and sort them:
This is a classic Linux administrator technique.dudoesn't have a built-in sort function, but it can be combined with other standard utilities using a pipe (|).sudo du -h /var | sort -rh | head -n 10Let's break that down:
sudo du -h /var: Calculates the disk usage for everything inside/var. We usesudoto avoid "Permission denied" errors on system files.|: The pipe sends the output of theducommand as the input to the next command.sort -rh: Sorts the incoming text.-rreverses the order (largest first), and-henables human-numeric sort (so10Gis correctly sorted as larger than2M).|: Another pipe sends the sorted list to the next command.head -n 10: Displays only the first 10 lines of the input, giving you a "top 10" list of the largest space consumers.
This combination is incredibly powerful for quickly finding what's eating up your disk space.
3. Workflow: Using df and du Together
The real power of these tools comes from using them in tandem. df shows you the "what" (a filesystem is full), and du helps you find the "why" (which files are responsible).
Let's explore this workflow with a helpful article.
The article 'Linux tools: du vs. df' from Red Hat concisely explains the different roles of these two commands and provides a great practical example of using them together.
Please read the entire short article, focusing on the sections 'df', 'du', and especially 'df vs. du'. Notice the practical scenario described: getting an error, using df to confirm, and then using du to investigate.
As the article illustrates, a typical troubleshooting scenario is:
- Notice a problem: An application fails, or you get an alert that a disk is full.
- Confirm with
df: You rundf -hand identify which mount point is at or near 100% capacity (e.g.,/). - Investigate with
du: You start at the problematic mount point and drill down.sudo du -h --max-depth=1 /- You see that
/varis consuming the most space. sudo du -h --max-depth=1 /var- You find that
/var/logis the culprit. sudo du -h /var/log | sort -rh | head -5- You discover a massive, multi-gigabyte log file that needs to be rotated or cleaned up.
This systematic approach allows you to efficiently pinpoint the source of a storage problem.

Conclusion
You now have the fundamental tools to monitor and analyze disk space on a Linux system. Understanding the difference between df and du and how to use them together is a core competency for the Linux+ exam and for any real-world administration role.
Key Takeaways:
df(disk free) reports usage at the file system level. Usedf -hTfor a quick, readable overview.du(disk usage) reports usage at the file and directory level. It helps you find what is using the space.- Key
dupatterns includedu -sh(summary) anddu -h --max-depth=1(one level deep). - Combine
duwithsort -rhandheadto create a "top offenders" list. - The standard workflow is to use
dfto identify a full filesystem and then useduto drill down and find the cause.
Preview of the Next Lesson:
In this lesson, you saw the "Mounted on" column in the df output. This concept of mounting is how a file system on a device like /dev/sdb1 becomes accessible as part of your main directory tree, like /data. In our next lesson, we will cover exactly that: mounting and unmounting file systems. You will learn to use the mount command and configure the /etc/fstab file to make your storage permanently available after a reboot.