Hello! Welcome to your next lesson in the "Storage and Filesystem Management" module.
In our last session, we covered how to monitor disk usage with the df and du commands. You learned that df shows you space available on a whole filesystem, and you saw the critical "Mounted on" column in its output. That column is the key to today's topic. A formatted partition is just raw potential until it's attached to your main directory tree. That attachment process is called mounting.
This lesson directly addresses the learning outcome: Mount and unmount file systems and configure persistent mounts in /etc/fstab. We will cover:
- The concept of mounting and the Virtual File System (VFS).
- How to manually mount and unmount filesystems for temporary access using the
mountandumountcommands. - How to configure permanent mounts that survive a reboot by editing the
/etc/fstabfile.
This is a crucial skill for making new storage devices, like hard drives or USB sticks, a permanent and reliable part of your Linux system.
1. The Core Concept: What is Mounting?
Before we type any commands, let's address the theory behind mounting, which is a key part of the Linux architecture. Linux is designed to handle many different types of filesystems (e.g., ext4, XFS, vfat for USB drives, nfs for network shares) in a uniform way. It achieves this through an abstraction layer called the Virtual File System (VFS).
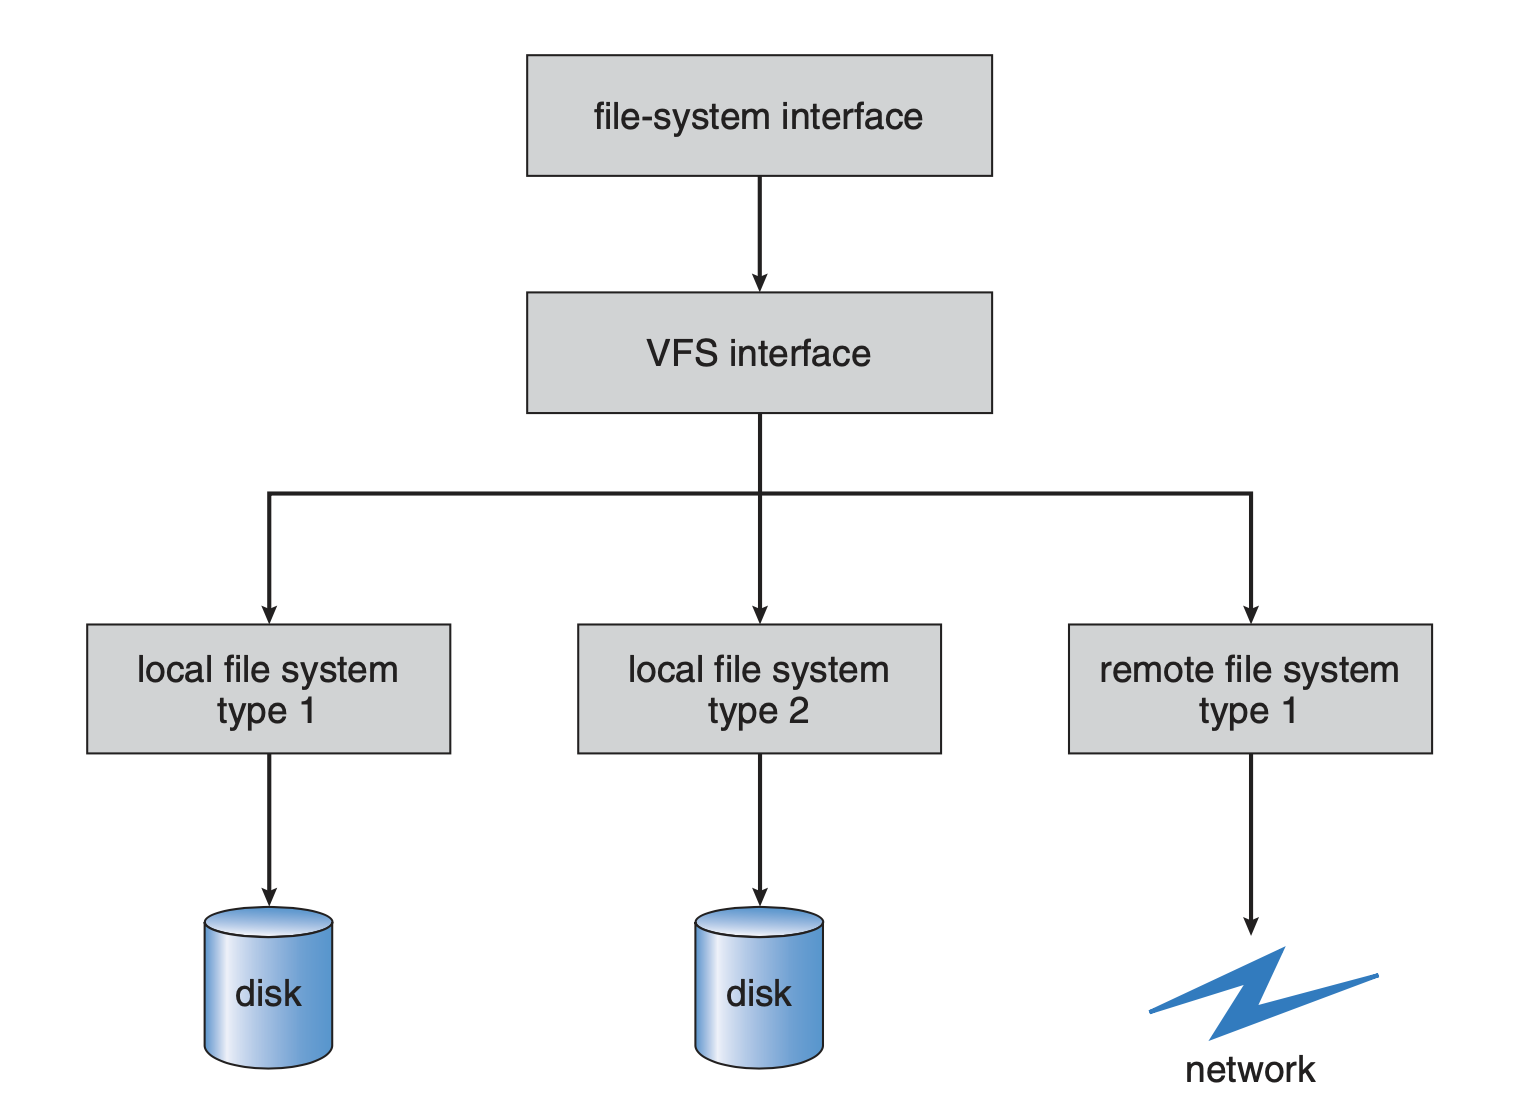
This diagram shows how the Virtual File System (VFS) acts as a middleman. Your user commands interact with a standard interface, and the VFS translates those actions for the specific underlying filesystem, whether it's on a local disk or a remote network.
Mounting is the act of telling the VFS: "Take this storage device, which has a filesystem of a certain type, and make its contents available at this specific directory." That directory is then called a mount point.

This visual makes the concept concrete. Block devices like hard drives or USB sticks are attached to specific directories (mount points) within the main filesystem tree, making their contents accessible.
2. Manual Mounting and Unmounting
When you need to access a device for a short time (like a USB drive), you can mount it manually. These mounts are temporary and will not persist after you reboot the system.
The primary commands for this are mount and umount. The following video provides a great practical demonstration.
Mounting Filesystems in Linux! (Linux+ Objective 1.3.3)
This clip from Shawn Powers' video, 'Mounting Filesystems in Linux!', will walk you through the process of manually mounting a partition, verifying it's mounted, and then unmounting it.
Please watch from 02:44 to 05:14. Pay attention to the three main steps: The mount command syntax: mount <device> <mount_point>. Using df -h to verify that the filesystem is successfully mounted. The umount command syntax (note the spelling: umount, not unmount).
The Manual Mounting Workflow
As the video showed, the process is straightforward:
- Identify the device: Use the
lsblkcommand to list your block devices and find the partition you want to mount (e.g.,/dev/sdb1). - Create a mount point: This is an empty directory that will serve as the access point for your filesystem's contents. The conventional location for temporary mounts is within the
/mntdirectory.sudo mkdir /mnt/mydrive - Mount the device: Use the
mountcommand withsudoprivileges.
Linux is usually smart enough to auto-detect the filesystem type (sudo mount /dev/sdb1 /mnt/mydriveext4,xfs, etc.), so you often don't need to specify it. - Verify the mount: You can use
df -horfindmntto see your new mount.df -h | grep mydrive - Unmount the device: When you're done, you can detach the filesystem using
umount. You can specify either the device or the mount point.sudo umount /mnt/mydrive
Test your understanding!
You plug in a USB drive, and lsblk shows it as /dev/sdc1. You want to access its files at /media/usb_backup. What are the three essential commands you would run in sequence to mount it, verify it, and then unmount it when you're finished?
Show answer
- Mount:
sudo mount /dev/sdc1 /media/usb_backup(Assuming the/media/usb_backupdirectory already exists. If not, you'd needsudo mkdir /media/usb_backupfirst.) - Verify:
df -horfindmnt /media/usb_backup - Unmount:
sudo umount /media/usb_backup
3. Persistent Mounts with /etc/fstab
Manually mounting is fine for temporary devices, but for internal hard drives or permanently attached external drives, you want them to be available automatically every time the system boots. This is the job of the /etc/fstab (File System Table) file.
This file is a configuration table that the system reads at boot time to mount all the filesystems listed within it.
The Problem with Device Names
Your first instinct might be to add a line like /dev/sdb1 /data ext4 defaults 0 0 to fstab. This is unreliable and bad practice. The reason is that device names like /dev/sdb1 are not guaranteed to be stable. If you add another drive or change the port a drive is plugged into, /dev/sdb1 might become /dev/sdc1 on the next boot, causing your system to fail to mount the correct device.
The Solution: UUIDs
The correct and professional way to define filesystems in /etc/fstab is by using their Universally Unique Identifier (UUID). A UUID is a unique, permanent ID assigned to the filesystem itself when it's created. This ID will never change, regardless of which port the drive is connected to or what device name the kernel assigns it.
The following video from Learn Linux TV does an excellent job of explaining the /etc/fstab file, the importance of UUIDs, and how to put it all together.
Linux Crash Course - The /etc/fstab file
In 'Linux Crash Course - The /etc/fstab file,' you'll learn the structure of the file, why UUIDs are essential, and how to safely edit and test your configuration.
Please watch from 07:01 to 14:49, and then from 18:28 to 24:48. Focus on these key concepts: The 6 Fields of fstab (07:01 - 14:49): Understand the purpose of each column. Why UUIDs are necessary (18:28 - 21:45): This is the most critical concept. Pay attention to the explanation of why device names are unstable. Editing and Testing (21:45 - 24:48): See how to find a UUID with blkid, replace the device name in fstab, and test the configuration with mount -a.
The /etc/fstab Workflow
Let's summarize the process shown in the video for adding a new persistent mount.
-
Get the UUID: Use the
blkidcommand as root to find the UUID of your target partition.sudo blkid # Example output: # /dev/sdb1: UUID="a1b2c3d4-e5f6-7890-1234-56789abcdef0" TYPE="ext4" ...Copy the long string inside the
UUIDquotes. -
Create the mount point: Make sure the directory where you want to mount the device exists.
sudo mkdir /data -
Edit
/etc/fstab: Open the file with a text editor as root. Be extremely careful when editing this file, as an error can prevent your system from booting.sudo nano /etc/fstabAdd a new line at the end of the file in the correct format.
This example from Red Hat's documentation shows the standard 6-column layout of the /etc/fstab file. You'll be adding a new line following this structure.
Your new line will look something like this:
UUID=a1b2c3d4-e5f6-7890-1234-56789abcdef0 /data ext4 defaults 0 2Let's break down the six fields:
- Field 1 (Device): The identifier. Use
UUID=.... - Field 2 (Mount Point): The directory path, e.g.,
/data. - Field 3 (Type): The filesystem type, e.g.,
ext4,xfs. - Field 4 (Options): Mount options.
defaultsis a good starting point, meaning read-write, allow execution, etc. - Field 5 (Dump): An outdated backup flag. Almost always set to
0. - Field 6 (Pass): Filesystem check order.
0means don't check.1is for the root filesystem.2is for other filesystems you want checked at boot.
- Field 1 (Device): The identifier. Use
-
Test your configuration: Before rebooting, test your
fstabentry. Themount -acommand will try to mount everything in/etc/fstabthat is not already mounted.sudo mount -aIf the command runs without errors, check with
df -hto see if your new filesystem is mounted. If it is, your configuration is likely correct and will work on reboot. If you get an error, carefully re-check your/etc/fstabentry for typos.
4. Other Considerations
- Mount Options: The
defaultsoption is a set of common options. You can override or add to them. For example,romounts a filesystem as read-only.noautotells the system not to mount the filesystem at boot, which is useful for removable drives that you still want to have a convenient entry for infstab. - systemd Integration: On modern Linux systems, the boot process is managed by
systemd. When you edit/etc/fstab, it's good practice to tellsystemdto reload its configuration to reflect the changes.sudo systemctl daemon-reloadsystemdactually reads/etc/fstaband dynamically creates mount "units" from it behind the scenes. While you can create these mount units manually, usingfstabremains the standard and recommended method for simple, persistent mounts.
Conclusion
You have now learned one of the most fundamental skills in Linux storage management. You can attach devices to your system, access their data, and configure them to be a permanent part of your server's file structure.
Key Takeaways:
- Mounting is the process of attaching a filesystem on a device to a directory (mount point).
- Use
mount <device> <mount_point>for temporary mounts andumount <mount_point>to detach them. - The
/etc/fstabfile configures permanent mounts that are activated at boot time. - Always use UUIDs in
/etc/fstabto identify devices reliably, not device names like/dev/sdb1. - Find a device's UUID with
sudo blkid. - Always test your
/etc/fstabchanges withsudo mount -abefore you reboot your system to avoid boot failures.
Preview of the Next Lesson:
In our next lesson, we will discuss a special type of storage: swap space. You'll learn how to create, activate, and manage swap, which your system uses as virtual memory when it runs out of physical RAM. Configuring swap also involves using some of the commands you learned today and often requires an entry in /etc/fstab, making this lesson a direct prerequisite.