Welcome to the next step in your AI journey. In our previous lessons, we've established a solid theoretical foundation, culminating in our exploration of learning curves to diagnose underfitting and overfitting. You now understand why models fail to generalize and how to detect these failures. Today, we shift from diagnosis to construction. Our goal is to set up a standard ML project environment with NumPy, pandas, and scikit-learn.
Think of the previous lessons as learning the blueprints and physics of building a car. Now, it's time to set up your garage, install the necessary tools, and organize your parts. A clean, reproducible, and well-organized environment is not just a matter of convenience; it is the hallmark of a professional and the foundation upon which all successful machine learning projects are built. This lesson will walk you through setting up this professional "garage" for your future work.
The Anatomy of a ML Project Setup
Setting up a robust environment involves a few distinct steps. You need a dedicated space for your project, the right tools, and a system for organizing your work.
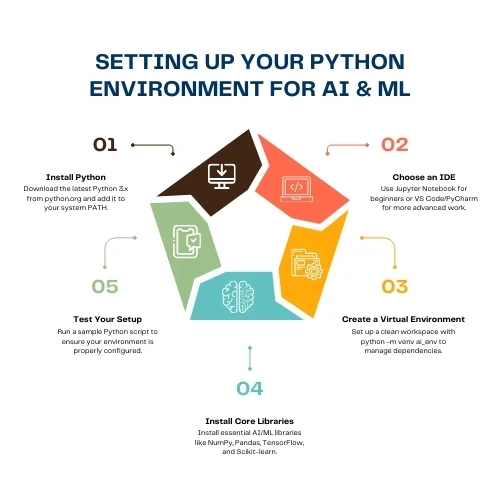
We will cover these steps in detail, focusing on professional best practices that will serve you throughout your career.
Step 1: Isolating Your Workspace with Virtual Environments
As a proficient Python user, you've likely used pip install to add packages to your system. While convenient for simple scripts, this practice becomes problematic for complex projects. Different projects may require conflicting versions of the same library (e.g., Project A needs pandas 1.5 while Project B requires pandas 2.0). Installing everything globally leads to a scenario known as "dependency hell."
The solution is to create an isolated, self-contained virtual environment for each project. A virtual environment is essentially a private directory that contains a specific version of Python and all the libraries required for one particular project, independent of all other projects. This practice is fundamental to creating reproducible and conflict-free applications.
Python provides a built-in module, venv, for this purpose. The following video from Tech With Tim offers a comprehensive tutorial on creating and managing virtual environments with venv.
Python Virtual Environments - Full Tutorial for Beginners
This tutorial provides a clear explanation of what virtual environments are and demonstrates how to create, activate, and deactivate them using Python's standard venv module.
Please watch the following segments: First, understand the core concept by watching the introduction on what a virtual environment is. Next, see how to create one in the segment on creating virtual environments. The commands are slightly different for Windows vs. Mac/Linux, so pay attention to the one for your system. Finally, learn how to enter and leave the environment by watching the section on how to activate and deactivate it. Notice how your command prompt changes to indicate that the environment is active.
An alternative and very popular tool in the data science community is Conda. Conda is both a package manager and an environment manager. It is particularly powerful because it can manage not only Python packages but also libraries and dependencies from other languages. While venv is often sufficient, familiarity with Conda is valuable.
This next video demonstrates how to achieve a similar setup using Miniconda, a lightweight version of Conda.
Setting Up A Python Environment for Data Analysis and Machine Learning
This video from Travis Media explains the rationale for using Conda in data science and shows how to create an environment and install packages.
For a comparative overview, watch these parts: What we're going to set up, which explains why Miniconda is popular. Creating a new environment, which walks through the conda create command. You can choose either venv or conda for this course, but we will proceed with the assumption you are using venv and pip, as they are part of the standard Python distribution.
Step 2: Installing the Core Libraries
With your virtual environment created and activated, you now have a clean slate. It's time to install the essential tools. For the vast majority of classical machine learning tasks, this involves what we can call "The Big Three."
Scikit-learn for Machine Learning: From Theory to Production
This article from Tredence emphasizes the importance of a professional setup and identifies the core stack for machine learning in Python.
Read the section Setting Up a Production-Ready Machine Learning Environment. Notice how it stresses that a clean, reproducible setup is a hallmark of professional work and explicitly identifies the core stack.
As the article highlights, the foundational libraries are:
- NumPy: The fundamental package for scientific computing in Python. It provides a high-performance multidimensional array object and tools for working with these arrays. Your background in mathematics and physics will make you appreciate its power for vector and matrix operations, which are the bedrock of ML algorithms.
- pandas: A library providing high-performance, easy-to-use data structures (most notably the DataFrame) and data analysis tools. It is the standard for loading, cleaning, exploring, and manipulating tabular data.
- scikit-learn: The primary library for classical machine learning in Python. It offers a vast collection of algorithms for classification, regression, and clustering, as well as tools for data preprocessing, model selection, and evaluation. Its consistent API (Estimators, Transformers, Pipelines) makes it incredibly efficient to use.
To install these, you use pip, Python's package installer. Inside your activated virtual environment, run the following command:
pip install numpy pandas scikit-learn matplotlib seaborn
We've also included matplotlib and seaborn, which are standard libraries for data visualization.
Step 3: Ensuring Reproducibility with requirements.txt
Installing packages is only half the battle. To ensure your project is reproducible by others (or by yourself on a different machine), you must create a manifest of your project's dependencies. The standard way to do this is with a requirements.txt file.
This file is a simple list of all the packages and their exact versions required to run your project. You can generate it automatically and use it to recreate the environment perfectly. The "Tech With Tim" video you watched earlier also explains this critical process.
Python Virtual Environments - Full Tutorial for Beginners
This tutorial continues to demonstrate best practices by covering package installation and dependency management.
Please resume the video and watch these two key parts: Installing packages, which shows how to use pip install and pip list within the activated environment. Managing requirements, which explains how to create a requirements.txt file with pip freeze and how to install all dependencies from that file using pip install -r.
This practice of freezing your requirements is non-negotiable in professional software and data science development.
Step 4: Structuring Your Project Directory
A clean environment needs a clean workspace. Throwing all your code, data, notebooks, and models into a single folder quickly becomes unmanageable. A standardized directory structure makes your project logical, easy to navigate, and scalable.
While there is no single official layout, a widely adopted best practice, inspired by projects like Cookiecutter Data Science, provides an excellent template.

Let's break down the most important components of this structure:
data/: This directory is for all project data. It's often subdivided:raw/: The original, immutable data dump. Never edit files in here.processed/: Cleaned, transformed, and feature-engineered data ready for modeling.
notebooks/: For Jupyter notebooks used for exploratory data analysis (EDA), initial experiments, and visualizations. These are your scratchpads.src/: Contains the project's source code, organized into modules. This is where you put reusable code for data processing, feature engineering, model training, and prediction. This promotes a shift from one-off scripts to a maintainable codebase.models/: A place to save trained and serialized models.requirements.txt: The dependency manifest file we just discussed, located in the project's root directory.
Adopting a structure like this from the start will build strong habits for your future professional work.
Final Check: Test Your Setup
You've created an environment, installed your tools, and organized your workspace. The final step is to verify that everything is working correctly.
- Navigate to your project's root directory in your terminal.
- Activate your virtual environment (e.g.,
source venv/bin/activate). - Create a new Python file, for example
check_env.py, inside yoursrcfolder. - Add the following code to the file:
import numpy as np import pandas as pd import sklearn import matplotlib import seaborn def check_versions(): """Prints the versions of the core ML libraries.""" print(f"NumPy version: {np.__version__}") print(f"pandas version: {pd.__version__}") print(f"scikit-learn version: {sklearn.__version__}") print(f"Matplotlib version: {matplotlib.__version__}") print(f"Seaborn version: {seaborn.__version__}") print("\nEnvironment setup successful!") if __name__ == "__main__": check_versions() - Run the script from your root directory:
python src/check_env.py.
If it runs without error and prints the version numbers of the libraries, your environment is correctly configured and ready for action.
Conclusion
In this lesson, you've moved from a theoretical understanding of machine learning models to the practical reality of building them. You have assembled your professional toolkit and organized your workspace.
Here are the key takeaways:
- Isolate Dependencies: Always use virtual environments (
venvorconda) to manage project-specific packages and avoid conflicts. - Install the Core Stack: The foundation of most classical ML projects rests on NumPy for numerical computation, pandas for data manipulation, and scikit-learn for modeling.
- Ensure Reproducibility: Use
pip freeze > requirements.txtto create a manifest of your project's dependencies, allowing anyone to replicate your environment. - Organize Your Workspace: A structured project directory (with separate folders for data, notebooks, source code, and models) is crucial for clarity and scalability.
Your environment is now primed. In our next lesson, we will finally put it to use. We will implement a k-nearest neighbors classifier using scikit-learn, taking our first practical step into model building and establishing a simple but important baseline for comparison.