Welcome to the final lesson of our module on verification! In our last session, we created a powerful data-driven testbench that reads input stimulus from an external file. We saw how this technique makes our verification efforts more scalable and easier to maintain. At the very end of our test sequence, we included the $finish system task to end the simulation.
Today, we will formalize the role of $finish. You'll learn precisely what this system task does, why it's a critical component of any automated test, and how it differs from a similar task, $stop. Mastering this will ensure your simulations conclude cleanly and automatically, which is essential for running tests without manual intervention.
1. Why We Need to Control Simulation Termination
So far, our testbenches have used a single initial block to apply a sequence of inputs. Since an initial block executes only once, the simulation naturally ends when the last statement is reached. However, many testbenches include components that run indefinitely. A common example is a clock generator:
// This block will run forever, toggling the clock every 5 time units.
always #5 clk = ~clk;
If a testbench contains such a block, the simulation will never terminate on its own. It would continue running forever, consuming resources. We need a definitive way to tell the simulator, "The test is complete. You can stop now." This is the job of simulation control system tasks.
The two primary tasks for this are $finish and $stop. Let's explore their definitions and differences.
This article from ChipVerify provides a concise and clear explanation of both $finish and $stop, complete with examples and a helpful comparison table.
Please read the entire article. As you read, focus on: The fundamental purpose of $finish: to terminate the simulation. The fundamental purpose of $stop: to pause the simulation. The syntax for both, including the optional argument that controls the level of detail in the output message. The summary table at the end, which clearly lays out the differences in functionality and use case.
2. Termination vs. Pausing: $finish and $stop
As you just read, the distinction between these two tasks is crucial.
$finish: Ends the simulation completely and returns control to the operating system. Think of it as closing the simulation program. It is used when a test has either passed or failed and no more simulation time is needed.$stop: Suspends the simulation. Think of it as hitting a breakpoint in a software debugger. The simulation is paused, and you can inspect signal values, but it can be resumed later. This is primarily a tool for interactive debugging.
For creating automated, self-checking testbenches, our goal is always to reach a definitive "pass" or "fail" state and then end. Therefore, $finish is the correct tool for the job.
The following video provides a verbal explanation of this difference, which can help solidify your understanding.
#22 How to write TESTBENCH in verilog || use of \$monitor, \$display,\$Stop,\$finish in verilog
This video from the channel Component Byte discusses various testbench system tasks. This specific clip focuses on the difference between $finish and $stop.
Please watch the section from the explanation of finish and stop. The key takeaway is that after $finish, the simulation session is over, whereas $stop allows you to resume.
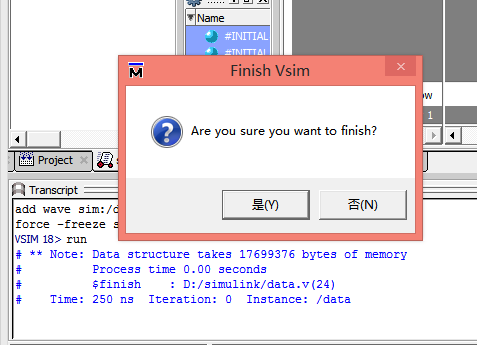
When $finish is executed, simulators with a graphical user interface (GUI) will often confirm that you want to exit, as shown in the image below. In a script-based or command-line flow, the simulator process will simply terminate.
3. Practical Use of $finish
Let's return to the data-driven MUX testbench from our previous lesson.
tb_mux_2_to_1_data_driven.v (Relevant part)
    // Stimulus and Checking Block
    initial begin
        $display("Starting Data-Driven MUX Test...");
        $readmemh("mux_stimulus.txt", stimulus_vectors);

        // Main test loop
        for (i = 0; i < NUM_TESTS; i = i + 1) begin
            // ... apply stimulus and check results ...


            #10;
        end

        // Final Report
        if (error_count == 0) begin
            $display("All %0d tests PASSED!", NUM_TESTS);
        end else begin
            $display("TESTS FAILED with %0d error(s).", error_count);
        end

        // --- END OF SIMULATION ---
        $finish;
    end
The $finish call is placed at the very end of the initial block. This is the most common and logical pattern. It ensures that:
- All test vectors from the file are applied.
- All checks are performed.
- A final summary report is printed to the console.
- Only then does the simulation terminate.
What if we didn't have $finish?
Imagine we add a clock generator to our testbench but forget to include $finish.
module tb_mux_2_to_1_no_finish();
    // ... all other declarations ...

    reg clk = 0;
    always #5 clk = ~clk; // This runs forever

    initial begin
        // ... test sequence runs here ...

        // Final report is printed...
        // NO $finish HERE
    end
endmodule
In this scenario, after the initial block completes, the simulation would not stop because the always block for the clock is still an active process. The simulation time would advance indefinitely, and the test would never be considered "complete" in an automated flow.
The $finish call within the main test sequence initial block acts as the master control, overriding any perpetual blocks and forcing the simulation to a clean halt.
The following video demonstrates the use of $finish to terminate a simulation after a set period, which is another common pattern for tests that aren't based on a fixed number of vectors.
This video from Aldec, Inc. shows a testbench for a counter.
Watch the short segment from the testbench implementation. Notice how the initial block sets up some initial signal values and then uses a delay (#5000) before calling $finish. This is a time-based approach to ending a simulation, ensuring it runs for a specific duration.
Whether your test sequence is based on iterating through a set of vectors or simply running for a fixed duration, the principle is the same: the initial block that orchestrates the test is responsible for calling $finish to signal its completion.
Conclusion
You have now formalized your understanding of how to properly conclude a Verilog simulation. This might seem like a small detail, but it's fundamental to creating robust, automated verification environments. A test that doesn't terminate reliably is a failing test.
Key Takeaways:
- Simulations often contain processes (like
alwaysblocks) that run indefinitely, requiring an explicit termination command. - The
$finishsystem task completely terminates the simulation and exits the simulator. - The
$stopsystem task only pauses the simulation for interactive debugging and is not used for concluding a test run. - In a self-checking testbench,
$finishshould be called at the end of the maininitialblock, after all stimuli have been applied and all checks are complete.
This lesson concludes our module on verification. You've gone from basic testbenches to writing structured, self-checking, data-driven tests—an essential skillset for any digital designer.
In our next module, we will move on to more advanced RTL design topics. We will start by examining different ways to reset our circuits—specifically, synchronous versus asynchronous resets—and apply our new testbench skills to verify their behavior correctly.