Hello! Welcome back to our course on advanced Go development.
In our last lesson, we tackled the crucial topic of database transactions. We saw how to group multiple database operations into an atomic unit using pgx, ensuring data consistency. You implemented a robust executeTx helper function and refactored our PostgresStore to use a Querier interface, a key step that allows methods to run transparently within a transaction or directly on the connection pool.
This was the final conceptual piece of our database puzzle. Now, it's time to put it all together.
Today's Learning Outcome: Implement a PostgreSQL-backed repository that satisfies the defined storage interface.
Today, you will write the concrete implementation for the Storage interface we designed earlier. This involves creating the PostgresStore methods that contain the actual SQL queries to create, read, update, and transfer data in our PostgreSQL database. By the end of this lesson, you will have a complete, self-contained, and production-ready data access layer for our application.
The Concrete Implementation
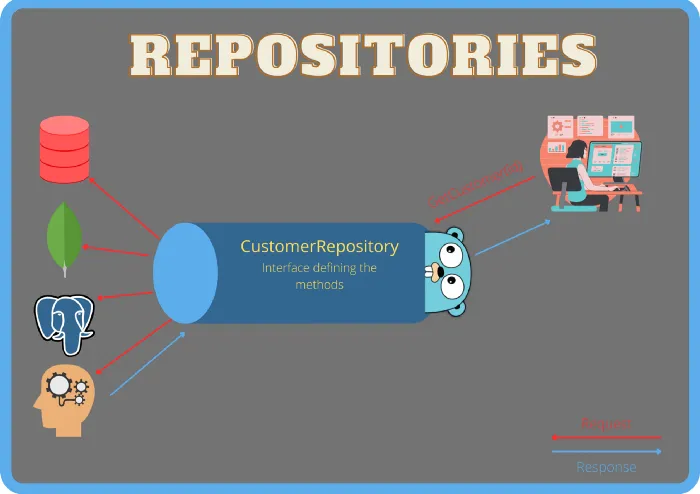
In previous lessons, we defined the Storage interface—our contract—and we prepared a PostgresStore struct to be the implementation. Let's formalize that connection.
The PostgresStore struct you refactored in the last lesson is our starting point. It holds a reference to the connection pool, which it needs to begin transactions, and a Querier that can be either the pool itself or a transaction object.
// in your data/postgres/store.go file

type PostgresStore struct {
	db   Querier
	pool *pgxpool.Pool
}

func NewPostgresStore(pool *pgxpool.Pool) *PostgresStore {
	return &PostgresStore{
		db:   pool,
		pool: pool,
	}
}
To ensure our PostgresStore correctly implements the Storage interface, we can add a compile-time check. This is a common and useful pattern in Go. If we forget to implement a method or the method signature is wrong, the compiler will immediately alert us.
// Add this below your PostgresStore struct definition
// It will fail to compile if PostgresStore doesn't satisfy the Storage interface.
var _ models.Storage = (*PostgresStore)(nil)
(Assuming your Storage interface is in a models package)
Implementing the Repository Methods
Now, let's implement the methods one by one. This process involves writing the SQL query and then using the pgx methods on our db field to execute it and scan the results into our Go structs.
The following article provides an excellent walkthrough of this exact process. It demonstrates building a repository manually, highlighting the patterns and the trade-offs.
Mastering Data Access in Go with Repositories & sqlc (2) - Dev.to
This article, 'Mastering Data Access in Go with Repositories & sqlc', is a fantastic guide to manually implementing a repository. We'll focus on the section where the author builds the pgx implementation from scratch.
Read the section 'The pgx Implementation: Step-by-Step'. This contains the full code for a pgxUserRepository with Create, GetByEmail, and GetByID methods. Pay close attention to: How SQL queries are defined as constants. The use of dbpool.QueryRow and row.Scan to fetch data and map it to a struct. The explicit check for pgx.ErrNoRows to handle cases where a record is not found. After that, read the following section, 'Observations on the Manual Approach', to understand the pros and cons of this technique.
Let's apply these patterns to our own PostgresStore.
1. Implementing GetAccount (Reading a single record)
This is a classic SELECT query where we expect one result. We use QueryRow and Scan to retrieve the data. Handling the pgx.ErrNoRows error is critical.
// in your data/postgres/store.go file

const getAccount = `SELECT id, owner, balance, currency, created_at FROM accounts WHERE id = $1 LIMIT 1`

func (s *PostgresStore) GetAccount(ctx context.Context, id int64) (models.Account, error) {
	var acc models.Account
	err := s.db.QueryRow(ctx, getAccount, id).Scan(
		&acc.ID,
		&acc.Owner,
		&acc.Balance,
		&acc.Currency,
		&acc.CreatedAt,
	)

	// Map pgx's not found error to a domain-specific error
	if err != nil {
		if errors.Is(err, pgx.ErrNoRows) {
			return models.Account{}, models.ErrNotFound
		}
		return models.Account{}, err
	}

	return acc, nil
}
2. Implementing CreateAccount (Creating a record)
Here we use INSERT ... RETURNING to create the record and get back the database-generated values (like id and created_at) in a single round trip.
// in your data/postgres/store.go file

const createAccount = `
INSERT INTO accounts (owner, balance, currency)
VALUES ($1, $2, $3)
RETURNING id, owner, balance, currency, created_at
`

func (s *PostgresStore) CreateAccount(ctx context.Context, arg models.CreateAccountParams) (models.Account, error) {
	var acc models.Account
	err := s.db.QueryRow(ctx, createAccount, arg.Owner, arg.Balance, arg.Currency).Scan(
		&acc.ID,
		&acc.Owner,
		&acc.Balance,
		&acc.Currency,
		&acc.CreatedAt,
	)
	if err != nil {
		return models.Account{}, err
	}
	return acc, nil
}
3. Implementing ListAccounts (Reading multiple records)
For queries that can return multiple rows, we use Query. This returns a pgx.Rows object, which we iterate over in a for loop.
// in your data/postgres/store.go file

const listAccounts = `SELECT id, owner, balance, currency, created_at FROM accounts ORDER BY id LIMIT $1 OFFSET $2`

func (s *PostgresStore) ListAccounts(ctx context.Context, arg models.ListAccountsParams) ([]models.Account, error) {
	rows, err := s.db.Query(ctx, listAccounts, arg.Limit, arg.Offset)
	if err != nil {
		return nil, err
	}
	defer rows.Close()

	var accounts []models.Account
	for rows.Next() {
		var acc models.Account
		if err := rows.Scan(
			&acc.ID,
			&acc.Owner,
			&acc.Balance,
			&acc.Currency,
			&acc.CreatedAt,
		); err != nil {
			return nil, err
		}
		accounts = append(accounts, acc)
	}

	// Check for errors from iterating over rows.
	if err := rows.Err(); err != nil {
		return nil, err
	}

	return accounts, nil
}
Improving the Implementation
As you've seen, manually scanning fields is tedious and error-prone. If you add a column to your SELECT statement but forget to add a corresponding variable to Scan, you'll get a runtime error.
The STRV article you've seen before mentions a library, scany, that simplifies this. It allows you to scan directly into a struct using db tags, much like you do with JSON. This is a common practice in production Go applications.
Creating a Project Template? Go With Database Storage - STRV
Let's revisit the STRV blog post to see a more ergonomic way of handling queries and scanning.
Find the section 'Querying & Scanning' below the SQL Driver discussion. Read about querying and scanning. It introduces two key improvements from pgx v5 and the scany library: named arguments and scanning into structs using db tags. This is a significant quality-of-life improvement over positional arguments and manual scanning.
With scany, your ListAccounts method could be simplified:
// You would first add `db` tags to your Account struct
type Account struct {
    ID        int64     `json:"id" db:"id"`
    Owner     string    `json:"owner" db:"owner"`
    Balance   int64     `json:"balance" db:"balance"`
    Currency  string    `json:"currency" db:"currency"`
    CreatedAt time.Time `json:"created_at" db:"created_at"`
}

// Then your ListAccounts could look like this:
import "github.com/georgysavva/scany/v2/pgxscan"

func (s *PostgresStore) ListAccounts(ctx context.Context, arg models.ListAccountsParams) ([]models.Account, error) {
	var accounts []models.Account
    // pgxscan.Select handles the rows loop and scanning for you
	err := pgxscan.Select(ctx, s.db, &accounts, listAccounts, arg.Limit, arg.Offset)
	if err != nil {
		return nil, err
	}
	return accounts, nil
}
This is a much cleaner and more maintainable approach that you can adopt for your project.
Implementing the Transactional Method
Finally, let's implement the TransferTx method. Thanks to our work in the last lesson, this is now a matter of orchestrating our existing (or soon-to-be-created) repository methods from within our executeTx helper.
The TransferTx method on PostgresStore will call the executeTx helper. The callback function passed to executeTx receives a new PostgresStore instance, q, that is bound to the transaction. We use q to call our building-block methods (CreateTransfer, UpdateAccountBalance, etc.), ensuring they all run within the same atomic transaction.
// in your data/postgres/store.go file

func (s *PostgresStore) TransferTx(ctx context.Context, arg models.TransferTxParams) (models.TransferTxResult, error) {
	var result models.TransferTxResult

	err := s.executeTx(ctx, func(q *PostgresStore) error {
		var err error

		// Step 1: Create a transfer record
		result.Transfer, err = q.CreateTransfer(ctx, models.CreateTransferParams{
			FromAccountID: arg.FromAccountID,
			ToAccountID:   arg.ToAccountID,
			Amount:        arg.Amount,
		})
		if err != nil {
			return err
		}

		// Step 2 & 3: Update account balances
		// To avoid deadlocks, it's good practice to update accounts in a consistent order (e.g., by ID).
		if arg.FromAccountID < arg.ToAccountID {
			result.FromAccount, result.ToAccount, err = updateBalances(ctx, q, arg.FromAccountID, -arg.Amount, arg.ToAccountID, arg.Amount)
		} else {
			result.ToAccount, result.FromAccount, err = updateBalances(ctx, q, arg.ToAccountID, arg.Amount, arg.FromAccountID, -arg.Amount)
		}
		if err != nil {
			return err
		}

		return nil
	})

	return result, err
}

// updateBalances is a helper to orchestrate the two balance updates.
func updateBalances(
	ctx context.Context,
	q *PostgresStore,
	accountID1 int64,
	amount1 int64,
	accountID2 int64,
	amount2 int64,
) (account1 models.Account, account2 models.Account, err error) {
	account1, err = q.UpdateAccountBalance(ctx, models.UpdateAccountBalanceParams{
		ID:     accountID1,
		Amount: amount1,
	})
	if err != nil {
		return
	}

	account2, err = q.UpdateAccountBalance(ctx, models.UpdateAccountBalanceParams{
		ID:     accountID2,
		Amount: amount2,
	})
	if err != nil {
		return
	}
	return
}
Note: This implementation assumes you will also create the CreateTransfer and UpdateAccountBalance methods on your PostgresStore, following the same pattern as CreateAccount and GetAccount.
This TransferTx function is a perfect example of the repository pattern in action. It exposes a single, clear business operation to the rest of your application, while hiding all the underlying complexity of SQL queries and transaction management.
Conclusion
Congratulations! You have now built a complete, robust, and interface-driven data access layer for your Go application. This PostgresStore is a concrete, working implementation of the Storage contract you designed.
Key Takeaways:
- A repository implementation is a concrete type (e.g.,
PostgresStore) that provides methods satisfying a repository interface (e.g.,Storage). - Each method implements a business operation by executing one or more SQL queries using a driver like
pgx. QueryRowis used for single-row results, whileQueryfollowed by arows.Next()loop is for multiple rows.- Proper error handling, especially mapping
pgx.ErrNoRowsto a domain error, is essential. - Libraries like
scanycan significantly reduce the boilerplate of scanning database results into Go structs. - Transactional methods orchestrate simpler, single-purpose repository methods within a transactional context, exposing a clean API for complex business operations.
Next Up
With a fully functioning persistence layer, we are now ready to expose our application's logic to the outside world. In the next module, we will begin Building a REST API with Swappable Storage. Our first step will be to design and implement our API server using the popular chi router, defining the endpoints that will eventually use our PostgresStore.